
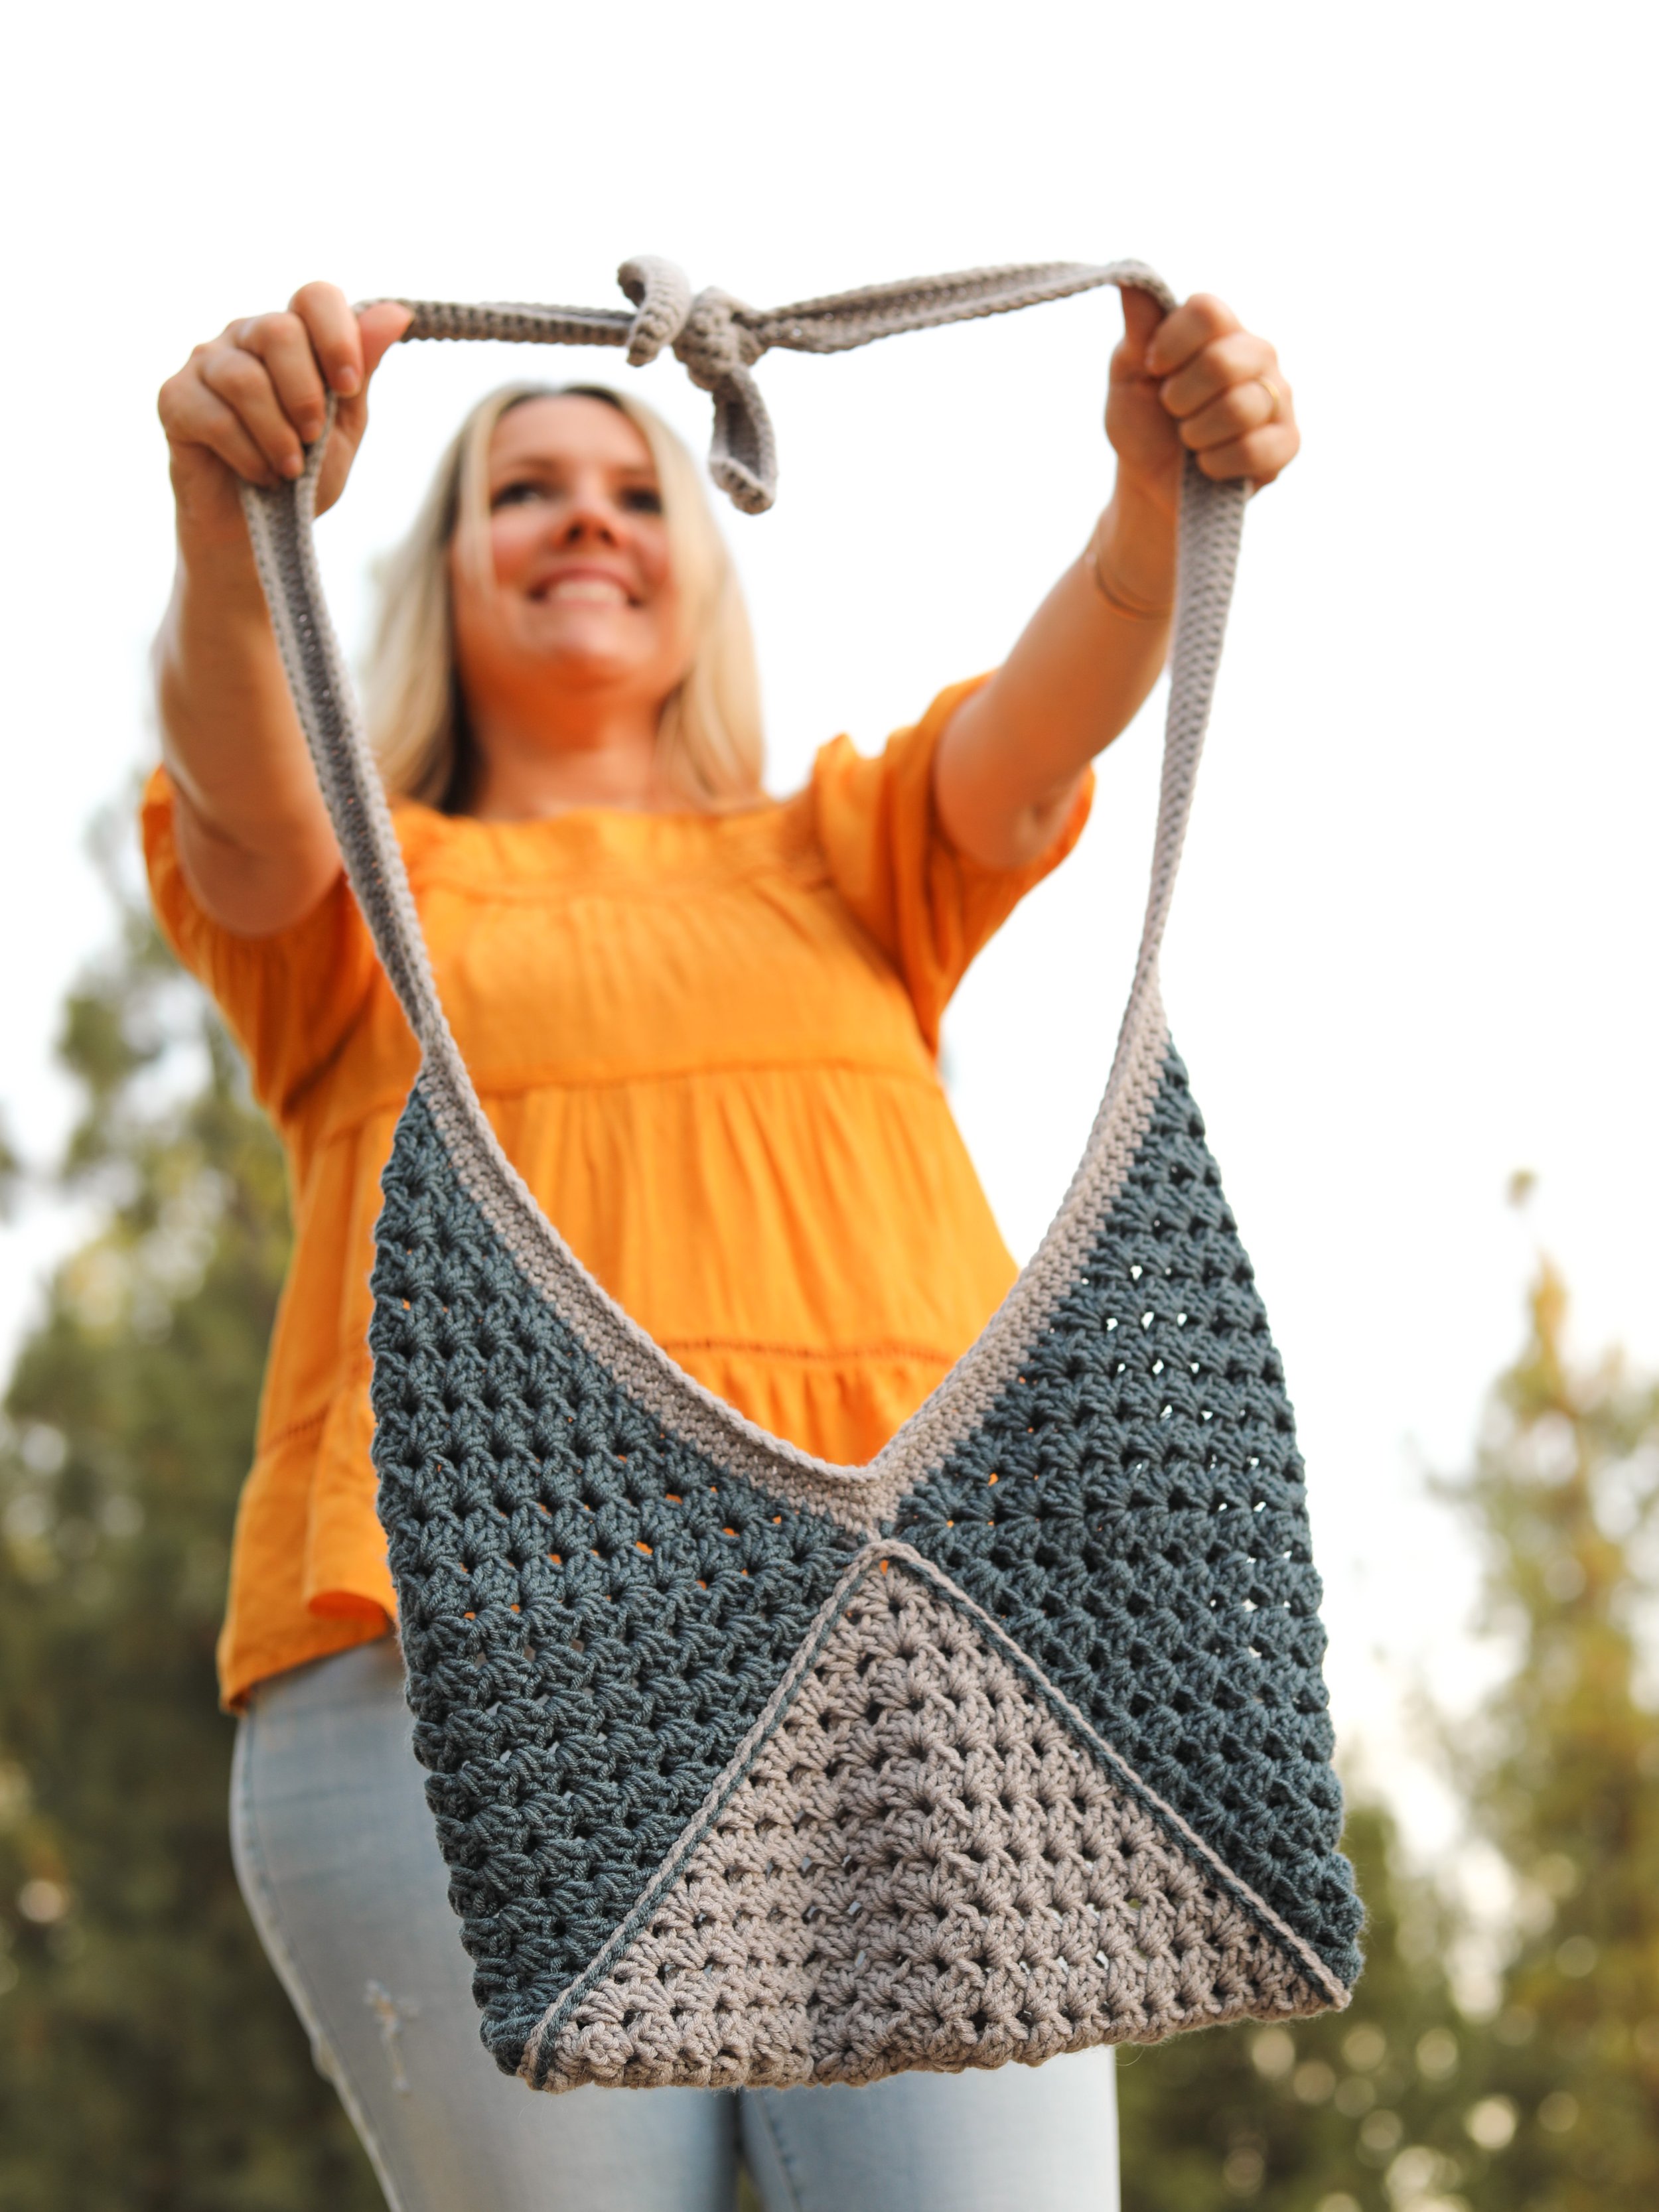
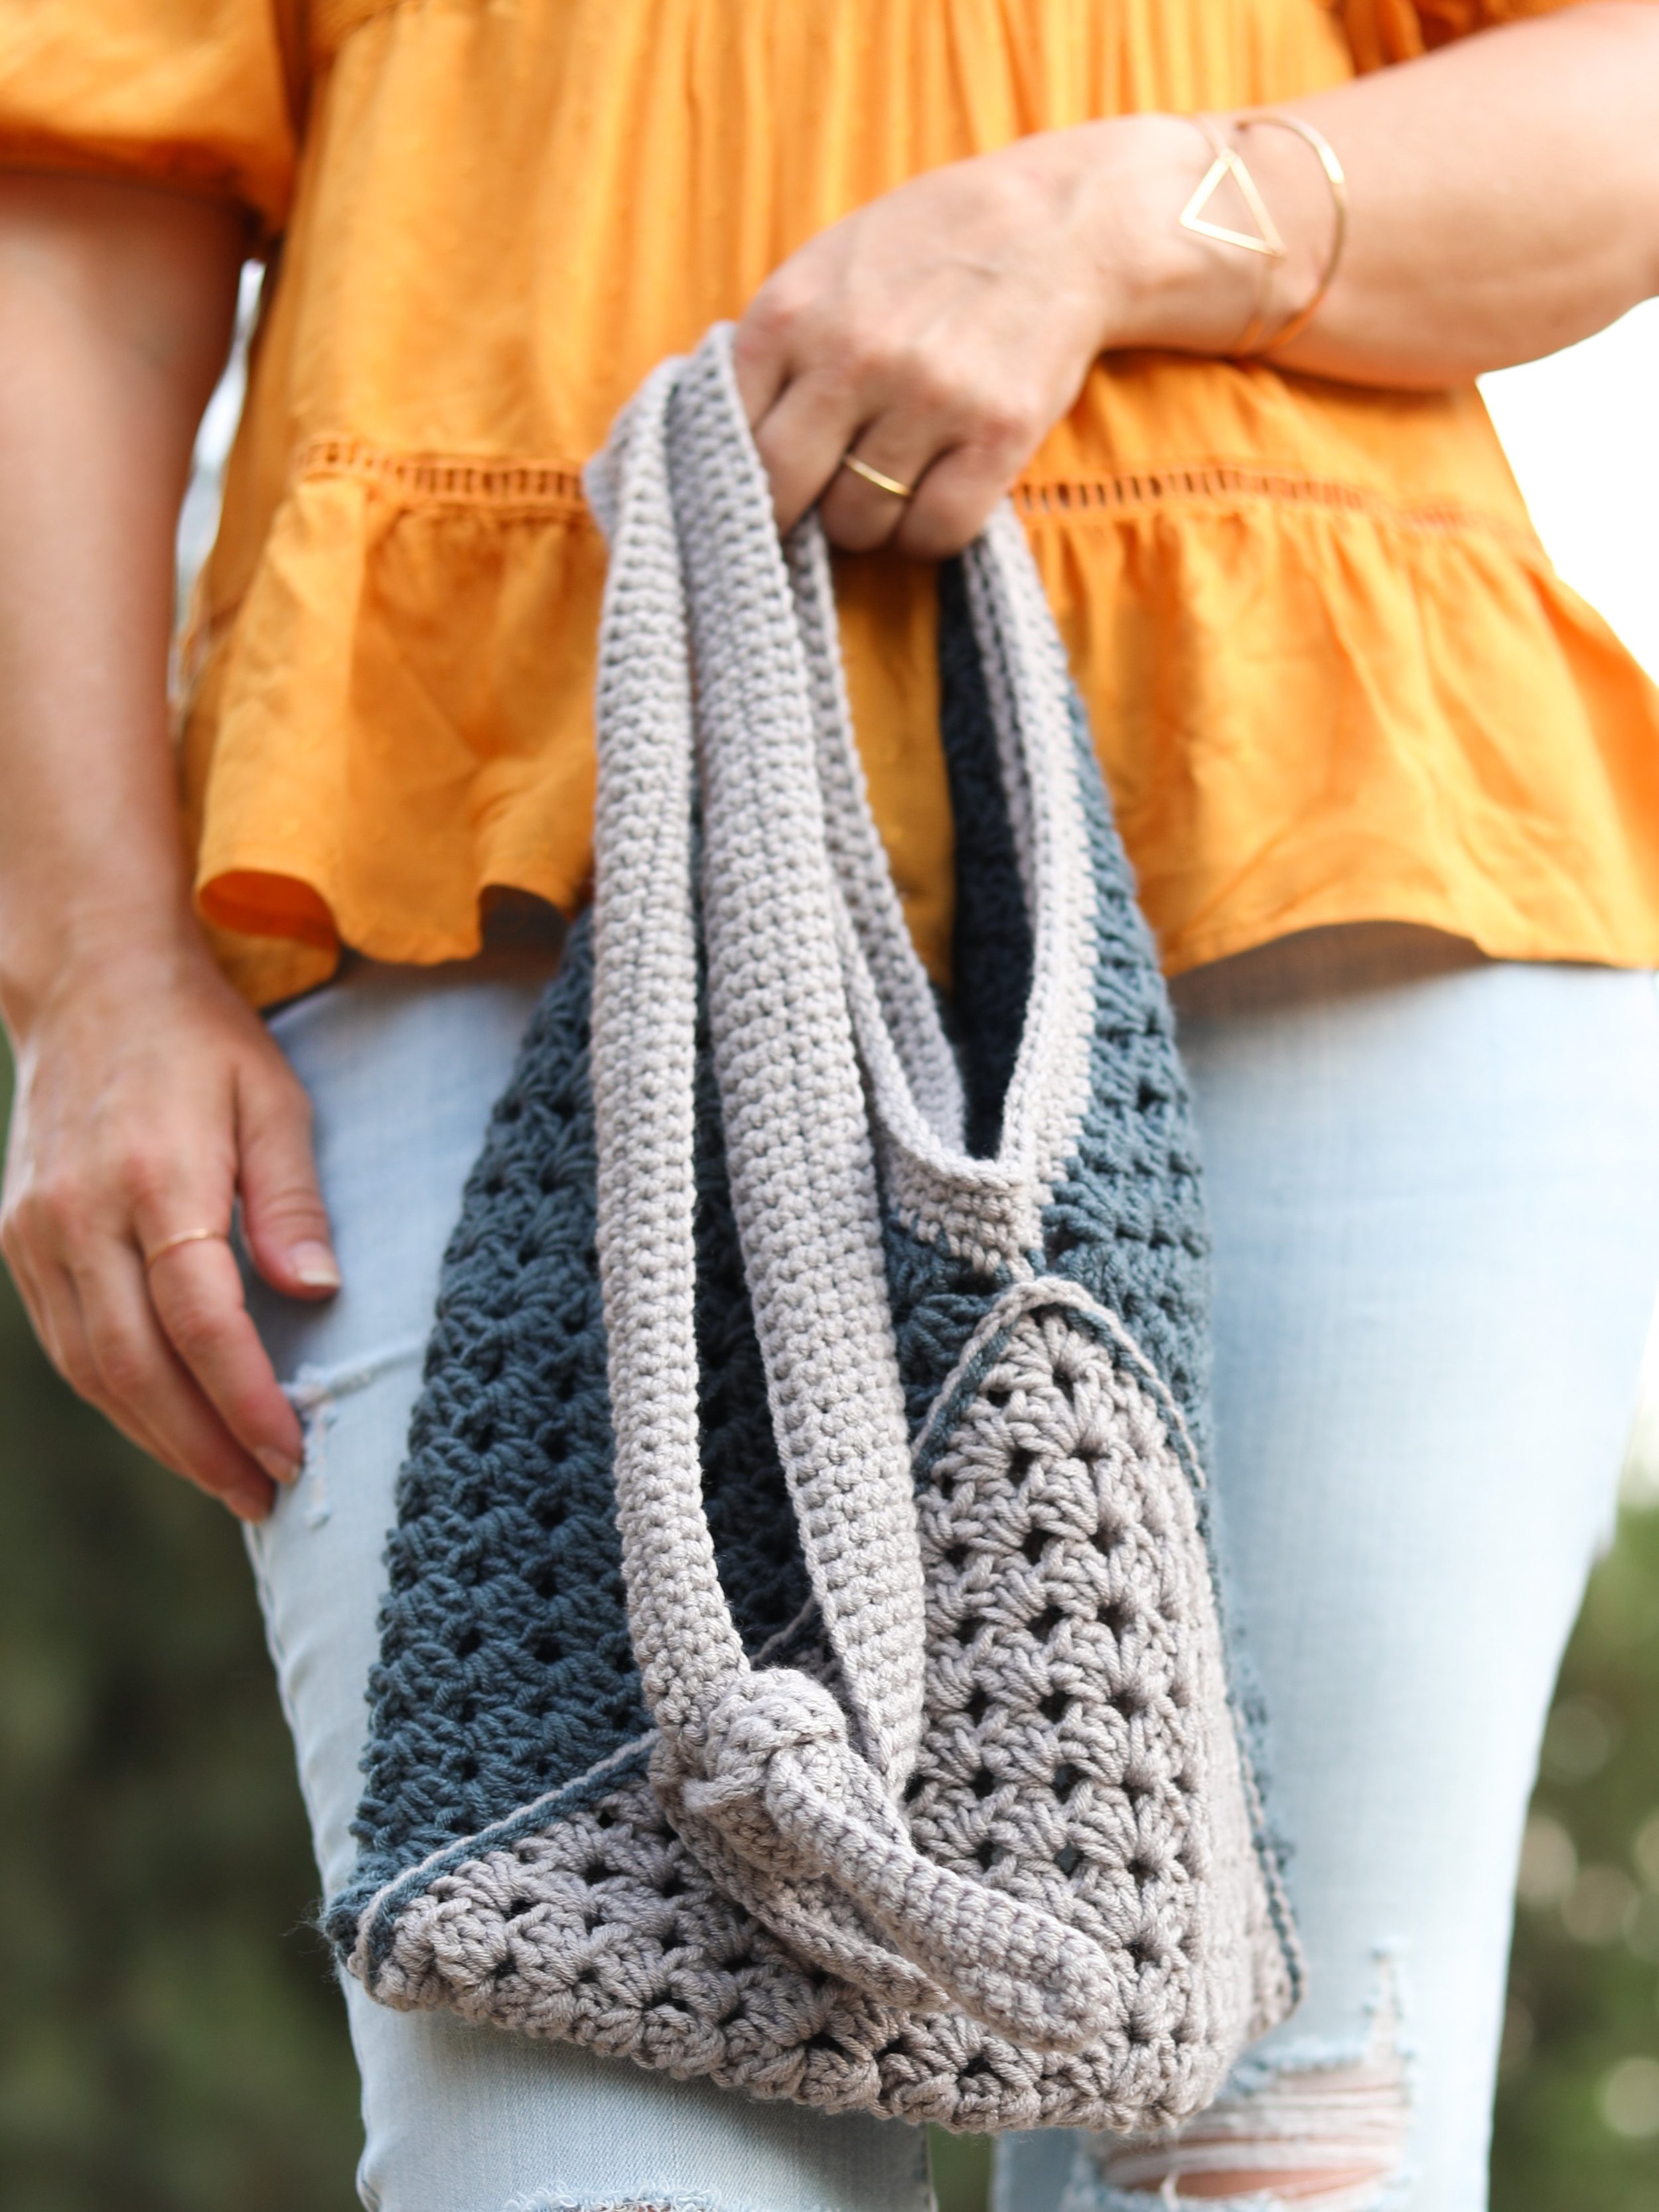
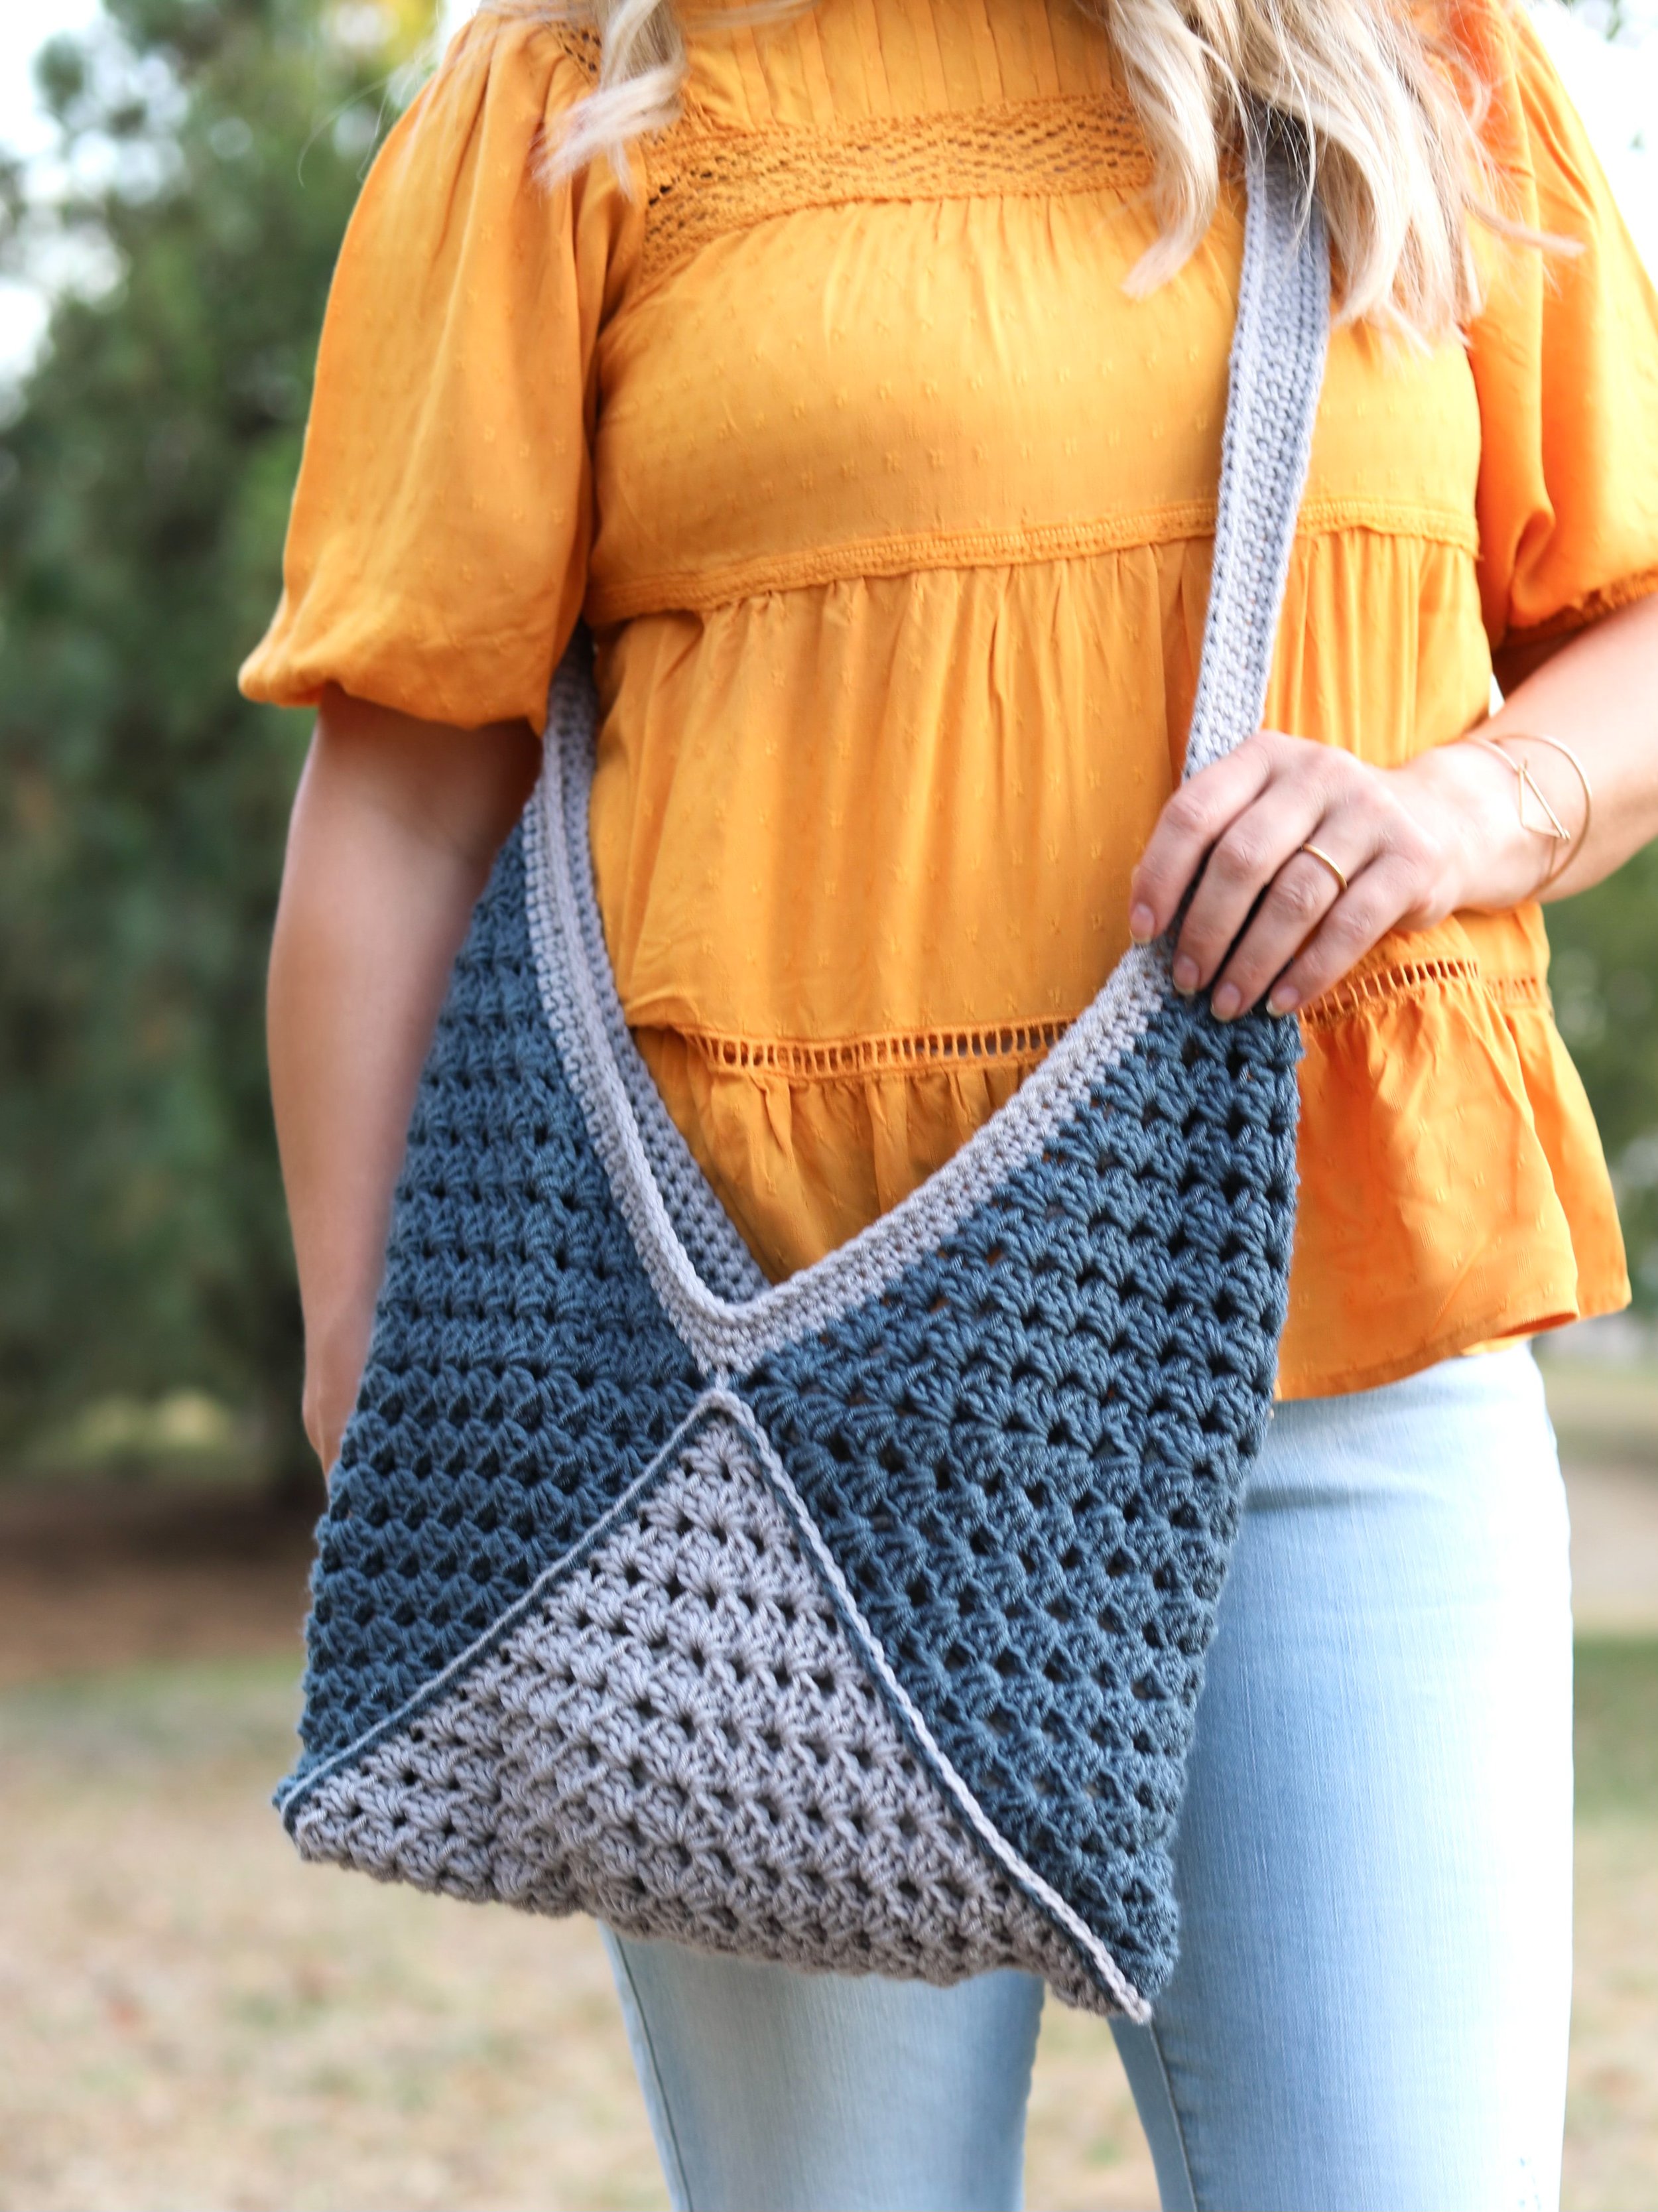
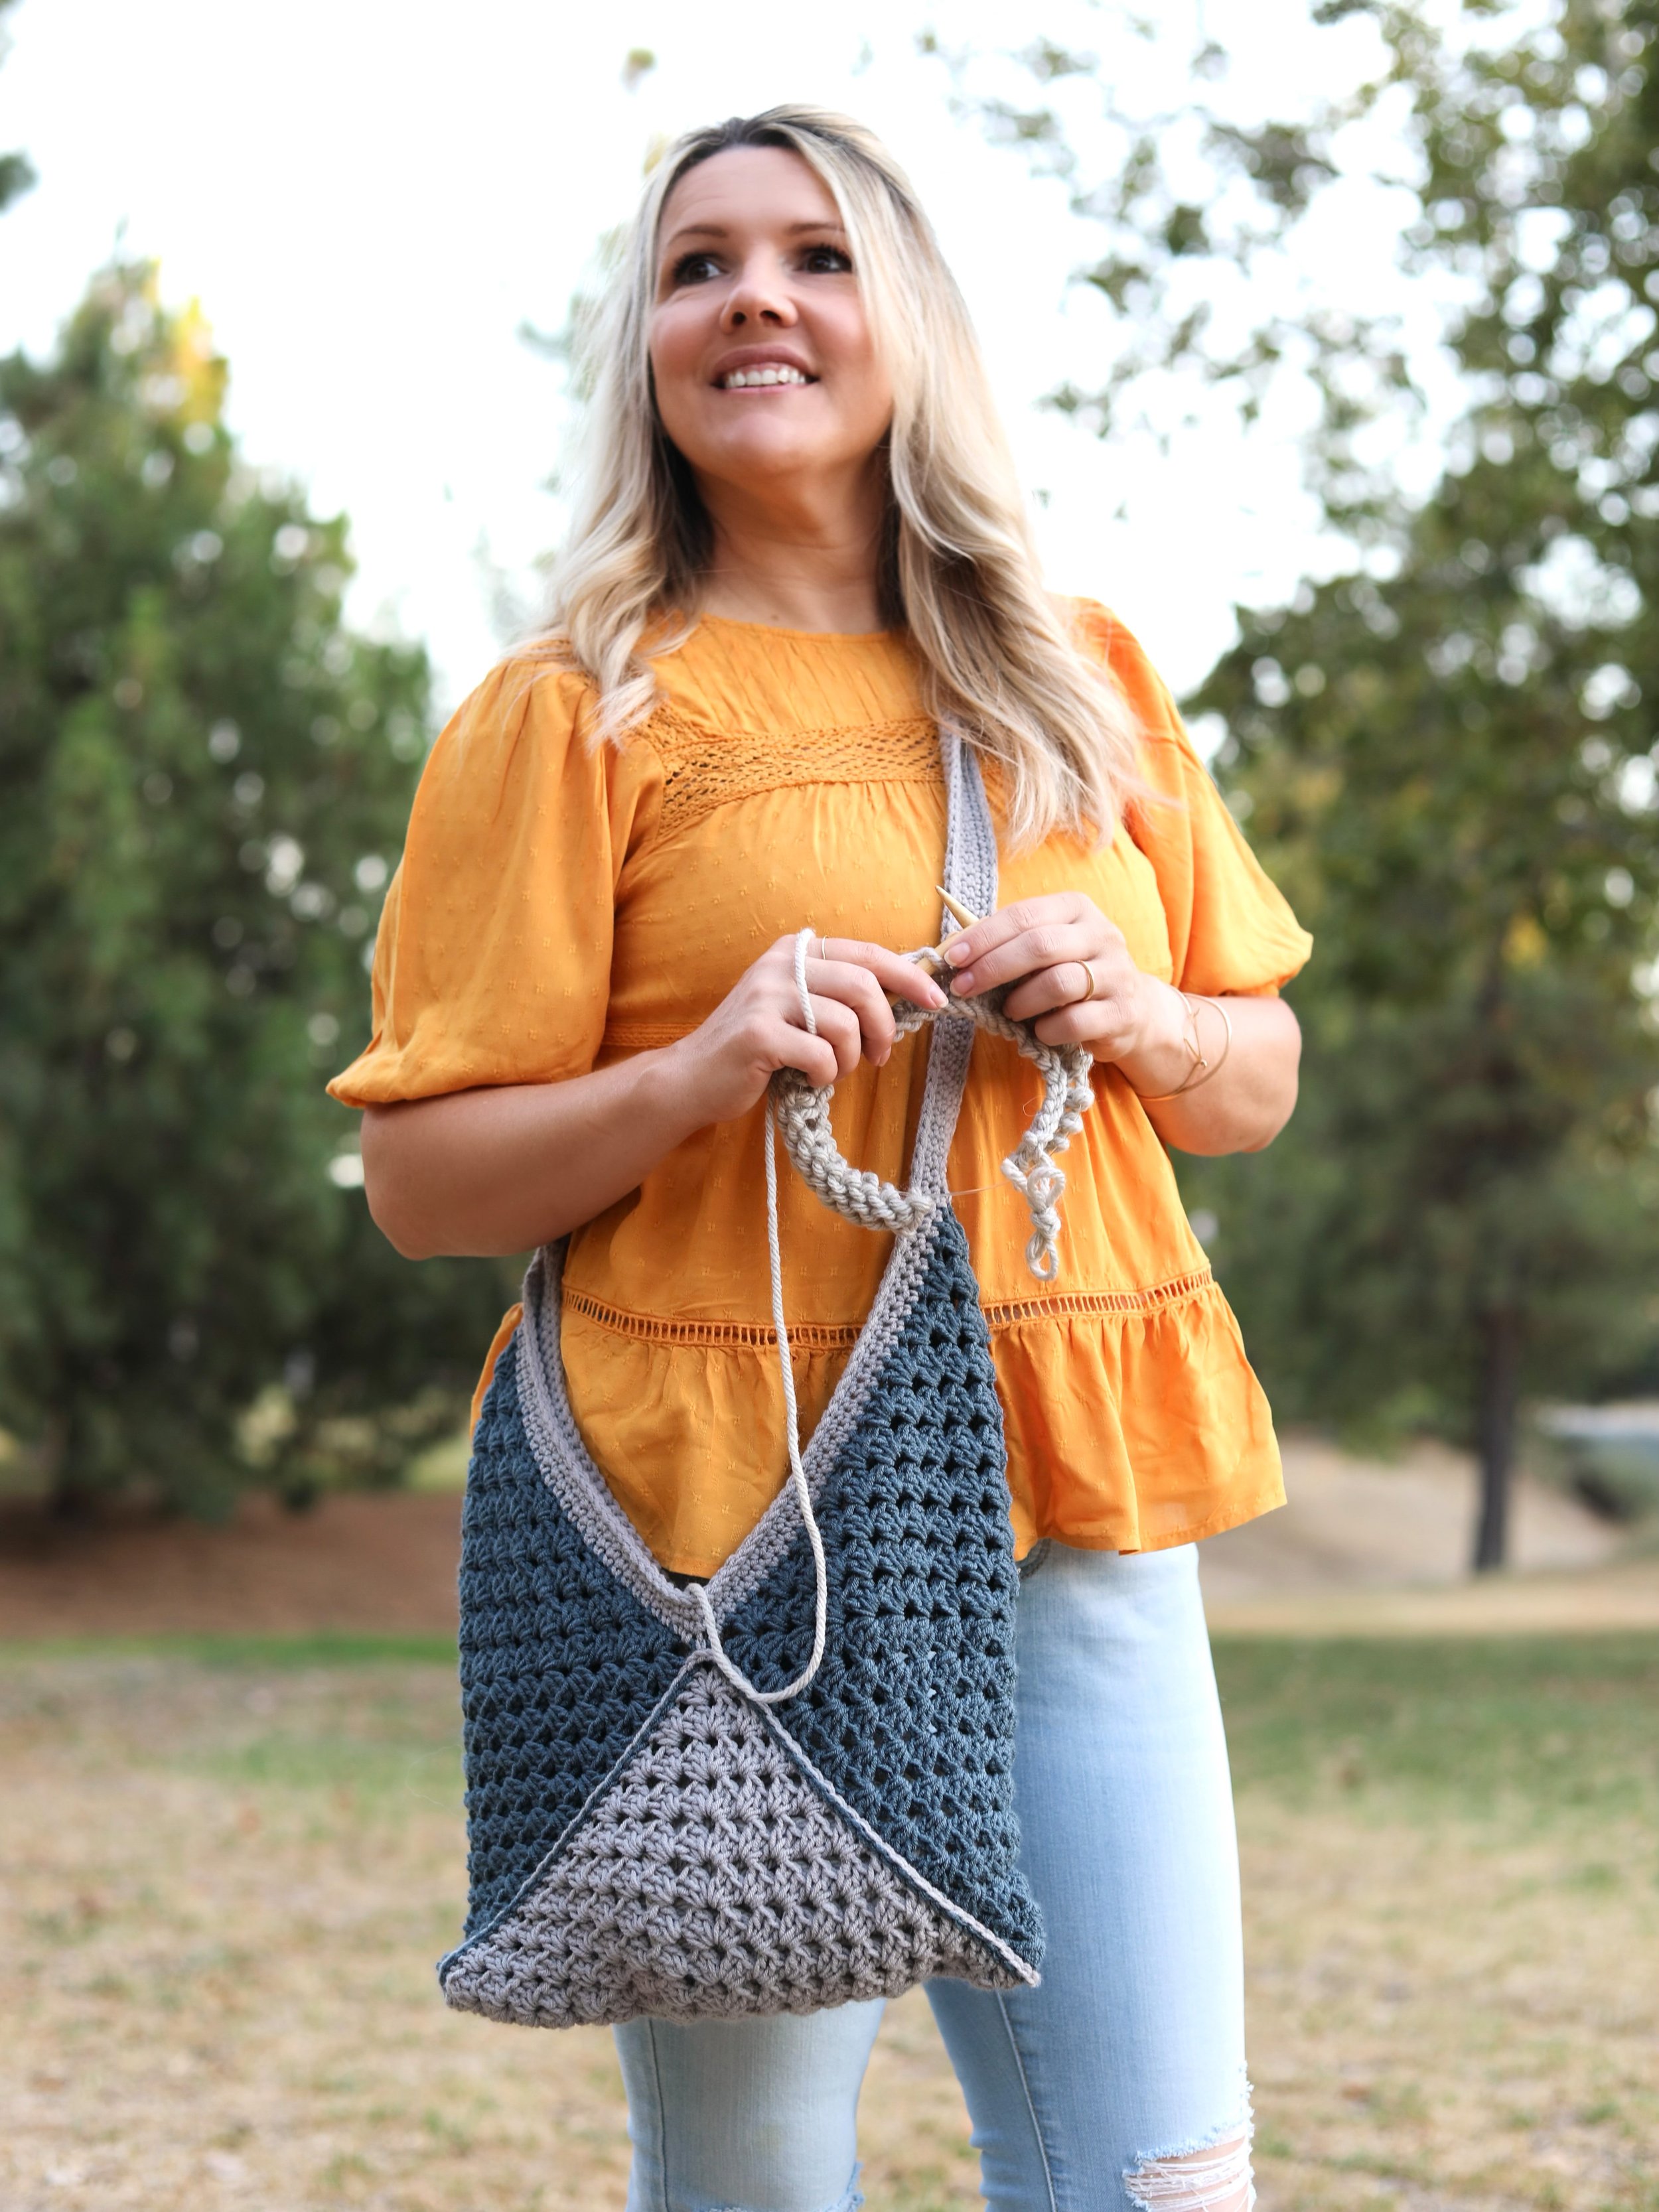
Journey Tote
I’m so excited to announce that the “Journey Tote” is now available, the perfect yarn on-the-go project bag!

NEW - Available as a kit, PDF and FREE here!
I think most of us agree that depending where we’re going, our yarn is coming with us. This tote makes your yarn and project easily picked up for on the go!! When I designed this, I had an urge to work up some granny squares but what to make? Then I thought about how if I build a few together the dip in the center would be the perfect way to easily grab more yarn, easily put your project away no matter how big it was AND not have to struggle with the bag to do it. After designing the sizing of it then came designing the straps! Making them adjustable was the perfect way to adjust for all situations and heights. Over the shoulder, cross body, whatever it is this bag can do it!! I also love how the stitch details gives a modern vibe to the classic square I grew up with.
“ I just wanted to do another quick thank you for all your love and support of my designing. I am very excited to announce this design is available FREE on my Blog and as a Kit thanks to Lion Brand Yarn. Each and every Kit purchase you’ve ever made means me collaborating more and more with a company and yarn I find so dear to me. I can’t even begin to add up all the projects I’ve made through the years with their yarn. My latest combo is with their new Worsted Weight Yarn. Order the kit, pick your combo, and happy stitching! If you reach out to me via email or IG, I’m happy to help give my thoughts on colorways to help you pick your perfect kit!” - Angie, now more from me below haha
A modern take on a granny square purse that brings me back to that 70s/80s vibe! This project bag will help you envision and work on your craft on the go! For between crafting, tote it along as a cute purse!

Journey Tote
Grab the kit! Select any colorway and the pattern is free from Lion Brand Yarn.
Make it in ONE color, or TWO!!
Journey Tote on Etsy
This project is also very affordable which is always a bonus! It only uses 2 skeins and the Color Theory yarn which is very easy to care for - which is bonus #2!!

I worked this up in a fave as far as neutrals go but I’d also like to mention you could totally make yours using a pop of color to add to your OOTD. You can make it all in one color which looks stunning, I had a tester work one up in Nutmeg and that’s definitely on my list of gift ideas for this winter!!

PATTERN INFO
METHOD: Crochet
DIFFICULTY: Beginner
SIZE: Tote
DESCRIPTION:
A modern take on a granny square purse that brings me back to the 70s/80s vibe! This project bag will help you envision and work on your craft on the go! For between crafting, tote it along as a cute purse!
YARN:
Lion Brand Yarn
Color Theory, #4, 3.5oz.
246yd, 100% Acrylic
Skeins: 1 in Satellite
1 in Stonewash
HOOK
H (5mm) or hook needed to obtain gauge
NOTIONS
Yarn Needle for weaving in ends
GAUGE
(unblocked)
4.5 clusters x 8 rows = 4” in pattern (clusters)
NOTES:
The Project Bag is made using 3 equal sized Granny Squares.
The Chain counts as a stitch throughout the entire pattern.
The straps have a center chain and a Sl St edging to reinforce the strength of them.
Granny Square: the ch2 between the dc clusters at the corners, will be your increase to keep its square shape.
GAUGE
**Please check your gauge before you start this Pattern to match the finished measurements:
It’s best to make your swatch slightly bigger than what the pattern states it should measure, so you can measure it in the center of your square, getting an accurate reading. You can do this by adding 2 additional stitches and work 2 additional rows. Do not count the first and last stitch in your measurement or the first and last row.
Hook Size Suggestions:
If your swatch has less stitches, swatch again using a smaller hook.
If your swatch has more stitches, swatch again using a larger hook.
For an EASY TO READ, PRINTABLE PDF, shop below
A bit of inspo behind the name:
I think most of us agree that depending where we’re going our yarn is coming with us. This tote makes your yarn and project easily picked up for on the go!! When I designed this, I had an urge to work up some granny squares but what to make? Then I thought about how if I build a few together the dip in the center would be the perfect way to easily grab more yarn, easily put your project away no matter how big it was AND not have to struggle with the bag to do it. After designing the sizing of it then came designing the straps! Making them adjustable was the perfect way to adjust for all situations and heights. Over the shoulder, cross body, whatever it is this bag can do it!! I also love how the stitch details gives a modern vibe to the classic square I grew up with!
Journey Tote
Finished measurements : In inches
Width (laid flat)
14”
Bottom of bag to center V dip
8”
Height to top of bag (laid flat)
14”
Straps (each)
25”
Stitches to Know
ch Chain *Chain counts as a stitch in this pattern.
Cluster 3dc in same stitch
Corner Cluster 3dc, ch2, 3dc in same stitch (Increase)
Dc Double Crochet
MC Magic Circle
RS Right Side of the project
Sl St Slip Stitch
st(s) Stitch(es)
WS Wrong Side of the project
Want another cozy design to set your needles or hooks on?
Granny Square - make 3 (2 in color A, 1 in Color B)
Chain counts as a stitch
MC: ch3 2dc ch2 (1st cluster), *3dc ch2, repeat after *2 more times (4 clusters), Sl St to join at the top of first ch3
Round 2: ch3, 2dc into the corner before the ch3, in the next corner (ch2 space) 3dc ch2 3dc, repeat in the next 2 corners, in the last corner 3dc ch2 and Sl St into the top of your starting chain
Round 3: ch3, 2dc into the corner before the ch3, 3dc into the next side space, 3dc ch2 3dc into the corner, repeat around until your last corner, 3dc ch2 and Sl St to join
Round 4-10: Continue this pattern for the Rounds: ch3 2dc in the previous corner, 3dc in each side space, 3dc ch2 3dc in the corner spaces. All last clusters are a 3dc ch2 and Sl St to join
Your granny square will measure 10”
Cut yarn, weave in ends.
Steam block to flatten edges for easy seaming if preferred.
Seaming the Bag Body
Step 1: Place the Color B square down, RS up, in diamond position. Pic 1.
Step 2: Line the 2 Color A squares in diamond position along the top half, one on each side, RS up. Pic 1.
Step 3: With Color A, seam the square edges together beginning in the bottom left corner, until the bottom right corner (see pic 1), using the Slip Stitch method in Pic 2.
Step 4: Turn the piece upside down, WS up. Fold the squares in half, bringing the side points inward to the center. Pic 3.
Step 5: RS now facing you, beginning in the bottom left corner, seam the squares together until the right corner. Pic 4.
Photo Tutorial

Photos 1-4
Straps
The straps are worked in one big round.
It’s two separate straps that tie together, but the entire top of the bag and straps are worked in one round.
Chains in the middle of the straps help add to the sturdiness of them. Follow along the photo tutorial for a good visual.
Step 1: At the center V of the bag (red X), attach Color B with a Ch 1, sc1 in each stitch along the bag edge, to the top of the color A square ch2 space, see pic on the left.
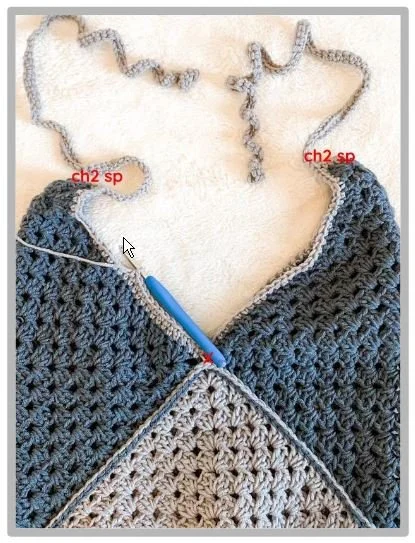
Step 2: Strap 1: Ch 100, in the 2nd chain from the hook, sc back down the chain, sc1 into the ch 2 space again at the top of the square, now continue to sc along the edge of the bag to the center V, then back up to the other side of the bag at the top of the square, ch 2 space.
Step 3: Strap 2: Ch 100, in the 2nd chain from the hook, sc back down the chain, sc1 into the chain 2 space again at the top of the square before sc’ing along the bag edge to the start of the round, Sl St to join in the round.
Round 2: Ch1, sc the entire round, Sl St to join in the round.
Note, at the tip of the straps, work a 2sc twice in a row at the top before continuing back down, this helps round out the point of it.
Round 3-4: Repeat Round 2
Round 5: Ch1, Sl St the entire round, Sl St to join in the round.
Cut yarn and weave in all your ends.
Blocking your straps will help them to lay flat.
Voila! You’re done! Block and enjoy!
