Portland Basket
Portland Basket
By Whistle & Wool
Ravelry-Whistle and Wool
Join me on Instagram and tag your projects to @whistleandwool, #portlandbasket
CROCHET PATTERN
Sizes: One size
Thank you for your support of my designs! If you enjoy this pattern and would like a low cost PDF Pattern, please visit my Ravelry, Etsy or Love Craft links above. Your support helps me to be able to bring you more cozy makes. Thank you so so much!!
A bit of History behind the name:
Portland, England: Forming the southernmost point of the county of Dorset, England. Portland is a central part of the Jurassic Coast, a World Heritage Site on the Dorset and east Devon coast, important for its geology and landforms. Portland stone, a limestone famous for its use in British and world architecture, including St Paul's Cathedral and the United Nations Headquarters, continues to be quarried here. Portland has been inhabited since at least the Mesolithic period (the Middle Stone Age)—there is archaeological evidence of Mesolithic inhabitants at the Culverwell Mesolithic Site, near Portland Bill, and of habitation since then. The Romans occupied Portland, reputedly calling it Vindelis.
Please see “www.wikipedia.com” for more history behind the name.
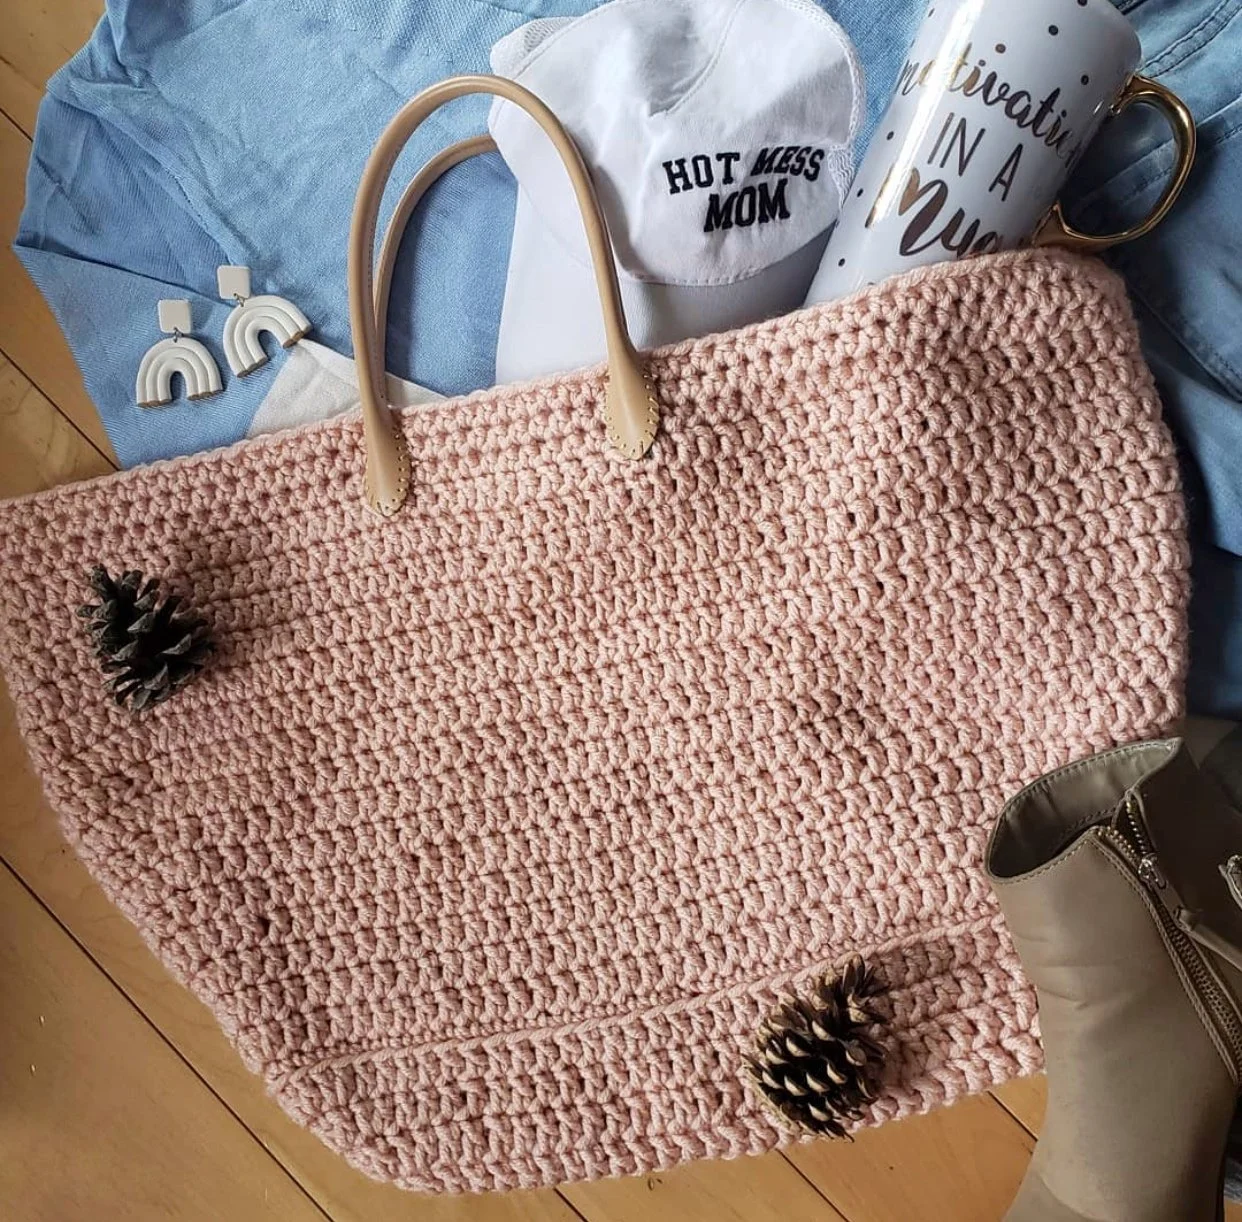
More organization is always needed right? Instead of paying a lot of money for a basket, with quality not always being the best, why not dip into our yarn stash? I set out to make my own little yarn tote! I found these Leather accents a few years back at Michaels Craft Store and even though I didn't know what I'd use them for, I new I had to have them (they're actually bracelets twisted in a cute way to be handles). Then earlier last month, inspiration struck! They were the perfect artsy handles for my newest basket! This fun and easy to create basket works up in just a few hours and can easily be customized with handles of your choice!
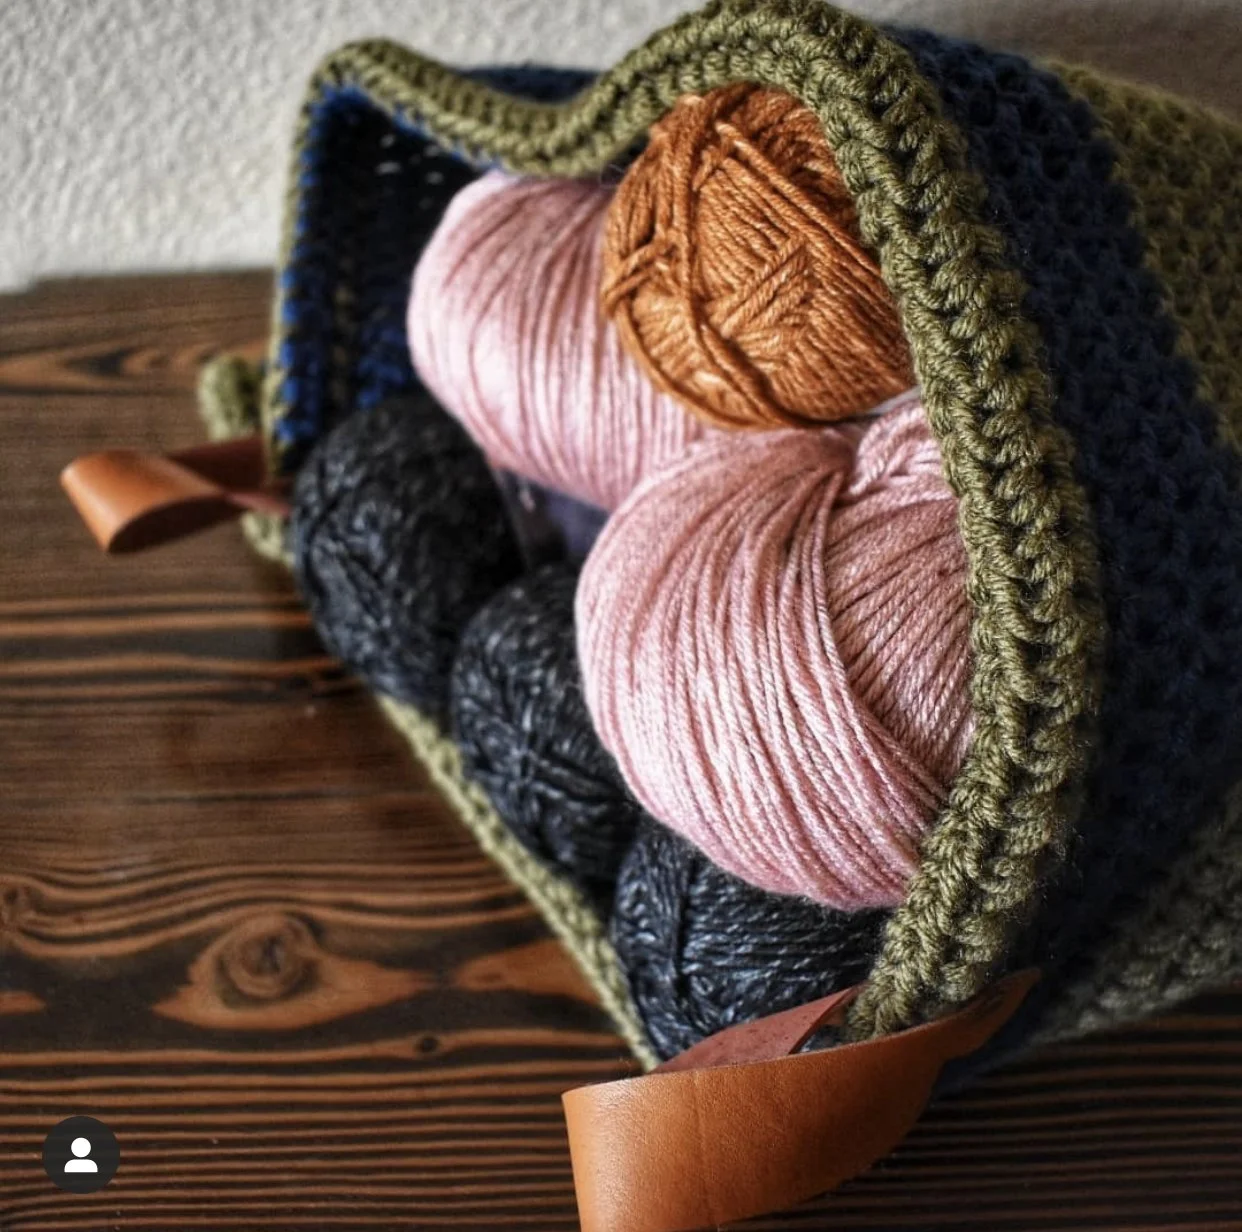
See some of my Testers images below, creating their own lovely styled baskets with a simple change in yarn and handles.

TESTER PICS
Sunshine and Daisies Tea Pray Crochet: Instagram @teapraycrochet
Benton Handmade: Instagram @bentonhandmade
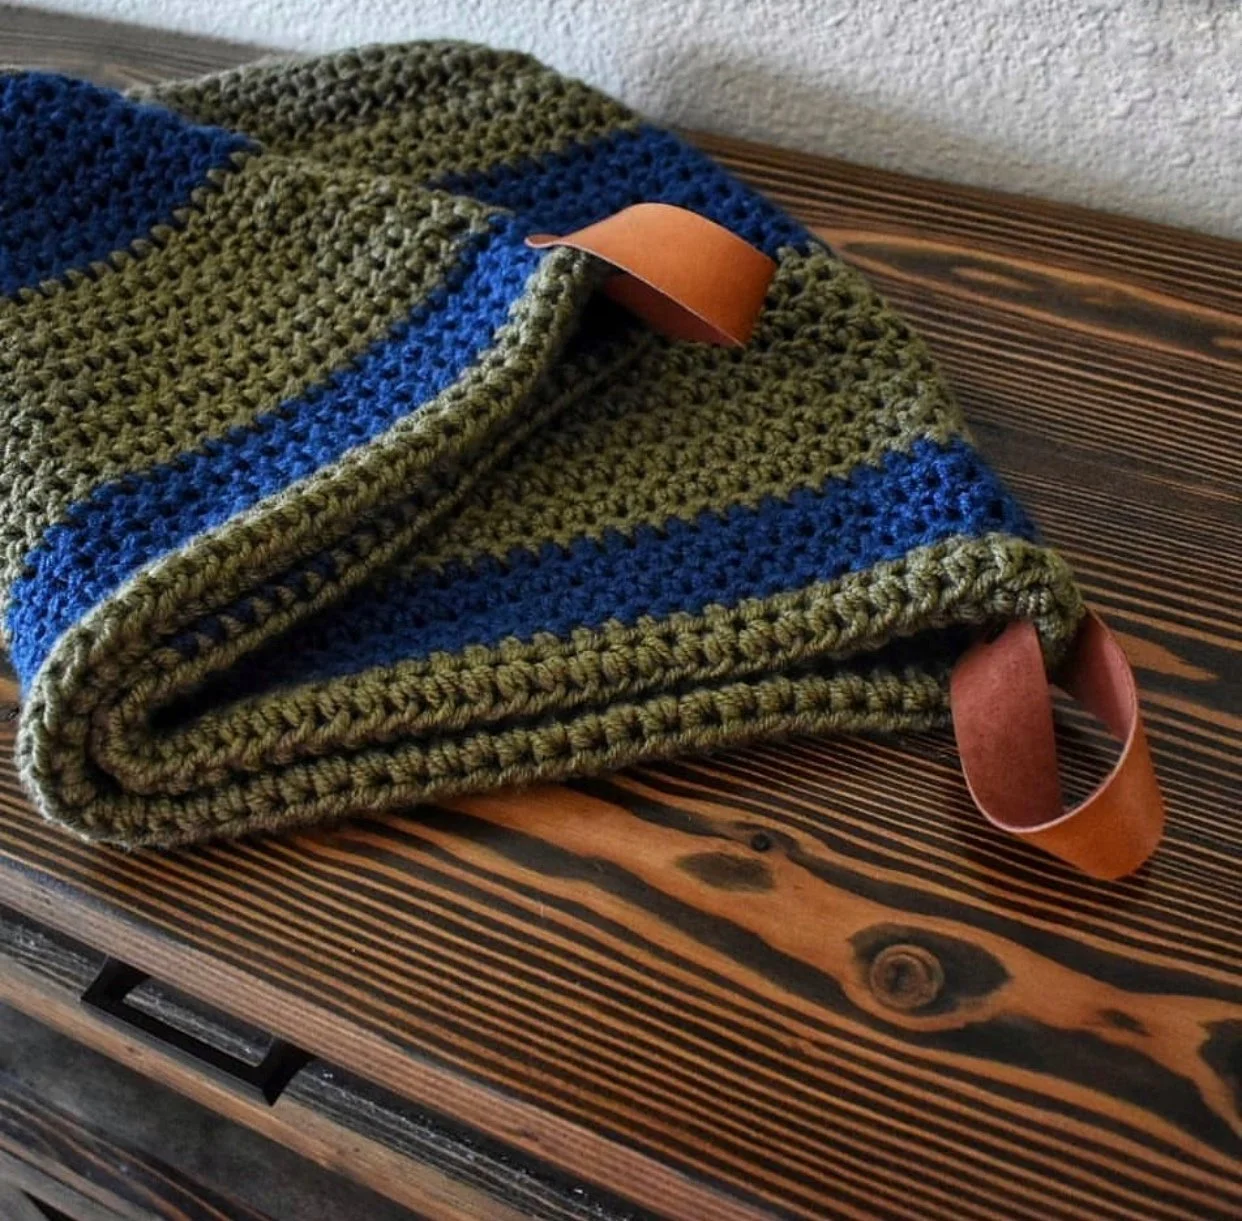
I also love how you can add a lovely striping effect if you have a few partial skeins in bulky! Look how gorgeous it turned out!
Thank you so much for your shop support! I hope you love it!! If you need any help or have questions along the way, please contact me via Email.
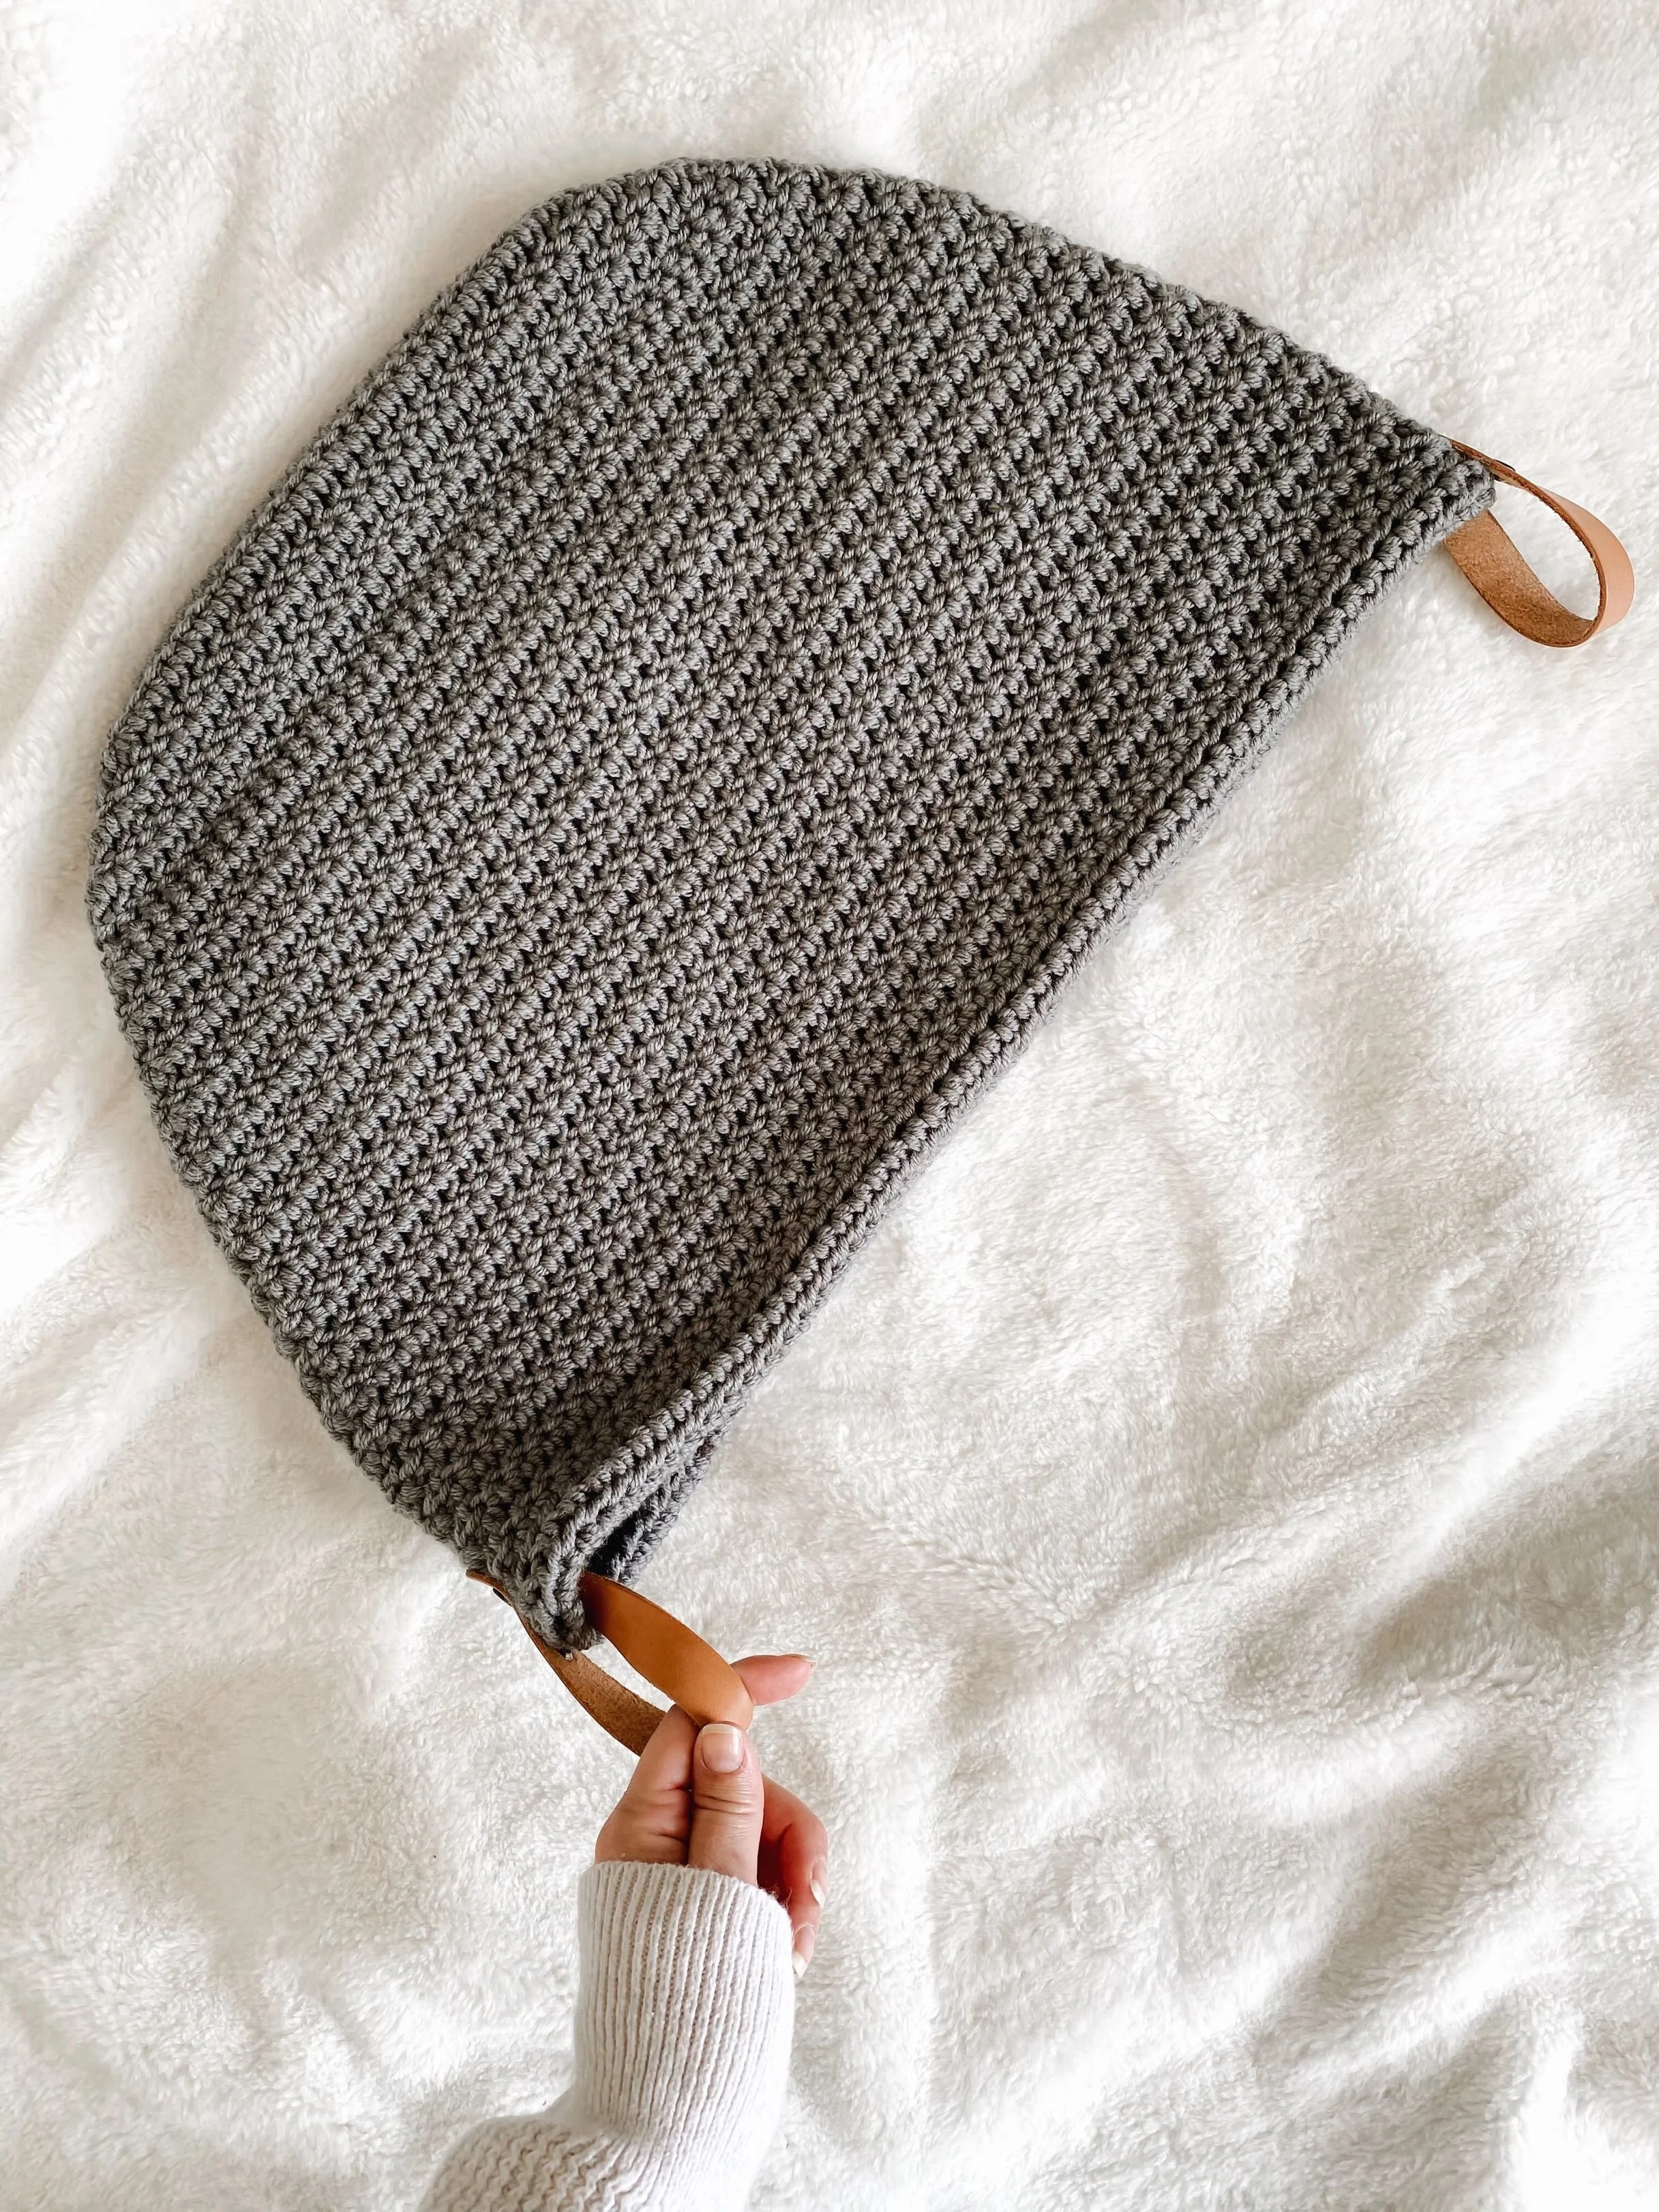
Description: The perfect basket to use for all kinds of storage! Works up easily and has leather handles as an elegant detail.
**Please check your gauge before you start this Pattern: Swatching for gauge is very important. It does take a few minutes to do but it ensures that the finished size of your piece will match the sizes given in the pattern. A change in your stitches per inch can affect your overall width measurements. A difference in your rows can affect your length for this piece.
*Start with the suggested hook size:
If your swatch per inches is larger, then you need to swatch again using a smaller hook.
If your swatch per inches is smaller, then you need to swatch again using a larger hook.
Getting a close and accurate swatch will get you to the exact measurements given for the pattern.
***This Pattern is a copyright of Whistle and Wool© so you may not copy, alter, adjust, share, record, redistribute or resell my pattern. No tutorials or any kind of demonstrations may be made using any information contained in my pattern. I do not mind if you wish to sell a completed HANDMADE item and you are a small independently owned business, however, you do not have permission to use ANY of my photos. If you do sell a completed item, please list credit of the design belonging to me, Whistle and Wool and a link to my shop. www.WhistleandWool.etsy.com
Pattern Size: One size
Materials needed:
Lionbrand Yarn, Color Made Easy, #5 weight, 247 yards, 7oz. 100% Acrylic
2 skeins in Cobalt
Hook: Clover Amour, L (8mm)
2- Stitch Markers
Large-eyed blunt Needle for yarn (Seaming & Weaving in your ends)
Handles: (optional)Yarn version included in the pattern
Handles: 2- Leather bracelet cuffs -Realeather from Michaels
Amazon link: Realeather, Natural Narrow Leather Wristbands, 8-Pack, 8 Count https://www.amazon.com/dp/B0044JMQR8/ref=cm_sw_r_cp_api_i_naOzFb1ZJ864H
Gauge:(unblocked) 11sts x 6.5 rows = 4 inch square of dc
Finished measurements in inches: laid flat, W measured along the top 20”W x 13.5”H (base included)
Stitches to Know: Standard American Terms
*-repeat the stitches indicated in the pattern
RS- Right Side
ch- Chain
st(s)- Stitch(es)
Sl St- Slip stitch
scFLO- Single crochet in the front loop only
SM- Stitch Marker
dc- Double Crochet
hdc- Half Double crochet
Pattern:
NOTE: I worked from the inside of the basket moving counter clockwise. Please note, If you crochet along the outside moving clockwise, your texture will be different.
Ch does not count as a stitch in this pattern.
Bag
Ch 30
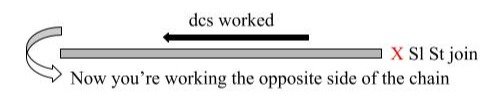
Round 1: starting In the 3rd chain from the hook, dc27, dc twice into the last stitch (place a SM in each of these last 2 stitches), (see pic) we will now turn to work the other side of the chain, dc27 (1dc in each ch to finish the row), Sl St into the top of the starting chain to join -56 sts
Round 2: ch2, 2dc into the first and second stitch, dc24 to the stitch before the SM
2dc into this st
Remove SM, 2dc, place marker into the 2nd st created
Remove SM, 2dc, place marker into 1st created st
2 dc into the next st
dc24, til the last 2 stitches, 2dc into each of them (4sts), Sl St to join - 64sts
Round 3: ch2, 2dc into the first and second stitch, dc28 to the stitch before the SM
2dc into this st
Remove SM, 2dc, place marker into the 2nd st created
Remove SM, 2dc, place marker into 1st created st
2 dc into the next st
dc28, til the last 2 stitches, 2dc into each of them (4sts), Sl St to join - 72sts
Round 4: ch2, 2dc into the first and second stitch, dc32 to the stitch before the SM
2dc into this st
Remove SM, 2dc, place marker into the 2nd st created
Remove SM, 2dc, place marker into 1st created st
2 dc into the next st
dc32, til the last 2 stitches, 2dc into each of them (4sts), Sl St to join - 80sts
Bag Body
Round 1: ch1, sc into the back loop only (working counter clockwise still) - 80sts
This row not only makes the bag base have a definition but it also creates a little detail effect when you look inside the basket.
Replace markers into the newly made stitch as you come to them.
Round 2-5: ch2, 2dc into the 1st st, dc to SM
Remove SM, 2dc into the stitch (place SM into the 2nd newly made st)
Remove SM, 2dc (place SM into the 1st newly made st)
dc til the last st, 2dc, Sl St to join - 4 increase stitches made each row - Round 2 st count - 84sts, Round 3 st count - 88sts, Round 4 st count - 92sts, Round 5 st count - 96sts
Round 6: ch2, dc the round, replacing markers along the way, Sl St to join - 96 sts (same as round 5 but no increases)
Round 7-12: Repeat round 5-6, 3 more times - 108sts
Round 13-16: ch2, dc for the round, Sl St to join - 108sts
Round 17-19: ch1, hdc the round, Sl St to join
Cut yarn, weave in ends
Seaming/double folding the top of the basket
Photo on PDF
Fold over the last round of hdc to the inside of the basket, lining up with the bottom of the first round of hdc. Pin in place for easy sewing.
Using a piece of matching yarn 2 times the circumference of the basket, sew the edge down to the inside of the basket. Make sure your stitches don’t show on the right side.
Weave in all your ends.
Steam Block.
Handle: Yarn version
Chain 25
Row 1: Beginning in 2nd chain from hook, sc24
Row 2: ch1, turn, skip 1, sc23 - 23sts
Cut yarn and weave in the ends.
Attach Handle: See photos below.
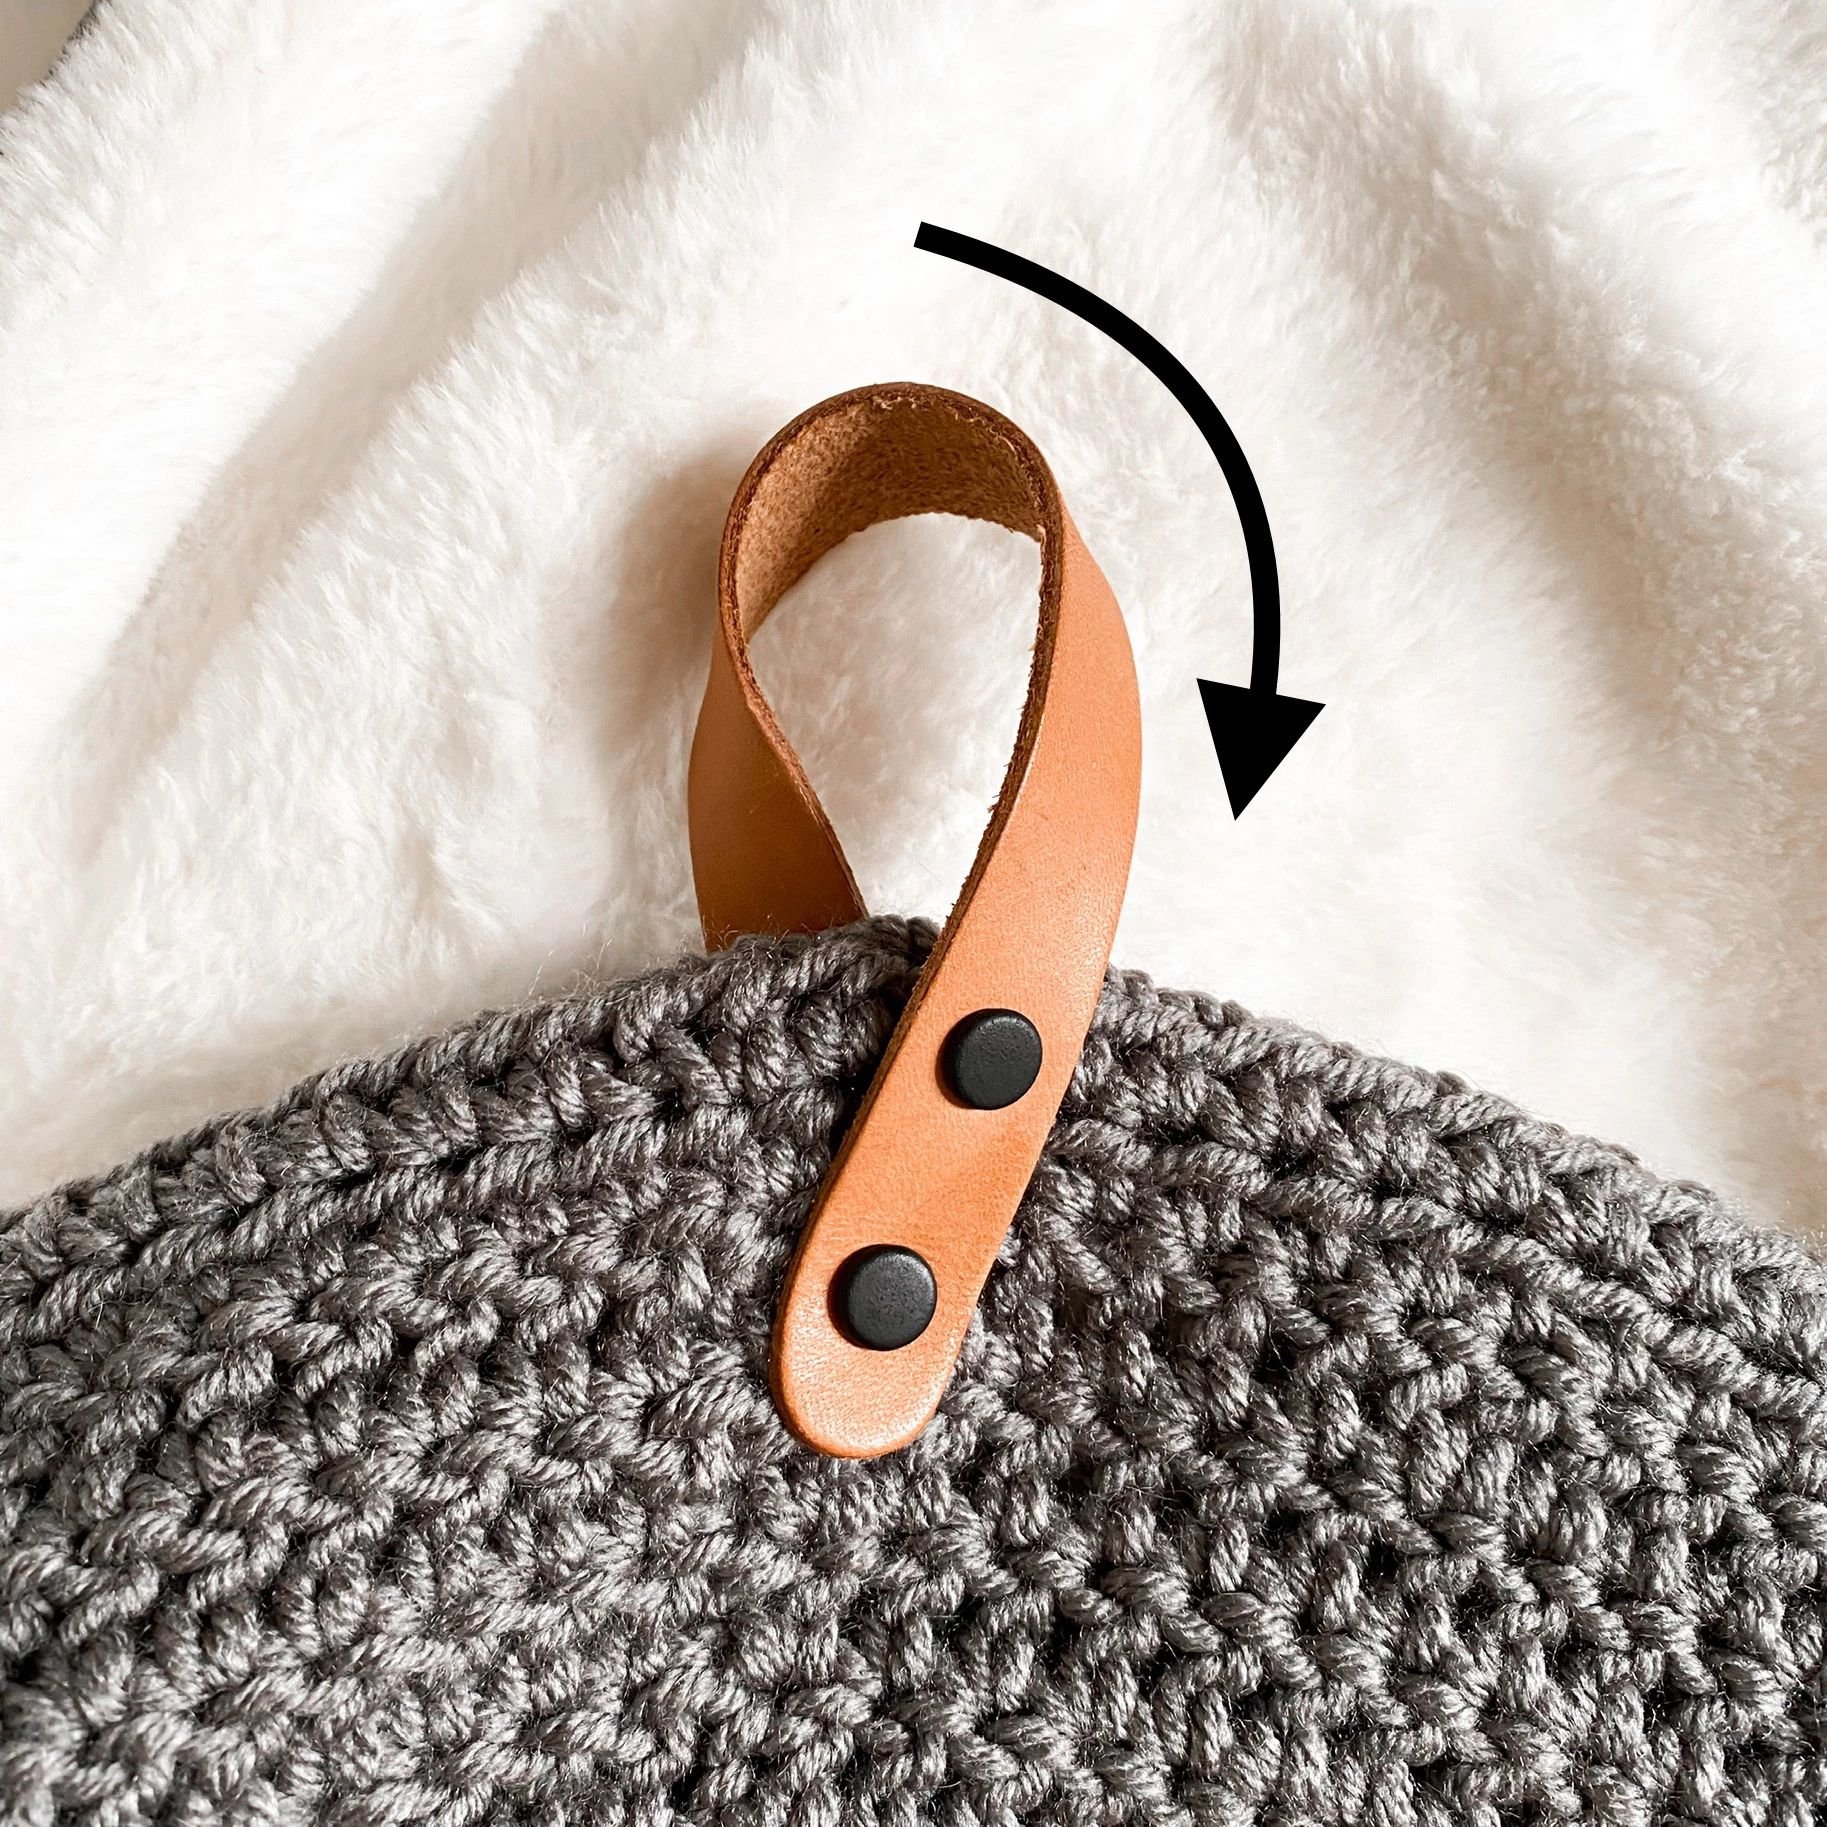
NOTE: if you made a yarn version instead, follow the instructions below still. Instead of a button attachment, sew your handle ends together where the X is on the pic or attach a button snap or rivet. (See Pic 4).
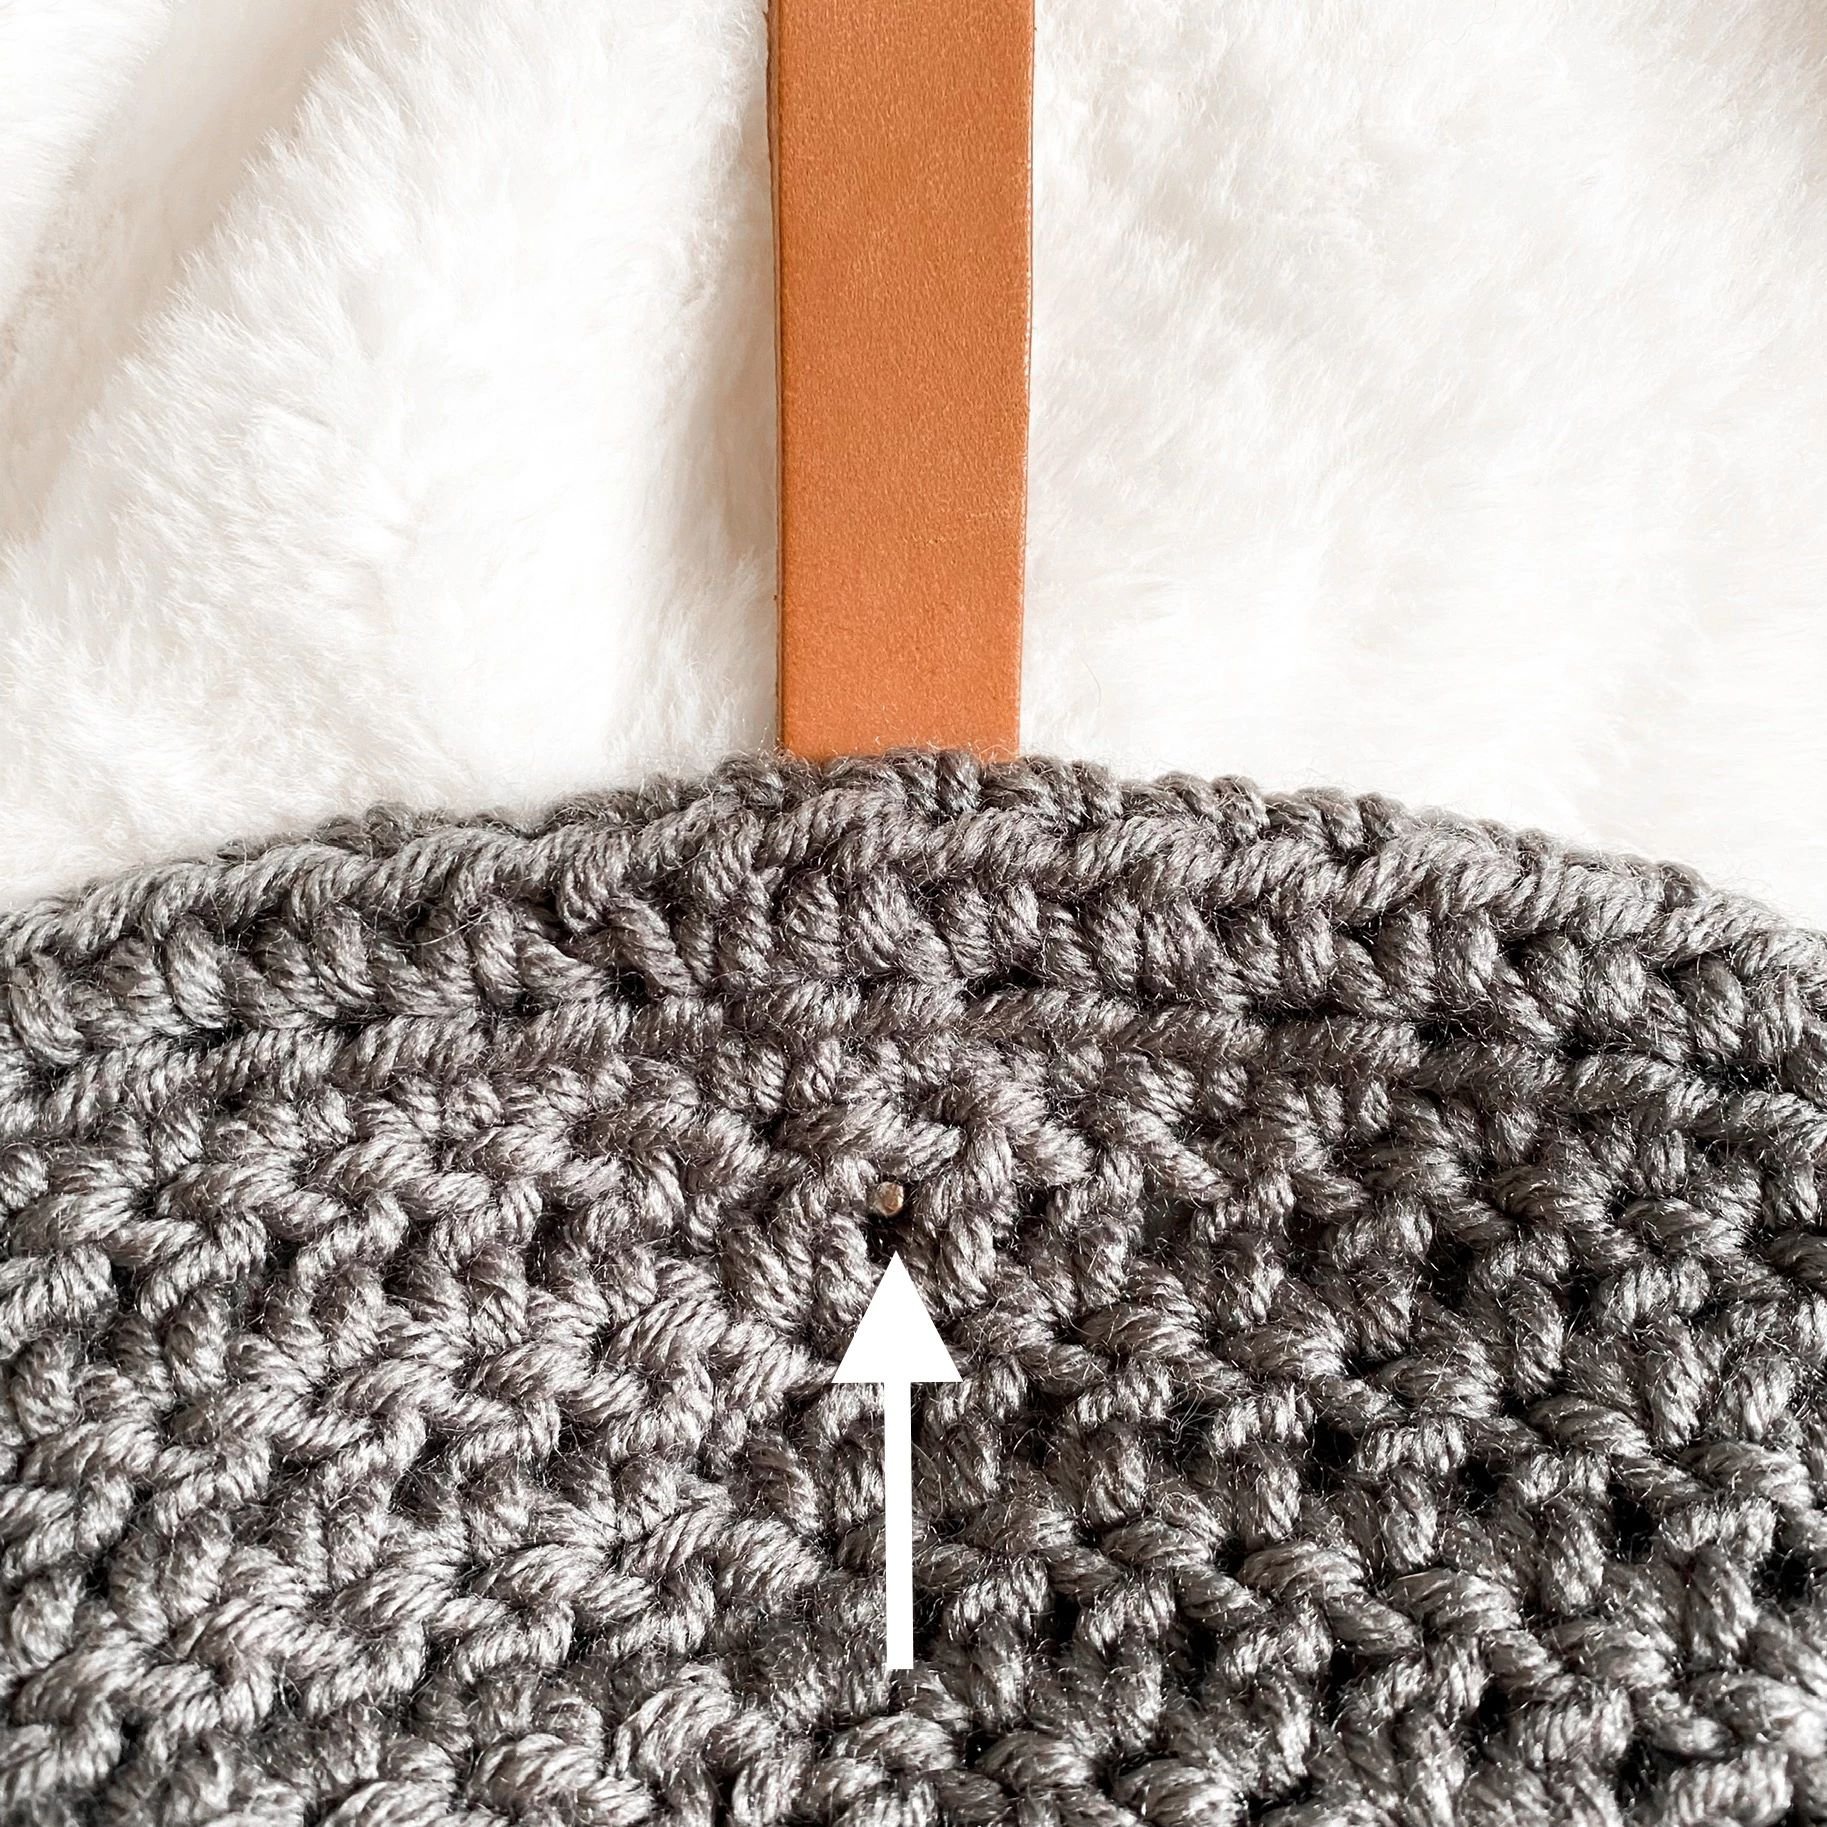
RS of the basket facing you. Along the corners (where increases were made) is where the leather straps get attached. (See Pic 1 below)
Place the leather strap with the button silver attachment end facing you, 1 inch down along the inside of the basket. The button component (see pic 2) should be in between 2 dc stitches so you can snap the other end to it.
Twist the other end of the band to the front outside of the basket and snap the 2 ends together (See Pic 3).
Repeat on the other side.
Voila! You’re done, enjoy!
Thank you for your support of my designs! If you enjoy this pattern and would like a low cost PDF Pattern, please visit my Ravelry, Etsy or Love Craft links above. Your support helps me to be able to bring you more cozy makes. Thank you so so much!!