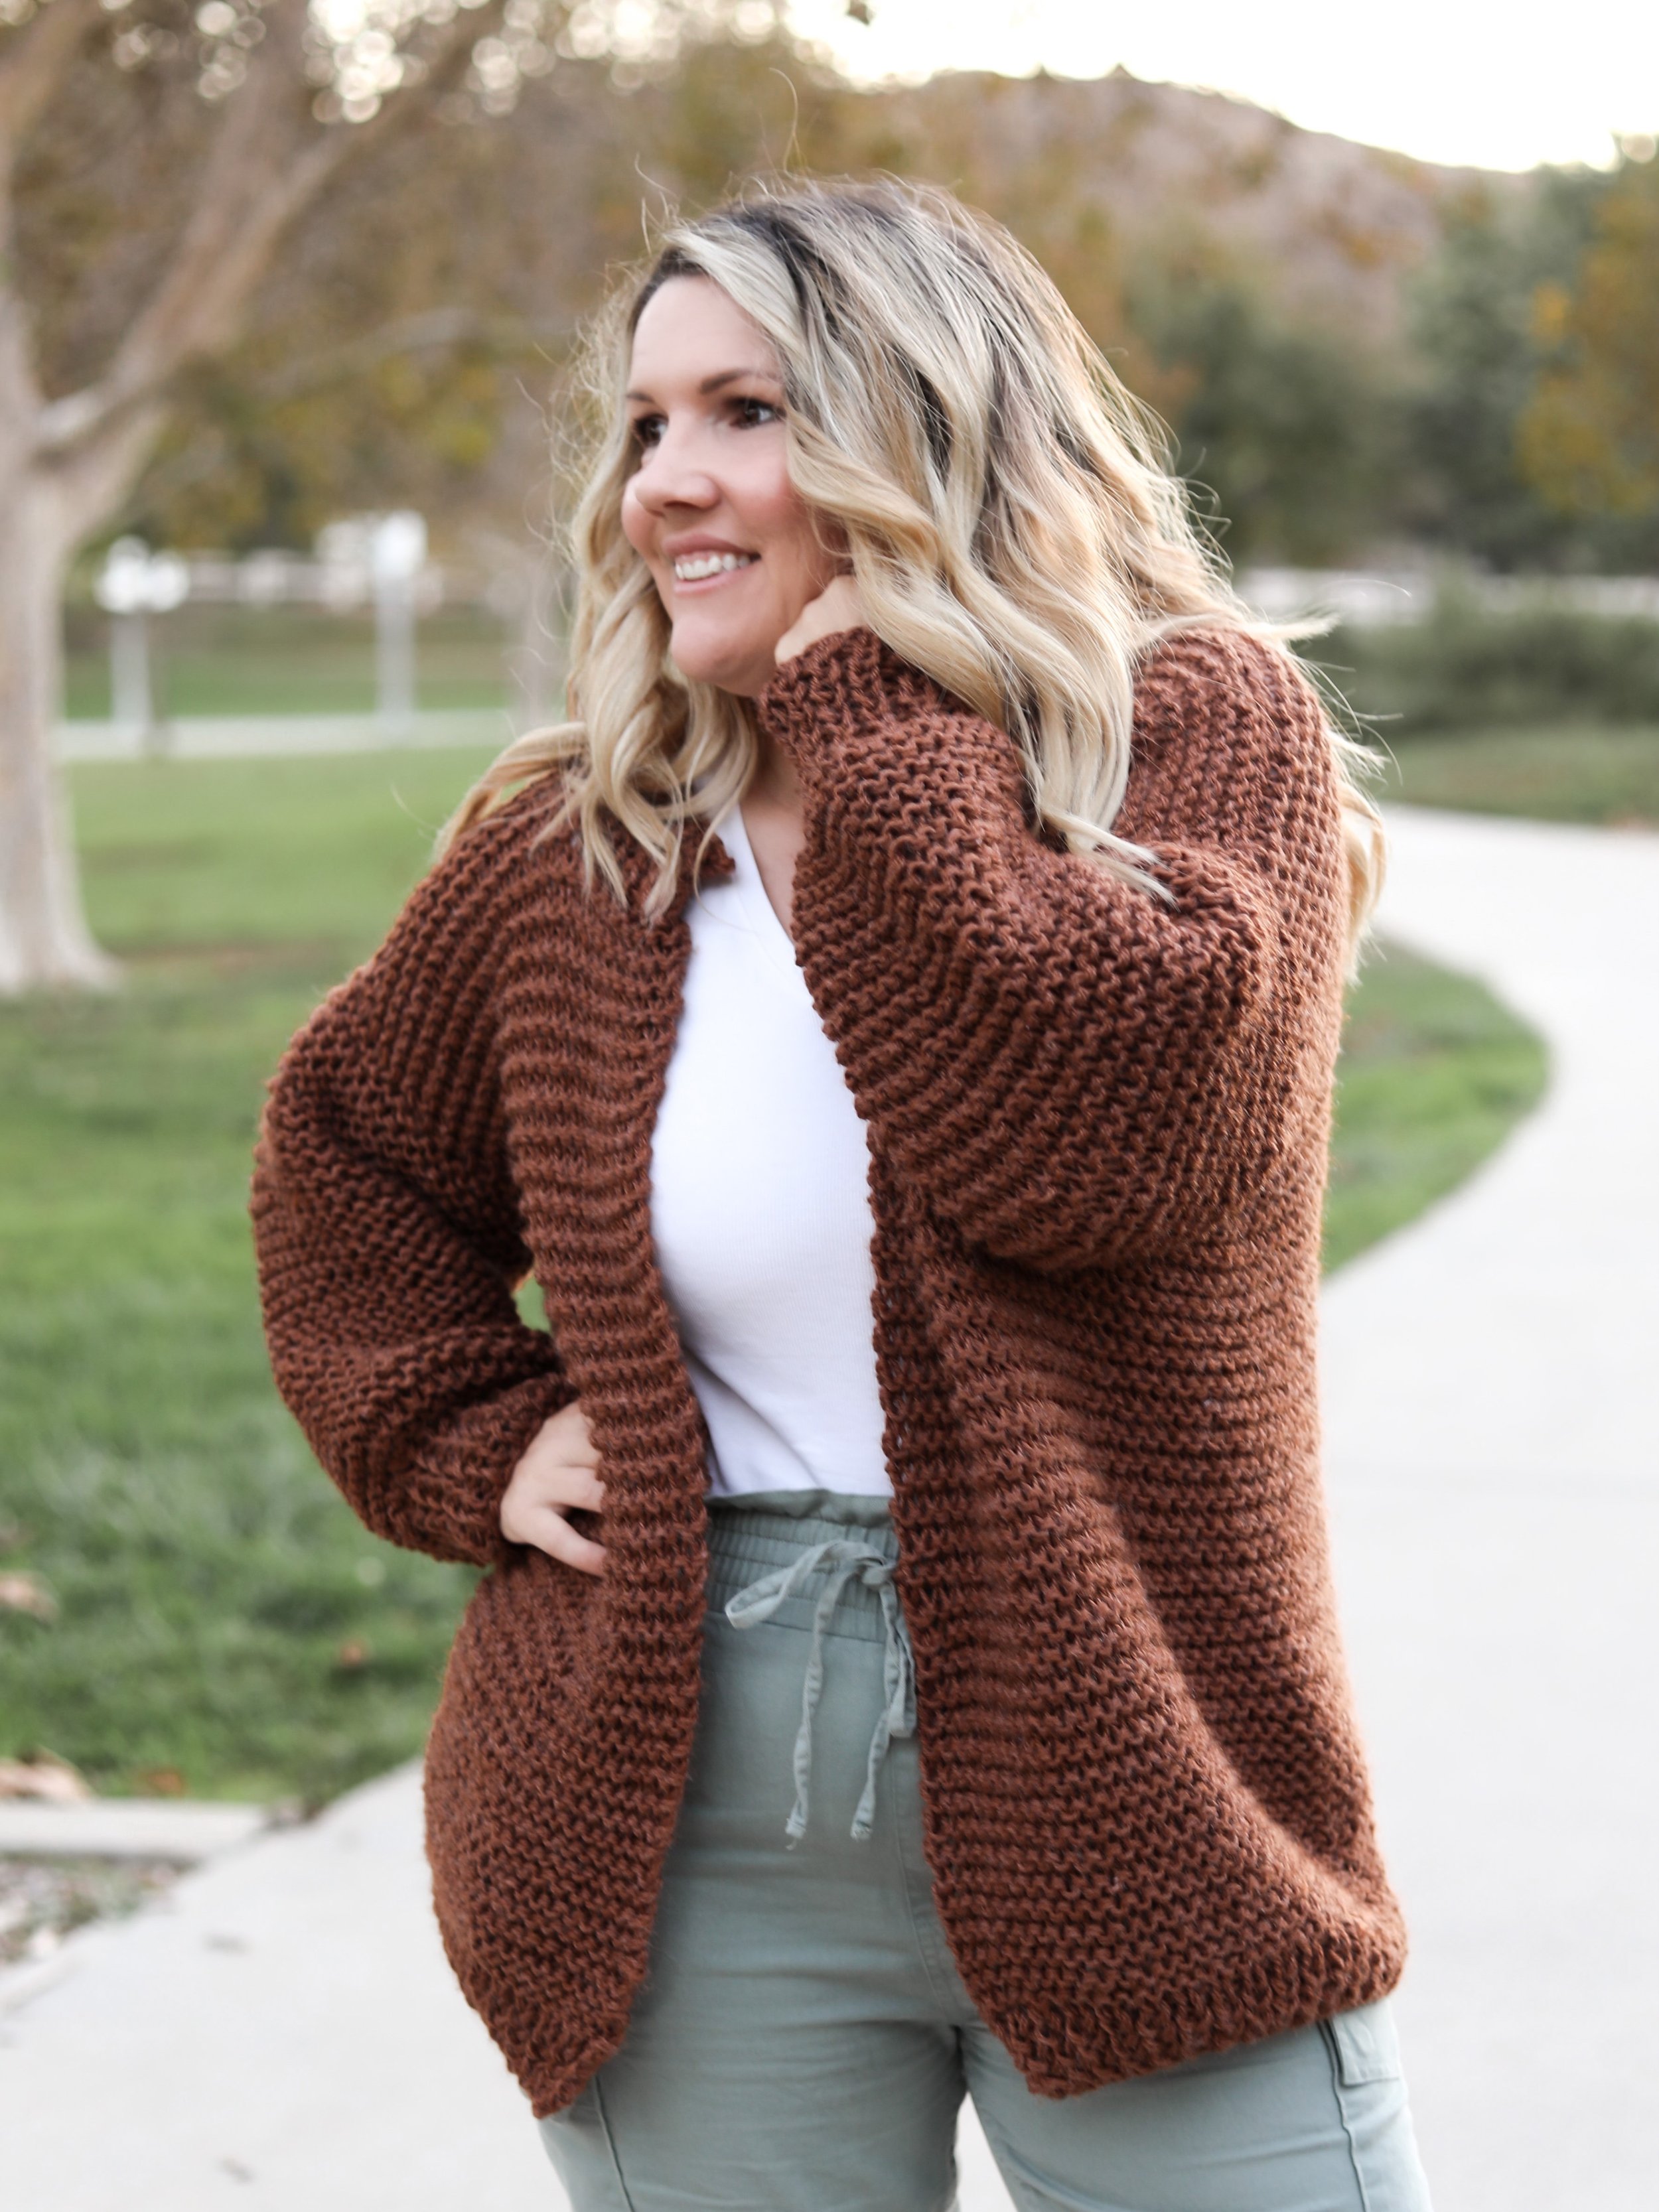
Cider Shacket

NEW - Available as a Kit through Lion Brand Yarn, PDF in my Ravelry, Etsy and LoveCrafts shops! FREE on the Blog :)
A bit of inspiration behind the name:
With my favorite season being Fall, I love all the burnt oranges, yellows and browns almost immediately as August rolls around. When I saw this gorgeous shade of Re Spun I instantly wanted to make a garment with it. When I saw its name was Cider, I instantly knew I wanted that name in my design.
“ I just wanted to do another quick thank you for all your love and support of my designing. I am very excited to announce this design is available as a Kit thanks to Lion Brand Yarn. Each and every Kit purchase you’ve ever made means me collaborating more and more with a company and yarn I find so dear to me. I can’t even begin to add up all the projects I’ve made through the years with their yarn. My latest combo is with their new Worsted Weight Yarn. Order the kit, pick your combo, and happy stitching! If you reach out to me via email or IG, I’m happy to help give my thoughts on colorways to help you pick your perfect kit!” - Angie, now more from me below haha

Cider Shacket
Grab the kit! Select any colorway and the pattern is free from Lion Brand Yarn.
Pick your favorite Fall inspo!
Warning, the Z on my keyboard is going out so if you spot a COY - that’s keyboard code for cozy! And Angie code for bummer, I missed that one in proofreading haha! I have to hit it 10 times for one haha. Oh well, onward we go right??
Okay, so this one is seriously COZY!! The comfort and squish on this one is real!!! There’s something about the colorways in this line that seriously nailed the internal joy we think of and feel when we know Fall is coming. Like this one, its summed up basically every tone and yummy treat I love during these months. I can see the yummy cinnamon, a burnt orange for a cute pumpkin and somehow I also see a shade of cider doughnuts in there. A few other faves in this line are the mustard and berry tones, definately go check it out! Here is a wee link! https://shrsl.com/3jkat

Cirrus Wrap on Etsy
Adv. Beginner, Worsted Weight, Crochet
LETS TALK YARN!!
What's interesting too, is this yarn has a #6 chunky knit line, but I didn’t use that one. I wanted this Cider shade :) So in order to still get that chunky knit goodness, I just held my yarn double and VOILA! A quick or super squishy knit all while being super affordable too. This yarn is under $5 a skein and I Iove that. Affordable and cozy, is a win in my book!
QUICK TIP, pull the yarn from the center when knitting it double to avoid twisting. I do this every time and it makes it a breeze! If I pull from the outside, it can be a bit of a twisted disaster, so try it, you may love it! It’s definitely softer than a wool yarn and it works incredible as an outside layer. With all that positive ease too, you have room for layers underneath and it will still have this profile of squishy goodness. I plan to wear mine all around the house because I always get cold as soon as the weather hits 60, and I love the idea of wearing this with some leggings and a sweater mixed with tall boots as I head outside with my kiddos!

Guess what else I did? Hidden pocket :)
I always have something that needs toting around, especially with all my kiddos. SOOOO…. because I love the look of the Garter stitch so much, I hid the pocket inside! This kept the outside clean and simple but yet BAM, holding power on the inside. I only added one, but could you have two?? Of course. Get creative and customize this seciton as much as you’d like. Make a higher and a lower one, add 4, I think all ideas for this would be super cute!
NOTES
The yarn is held double throughout this pattern. I like to pull the yarn from the center of the skeins to avoid tangling.
This Shacket is worked up in soothing garter in every section.
You will create 1 body panel, then the front and back panels are separated to be knit separately.
The body is completed with a whip stitch (overcast stitch) at the shoulders.
Stitches for the Sleeves are picked up along the Sleeve opening, worked flat and seamed up with a Mattress Stitch.
When I pick up Sleeve sts, I divide the total stitches I need in half to see how many to pick up on the front and back to be even/close to even. I divide stitches needed by the row count, from underarm to shoulder. This is how I know if I have to pick up 4sts, then sk1 space etc. - to space them out evenly.
I attached a pocket on the inside of my Shacket. You can add 1 pocket, 2 pockets, customize any way you’d like to. Place yours higher or lower, it’s up to you!
GAUGE
**Please check your gauge before you start this Pattern to match the finished measurements:
It’s best to make your swatch slightly bigger than what the pattern states it should measure, so you can measure it in the center of your square, getting an accurate reading. You can do this by adding 2 additional stitches and work 2 additional rows. Do not count the first and last stitch in your measurement or the first and last row.
Needle Size Suggestions:
If your swatch has less stitches, swatch again using a smaller needle.
If your swatch has more stitches, swatch again using a larger needle.
METHOD
Knitting
DIFFICULTY
Beginner
SIZES
XS (S, M, L, XL, 2L, 3X, 4X)
DESCRIPTION
Full of relaxing garter stitch, this project will have the feel of your favorite oversize jacket with the lightness of a knit. With a thick collar detail and a hidden pocket, these details combine to form the oh so comfy, Cider Shacket.
YARN
Lion Brand
Re Spun in Cider #4, 394 yd, 6oz. per Skein
Skeins: 4 (4, 5, 6, 7, 8, 9, 10)
NEEDLES
Addi US 11, 8.00 mm
Worked flat
NOTIONS
Stitch holder (scrap yarn)
Yarn Needle
GAUGE
(unblocked) yarn doubled
11 stitches x 18 rows = 4” in Garter Stitch
*Matching stitches per inch will get your width to match.
Body
Cast on 109 (121, 133, 143, 155, 167, 177, 187) sts
Row 1: (RS) (k1, p1) for the row, ends in a k1
Row 2: (p1, k1) for the row, ends in p1
Row 3-8: Repeat rows 1+2 in rib pattern
NEXT: (RS) knit all rows working in Garter Stitch, until the total length is 16” from CO edge to the last row worked, or until desired length to underarm is reached.
Last row worked is a WS row, do not cut yarn
Right Front Panel
Separation of front sides and back panel- See Diagram on pg 7
Row 1: (RS) K26 (29, 32, 35, 38, 41, 43, 46), place the remaining stitches on a holder, we will work those later - 26 (29, 32, 35, 38, 41, 43, 46) sts
Row 2: (WS) Bind off 4 sts for the underarm, knit the row - 22 (25, 28, 31, 34, 37, 39, 42) sts
Row 3-12 (16, 16, 20, 20, 24, 24, 30): Knit
Row 13 (17, 17, 21, 21, 25, 25, 31): (RS) Bind off 8 sts for the collar, knit the row - 14 (17, 20, 23, 26, 29, 31, 34) sts (See diagram on pg 7)
NEXT: Knit all rows until the total Underarm to Shoulder section measures 5 (6, 6, 7, 7, 8, 8, 9)”, 22 (26, 26, 30, 30, 34, 34, 40) rows total. Rows will have some stretch when worn.
On a RS row, bind off in knit
Cut yarn and weave in ends
Back Panel
With the RS facing, place the next 57 (63, 69, 73, 79, 85, 91, 95) sts onto your working needle from the stitch holder.
Slip them purlwise to avoid twisting the stitches.
Row 1: (RS) Bind off 4 sts, knit the row - 53 (59, 65, 69, 75, 81, 87, 91) sts
Row 2: (WS) Bind off 4 sts, knit the row - 49 (55, 61, 65, 71, 77, 83, 87) sts
Back Panel Continued…
Knit all remaining rows until the Underarm to Shoulder measurement is reached, a total of 22 (26, 26, 30, 30, 34, 34, 40) rows.
On a RS row, bind off in knit
Cut yarn and weave in ends
Left Front Panel
Working the last stitches left on your holder
With RS facing, place the last 26 (29, 32, 35, 38, 41, 43, 46) sts onto your working needle from the stitch holder.
Row 1: (RS) Bind off 4 sts for the underarm, knit the row - 22 (25, 28, 31, 34, 37, 39, 42) sts
Row 2-11 (15, 15, 19, 19, 23, 23, 29): Knit
Row 12 (16, 16, 20, 20, 24, 24, 30): Bind off 8 sts for the Collar, knit the row - 14 (17, 20, 23, 26, 29, 31, 34) sts
NEXT: Knit all remaining rows until the Underarm to Shoulder measurement is reached, a total of 22 (26, 26, 30, 30, 34, 34, 40) rows.
On a RS row, bind off in knit
Cut yarn and weave in ends
Seaming the Shoulders
Lay the garment flat, RS facing you. Fold the side panels in on top of the back panel so the WS is now facing you.
Seam the shoulders together using a Whip Stitch. Seam top of right panel to back panel, seam top of left panel to back panel.
Sleeves
With RS facing you, beginning in the center of the underarm, pick up stitches along the sleeve opening: 39 (39, 45, 45, 47, 51, 57, 63) sts. Sleeves are worked flat.
Row 1: (WS) knit
Row 2-5: Knit
Row 6: K1, k2tog, knit the row - 38 (38, 44, 44, 46, 50, 56, 62) sts
Row 7-11: Knit
Row 12: Knit till last 3 sts, k2tog, k1 - 37 (37, 43, 43, 45, 49, 55, 61) sts
The decrease alternates sides to keep the sleeve seam centered once sewn up.
Row 13-55: Repeat Rows 1-12 until you reach the total rows needed. Ends 1 knit row after a dec Row 6 repeat. Final count is:
30 (30, 36, 36, 38, 42, 48, 54) sts
For additional length, add knit rows before starting your cuff
CUFF, Row 56
XS-2X ONLY (RS) (k1, k2tog) for the row (XL ONLY ends in a k2) - 20 (20, 24, 24, 26, 28, X, X) sts
3X ONLY (RS) *K4, (k2tog, 10 times) repeat after * for the row - (28 sts)
4X ONLY (RS) *K5, (k2tog, 11 times) repeat after * for the row - (32 sts)
CUFF RIBBING
Row 57-67: (K1, p1) for the row
(RS) Bind off in pattern (k1, p1)
Cut yarn leaving a tail twice the length of the sleeve, Mattress Stitch up the sleeve
Weave in all ends
Collar
Step 1: (RS) Using DPNs or a circular cord, pick up sts all along the collar (see diagram on PDF). Starting at the left lapel, all blue arrows are a 1 for 1 stitch pick up, the red arrows along the row endings, pick up 6 sts for each section or adjust as needed per your gauge.
Row 1: (WS) (k1, p1) for the row
Row 2-7: Knit the knits, purl the purls in a 1x1 rib
(RS) Bind off in pattern
Cut yarn and weave in ends
Pocket (all sizes)
Cast On 20 sts
Row 1-18: (K1, p1) for the row
Bind off in pattern
Cut yarn leaving a 20” tail to sew the pocket on.
I attached my pocket on the right, inside, of my cardigan. When you sew your pocket down, make sure the sts don’t show on the right side.