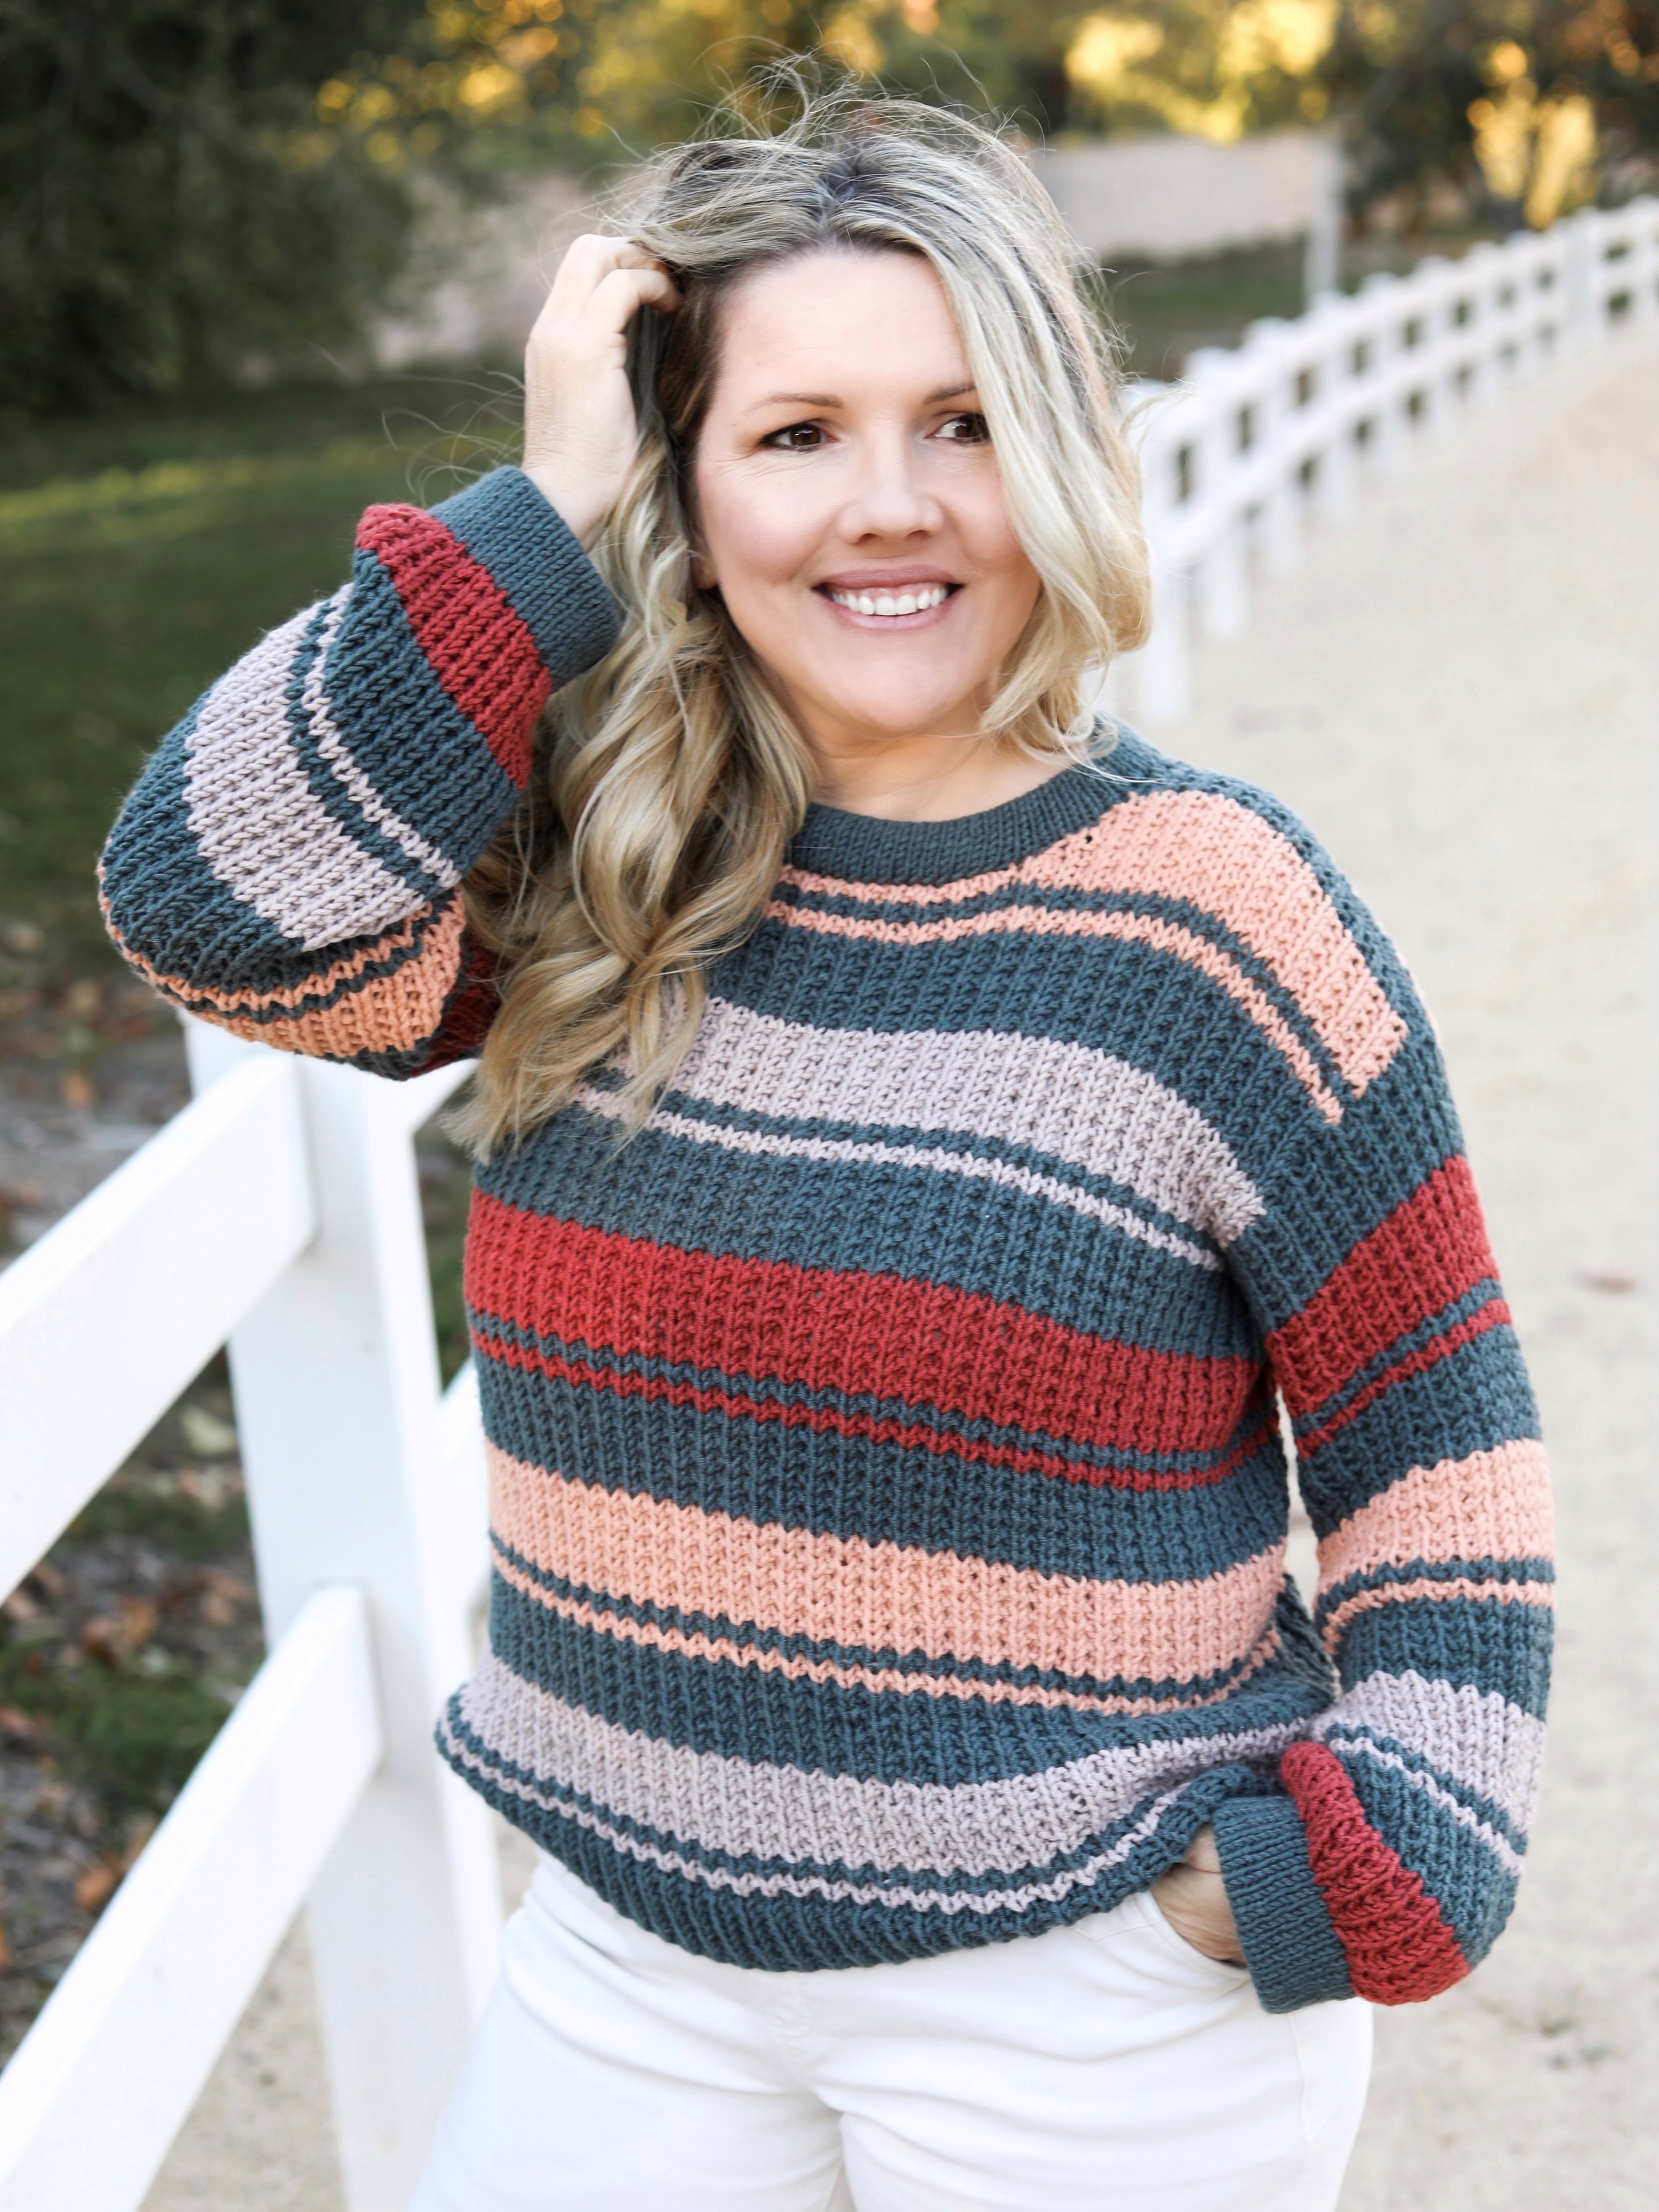
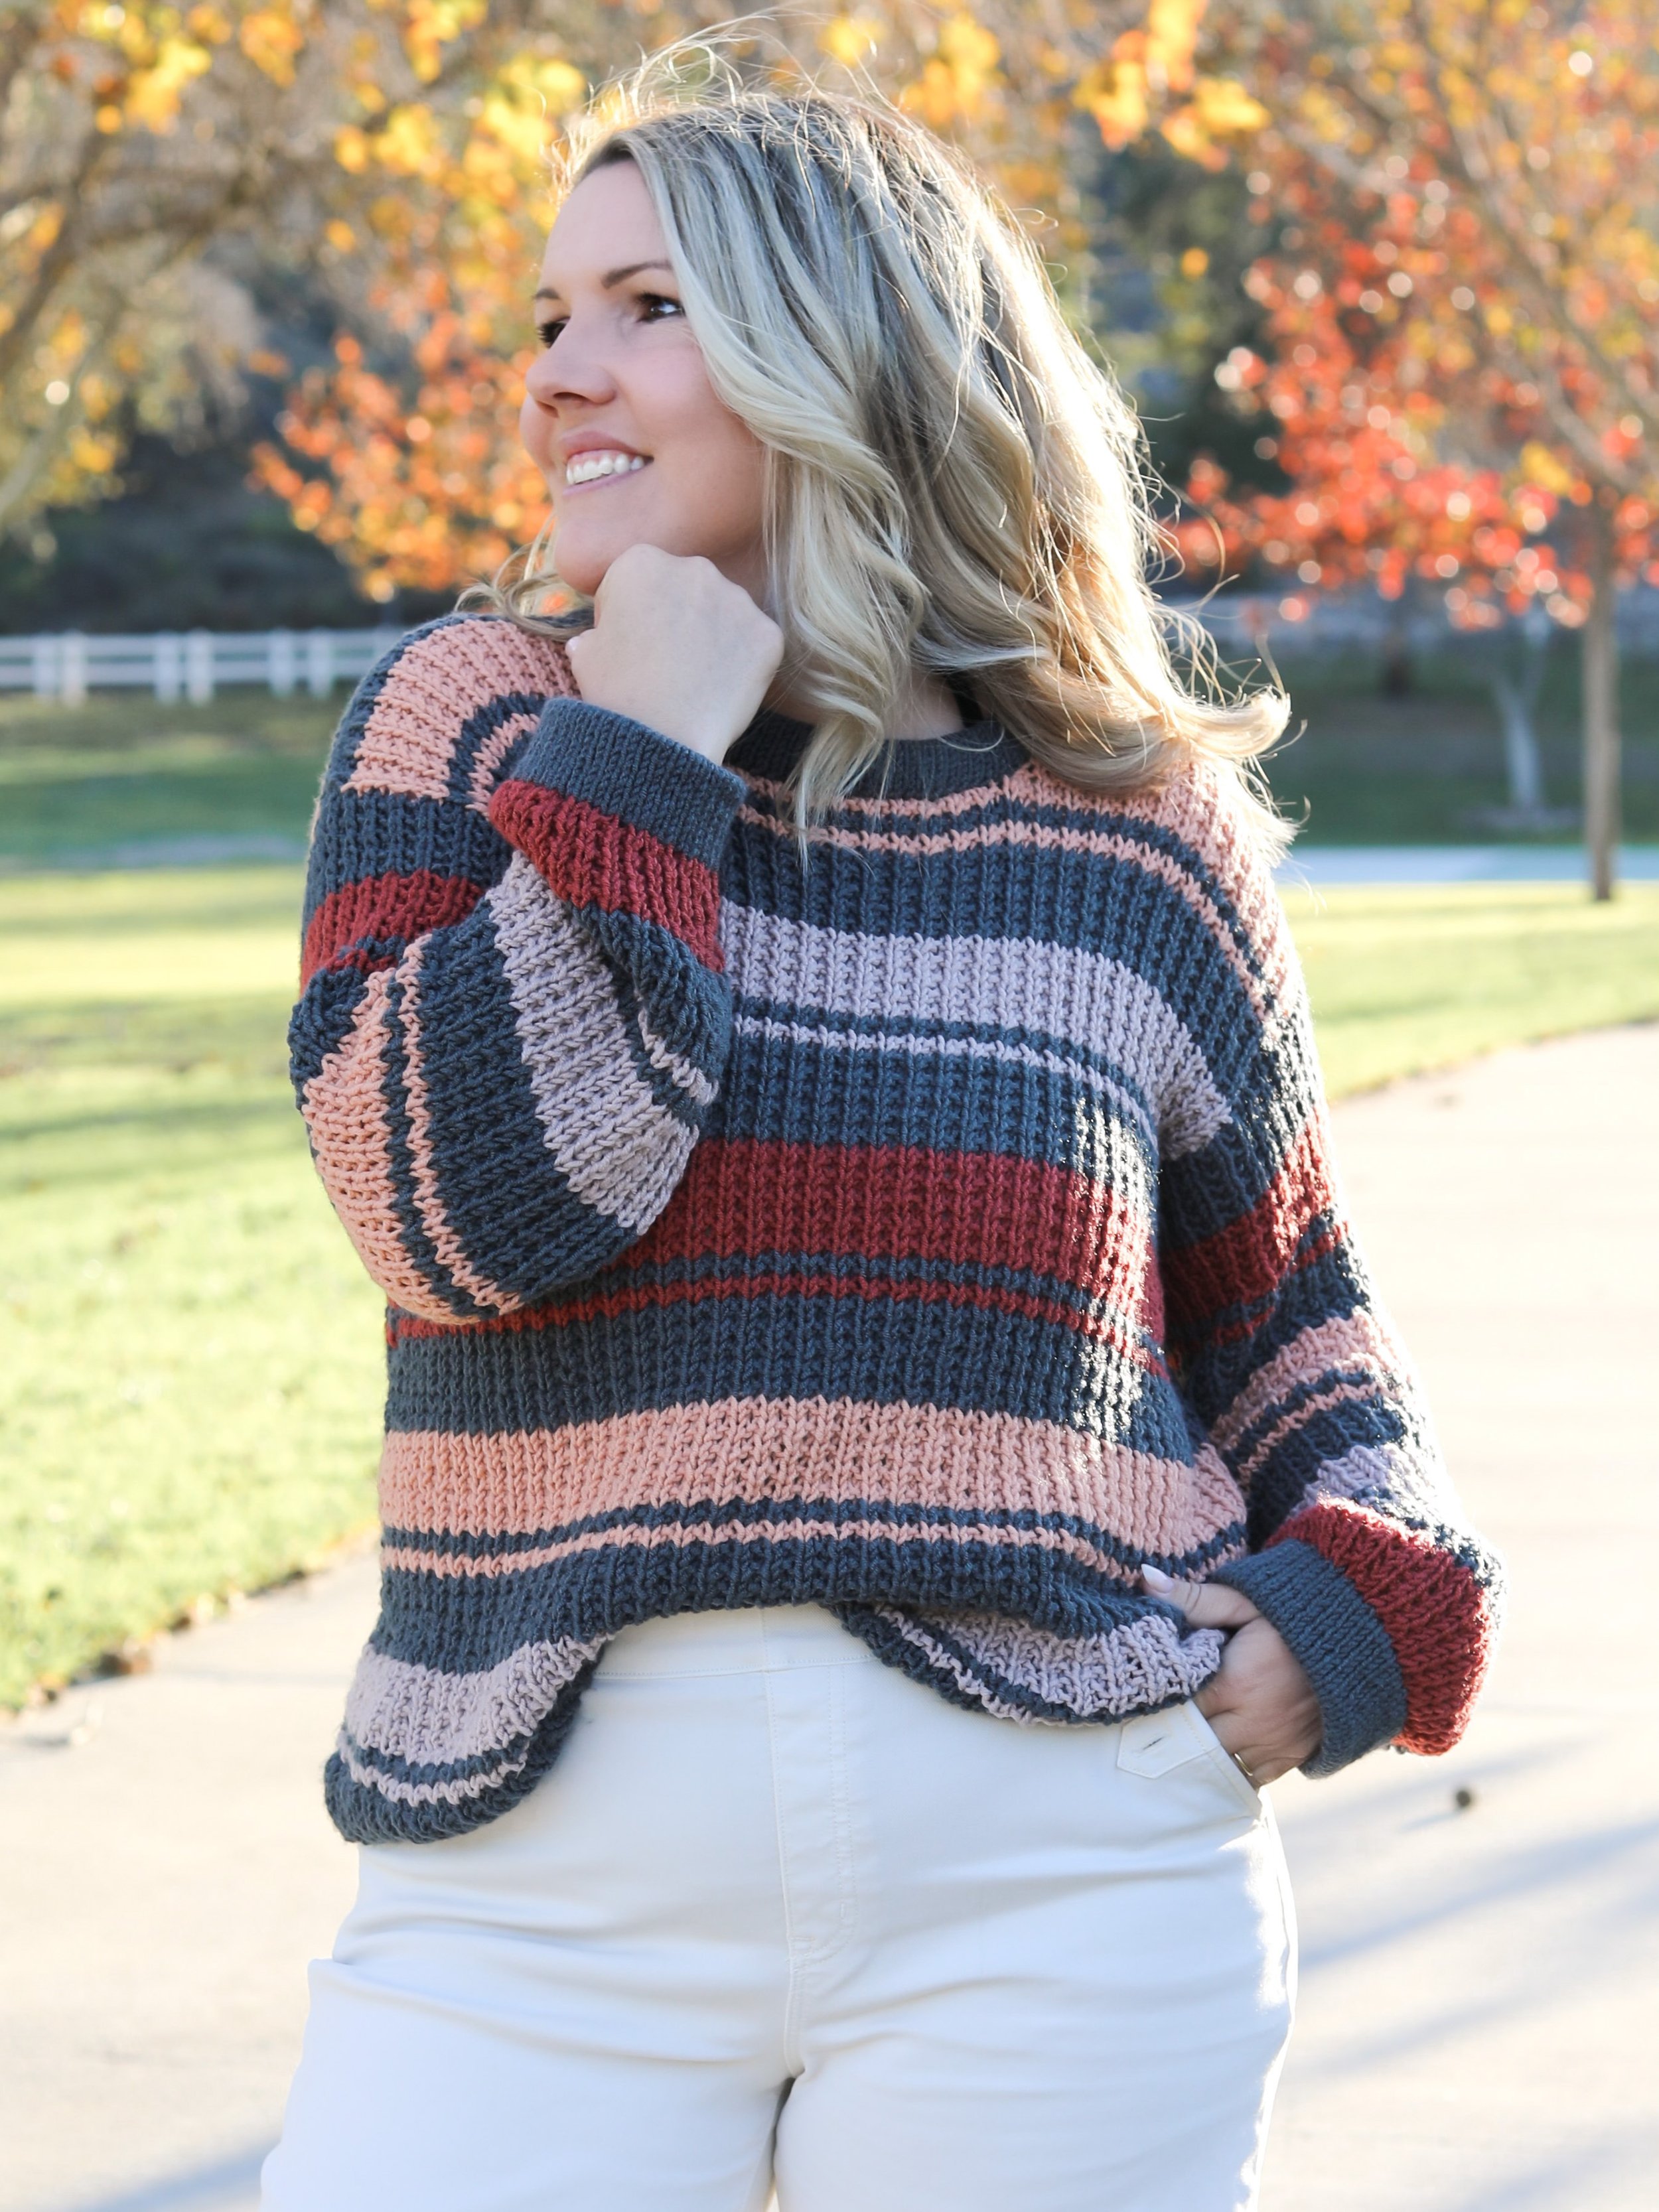
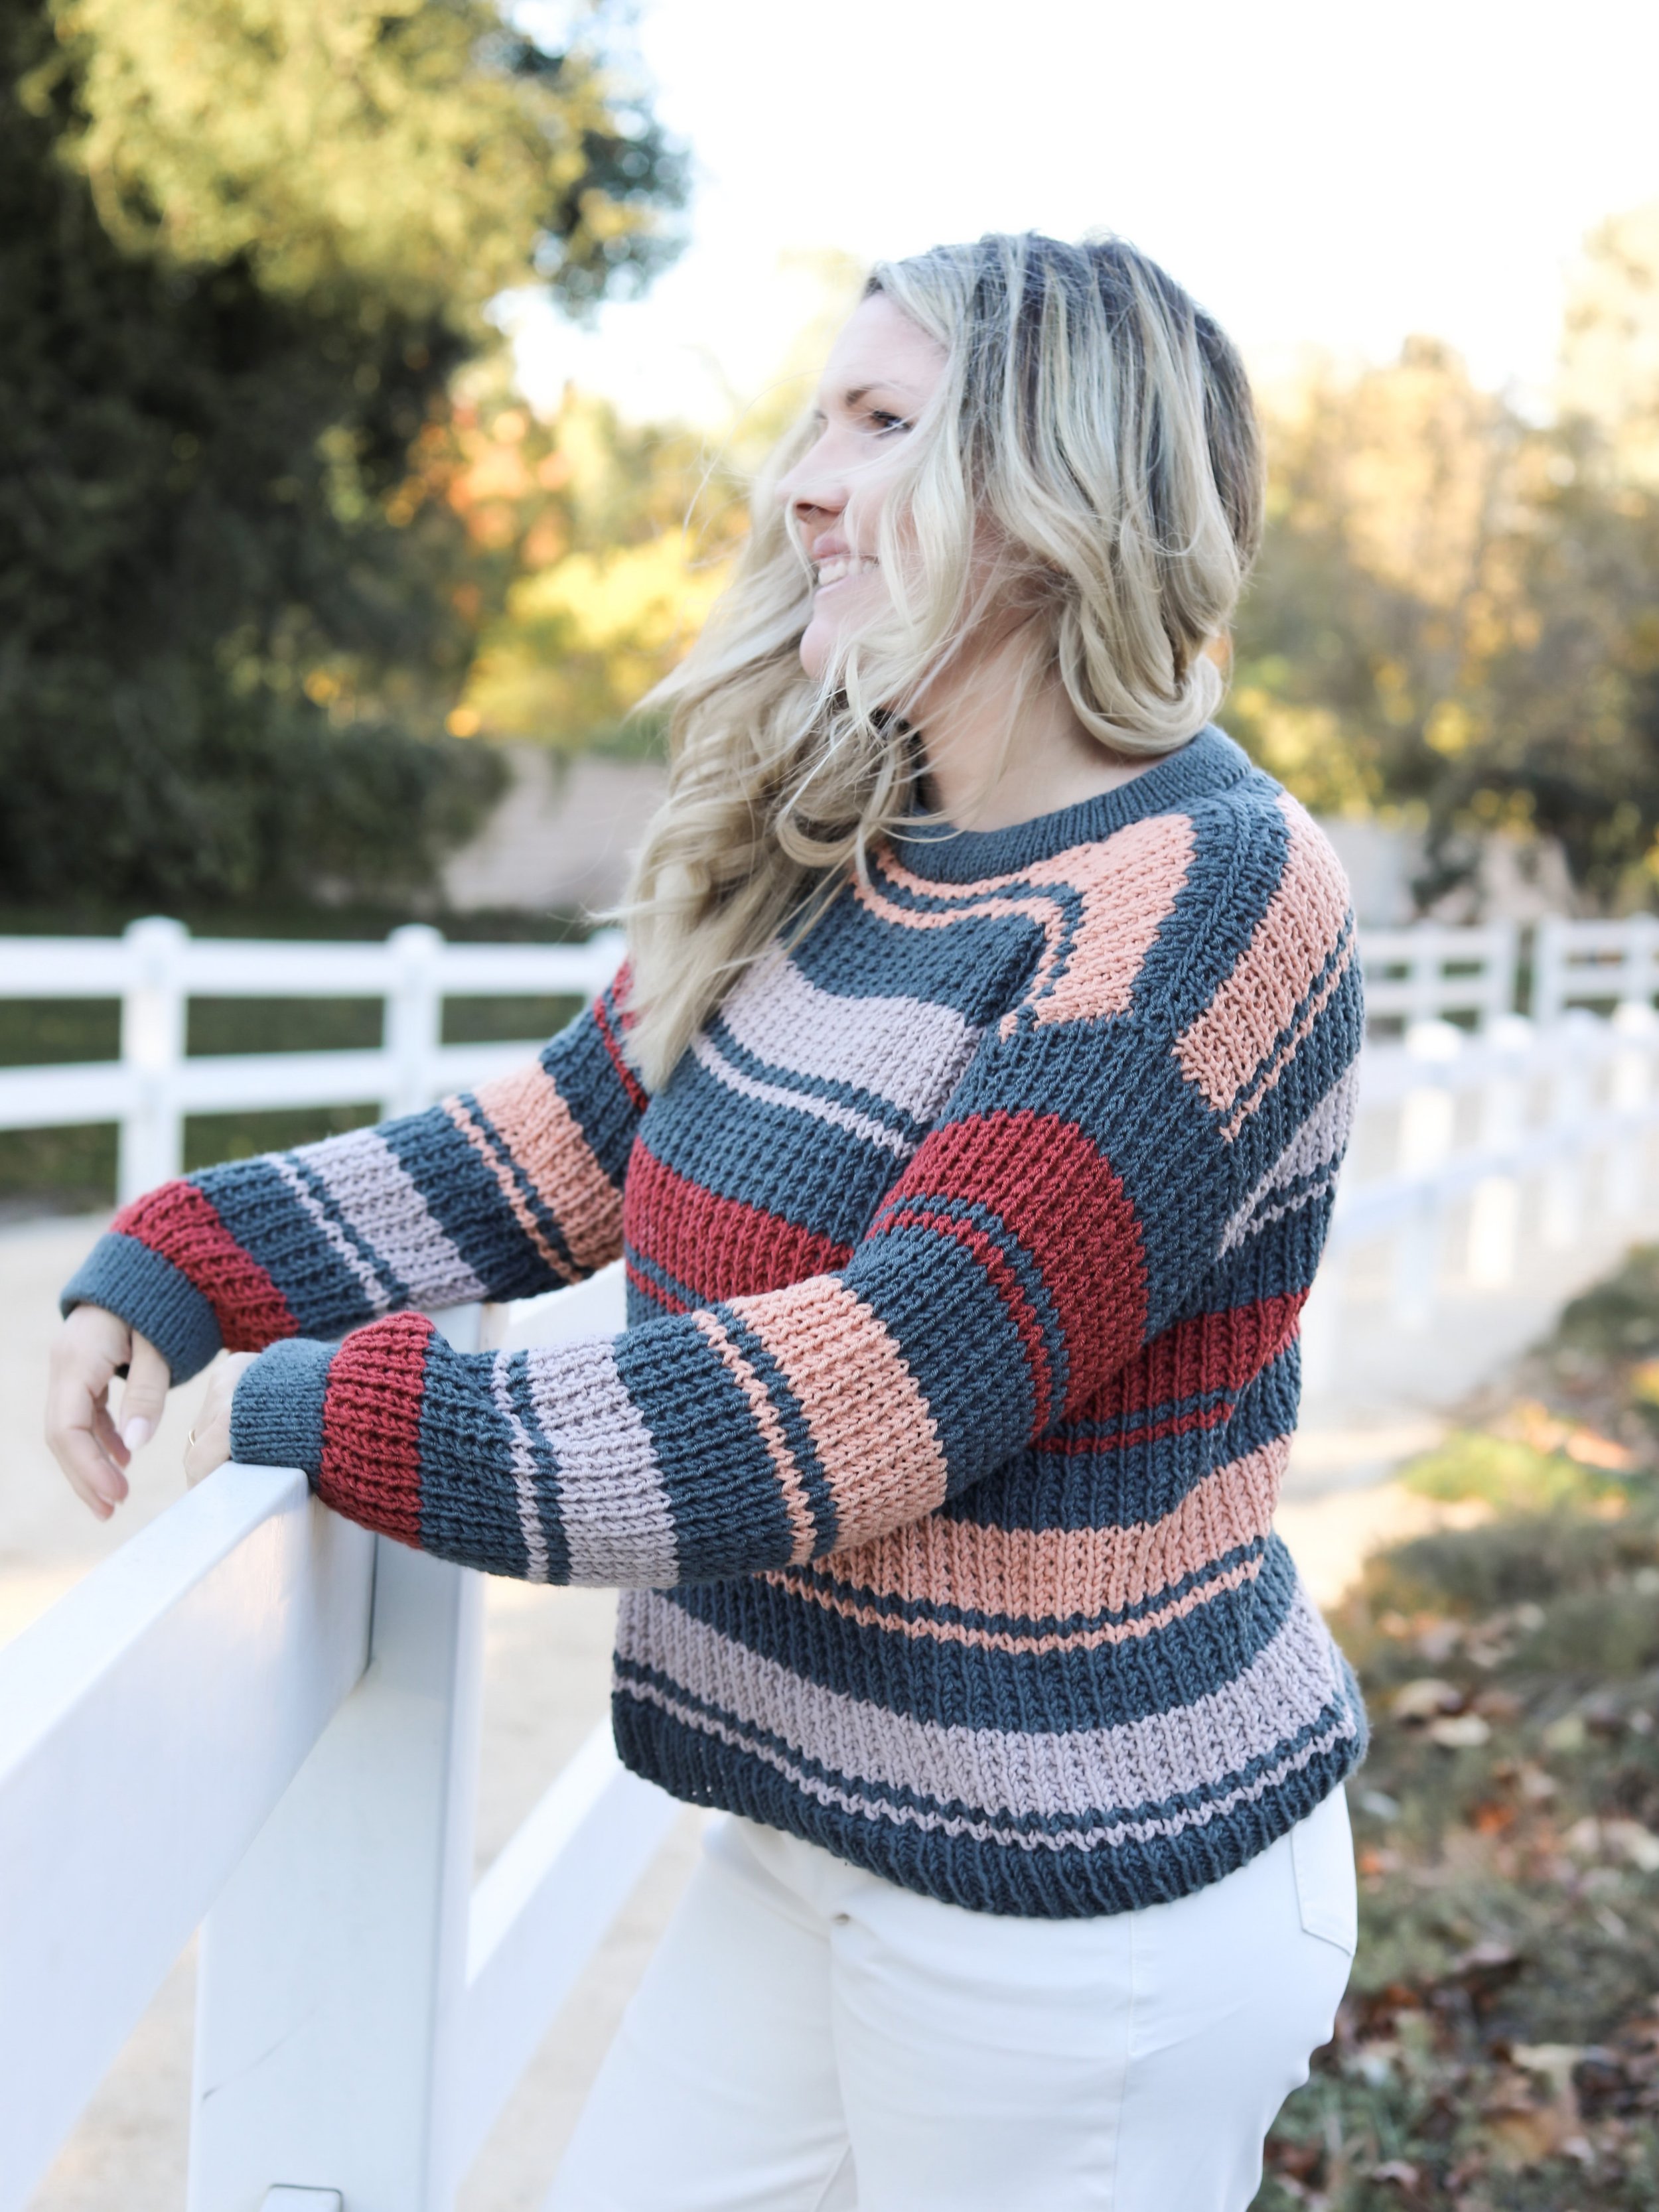
Cinnastripe Sweater

Available as a kit, PDF and FREE on the blog!
A bit of inspo behind the name:
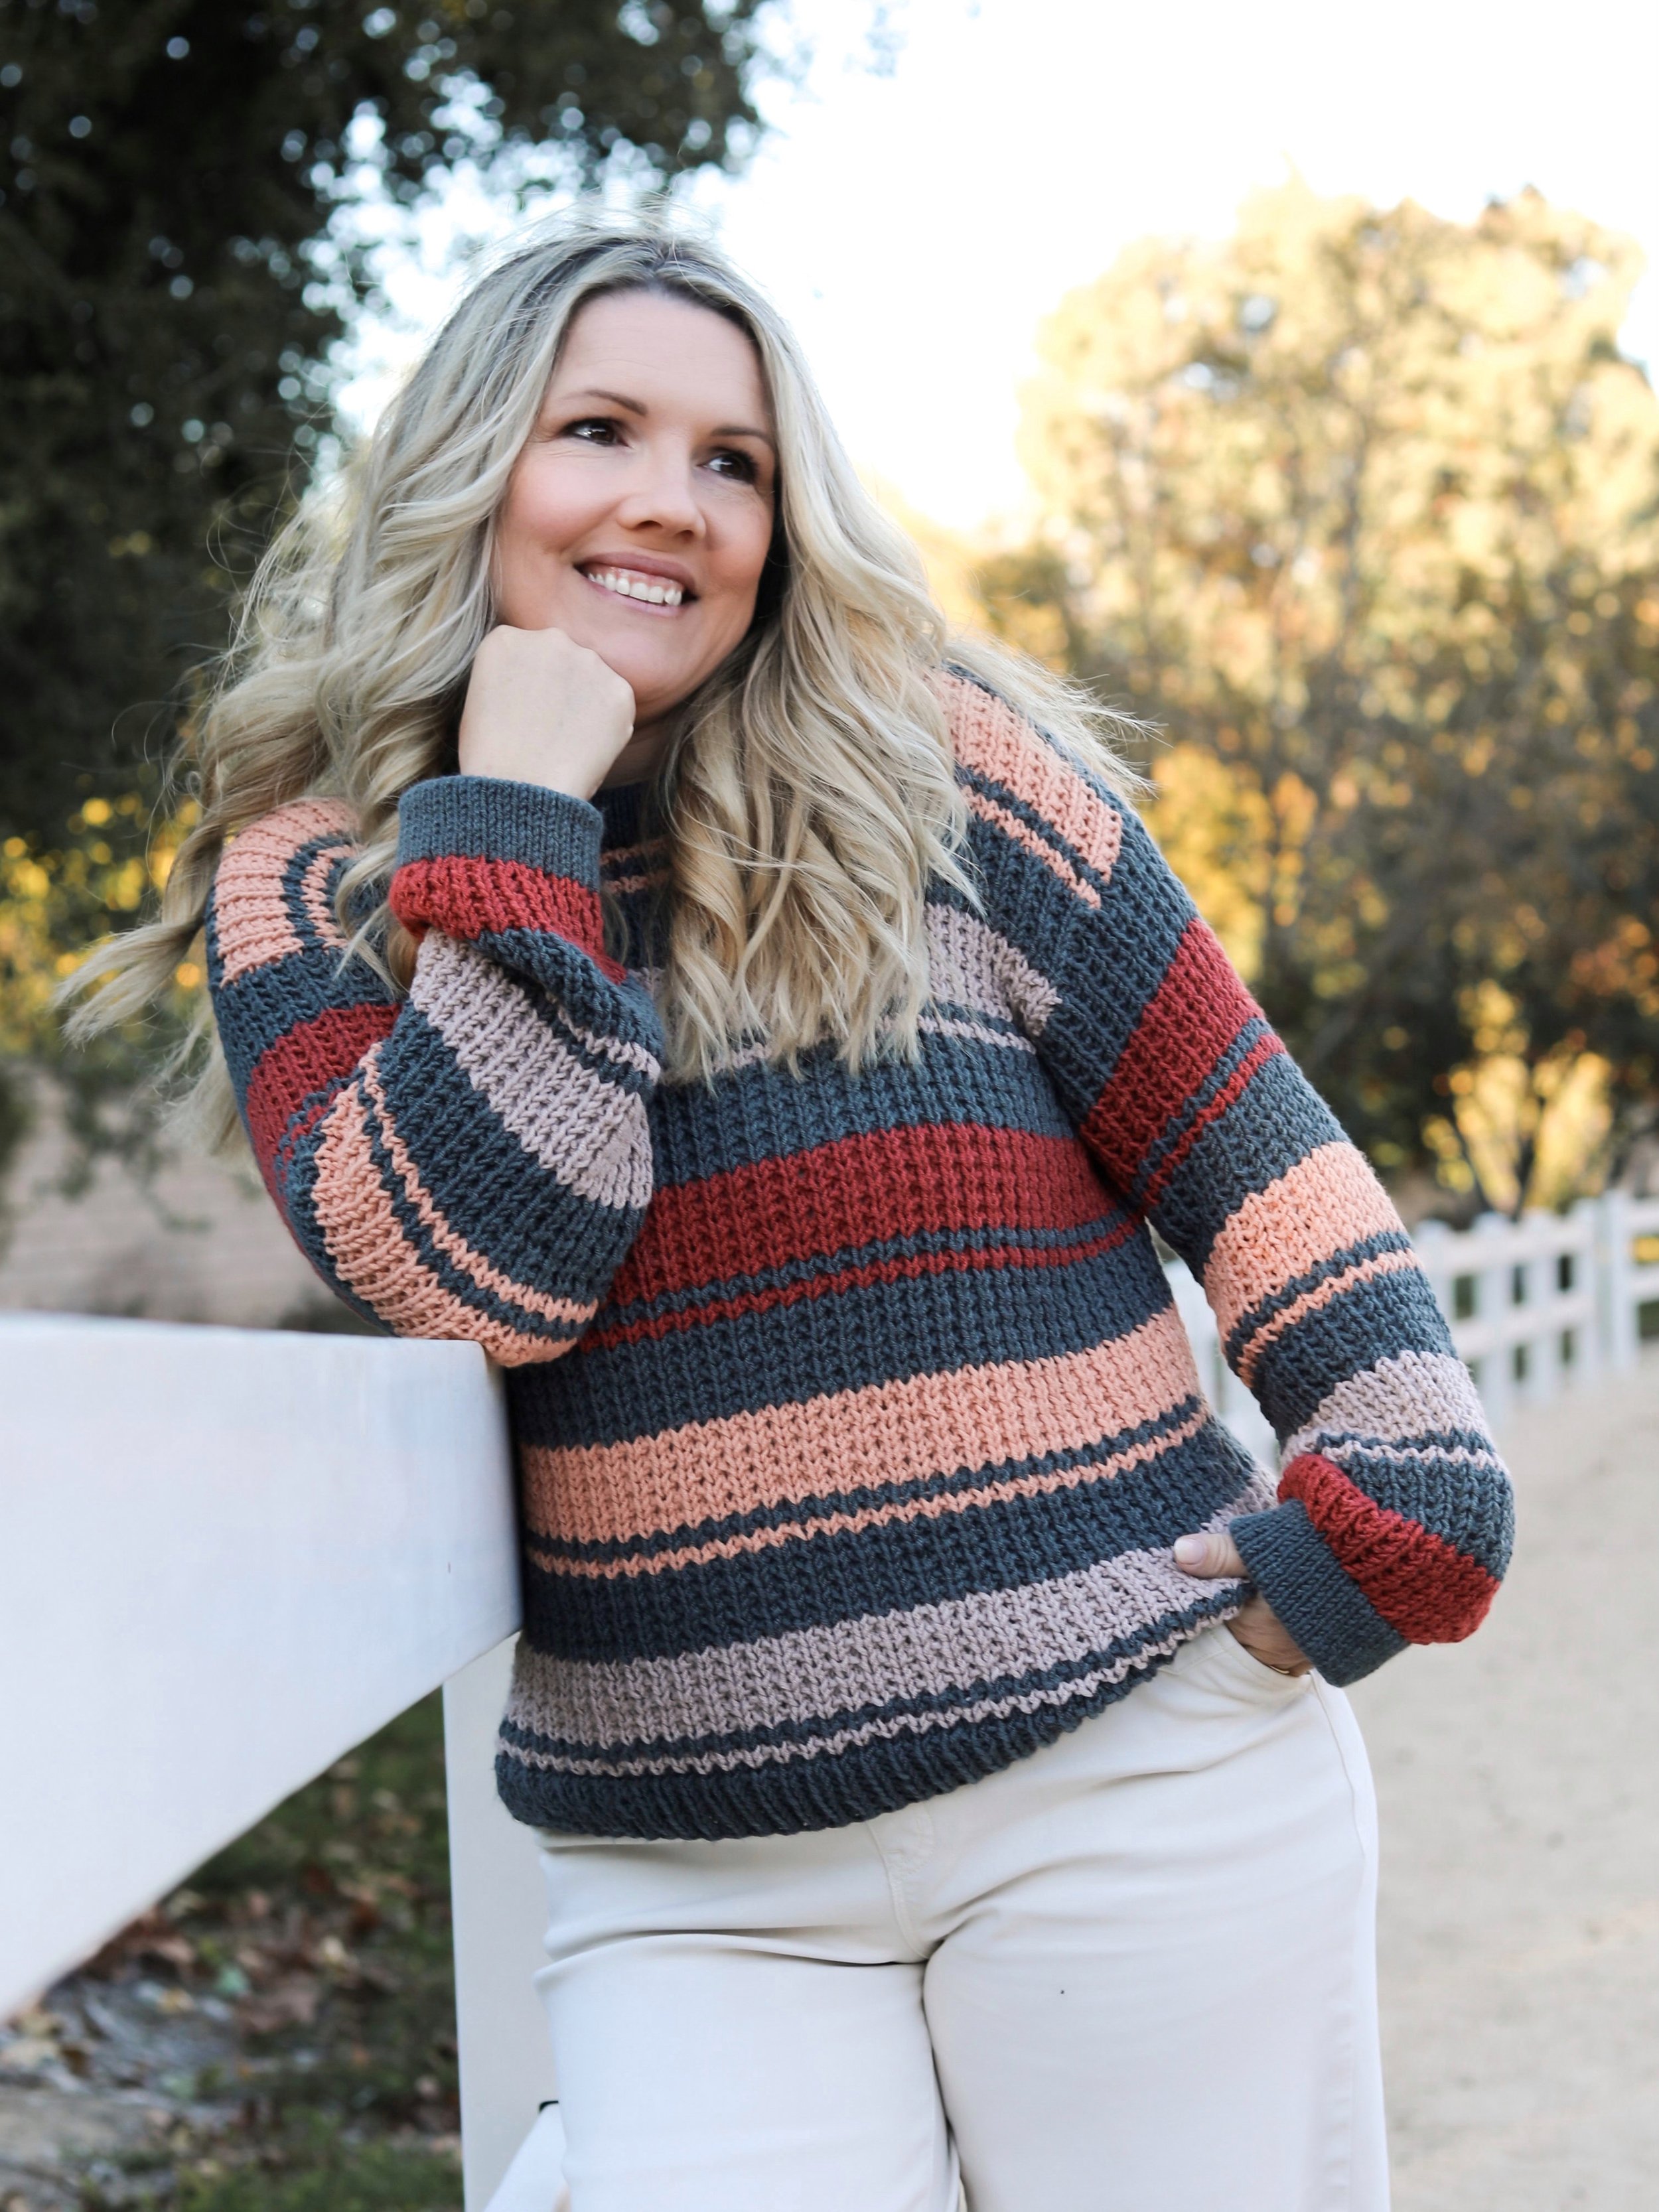
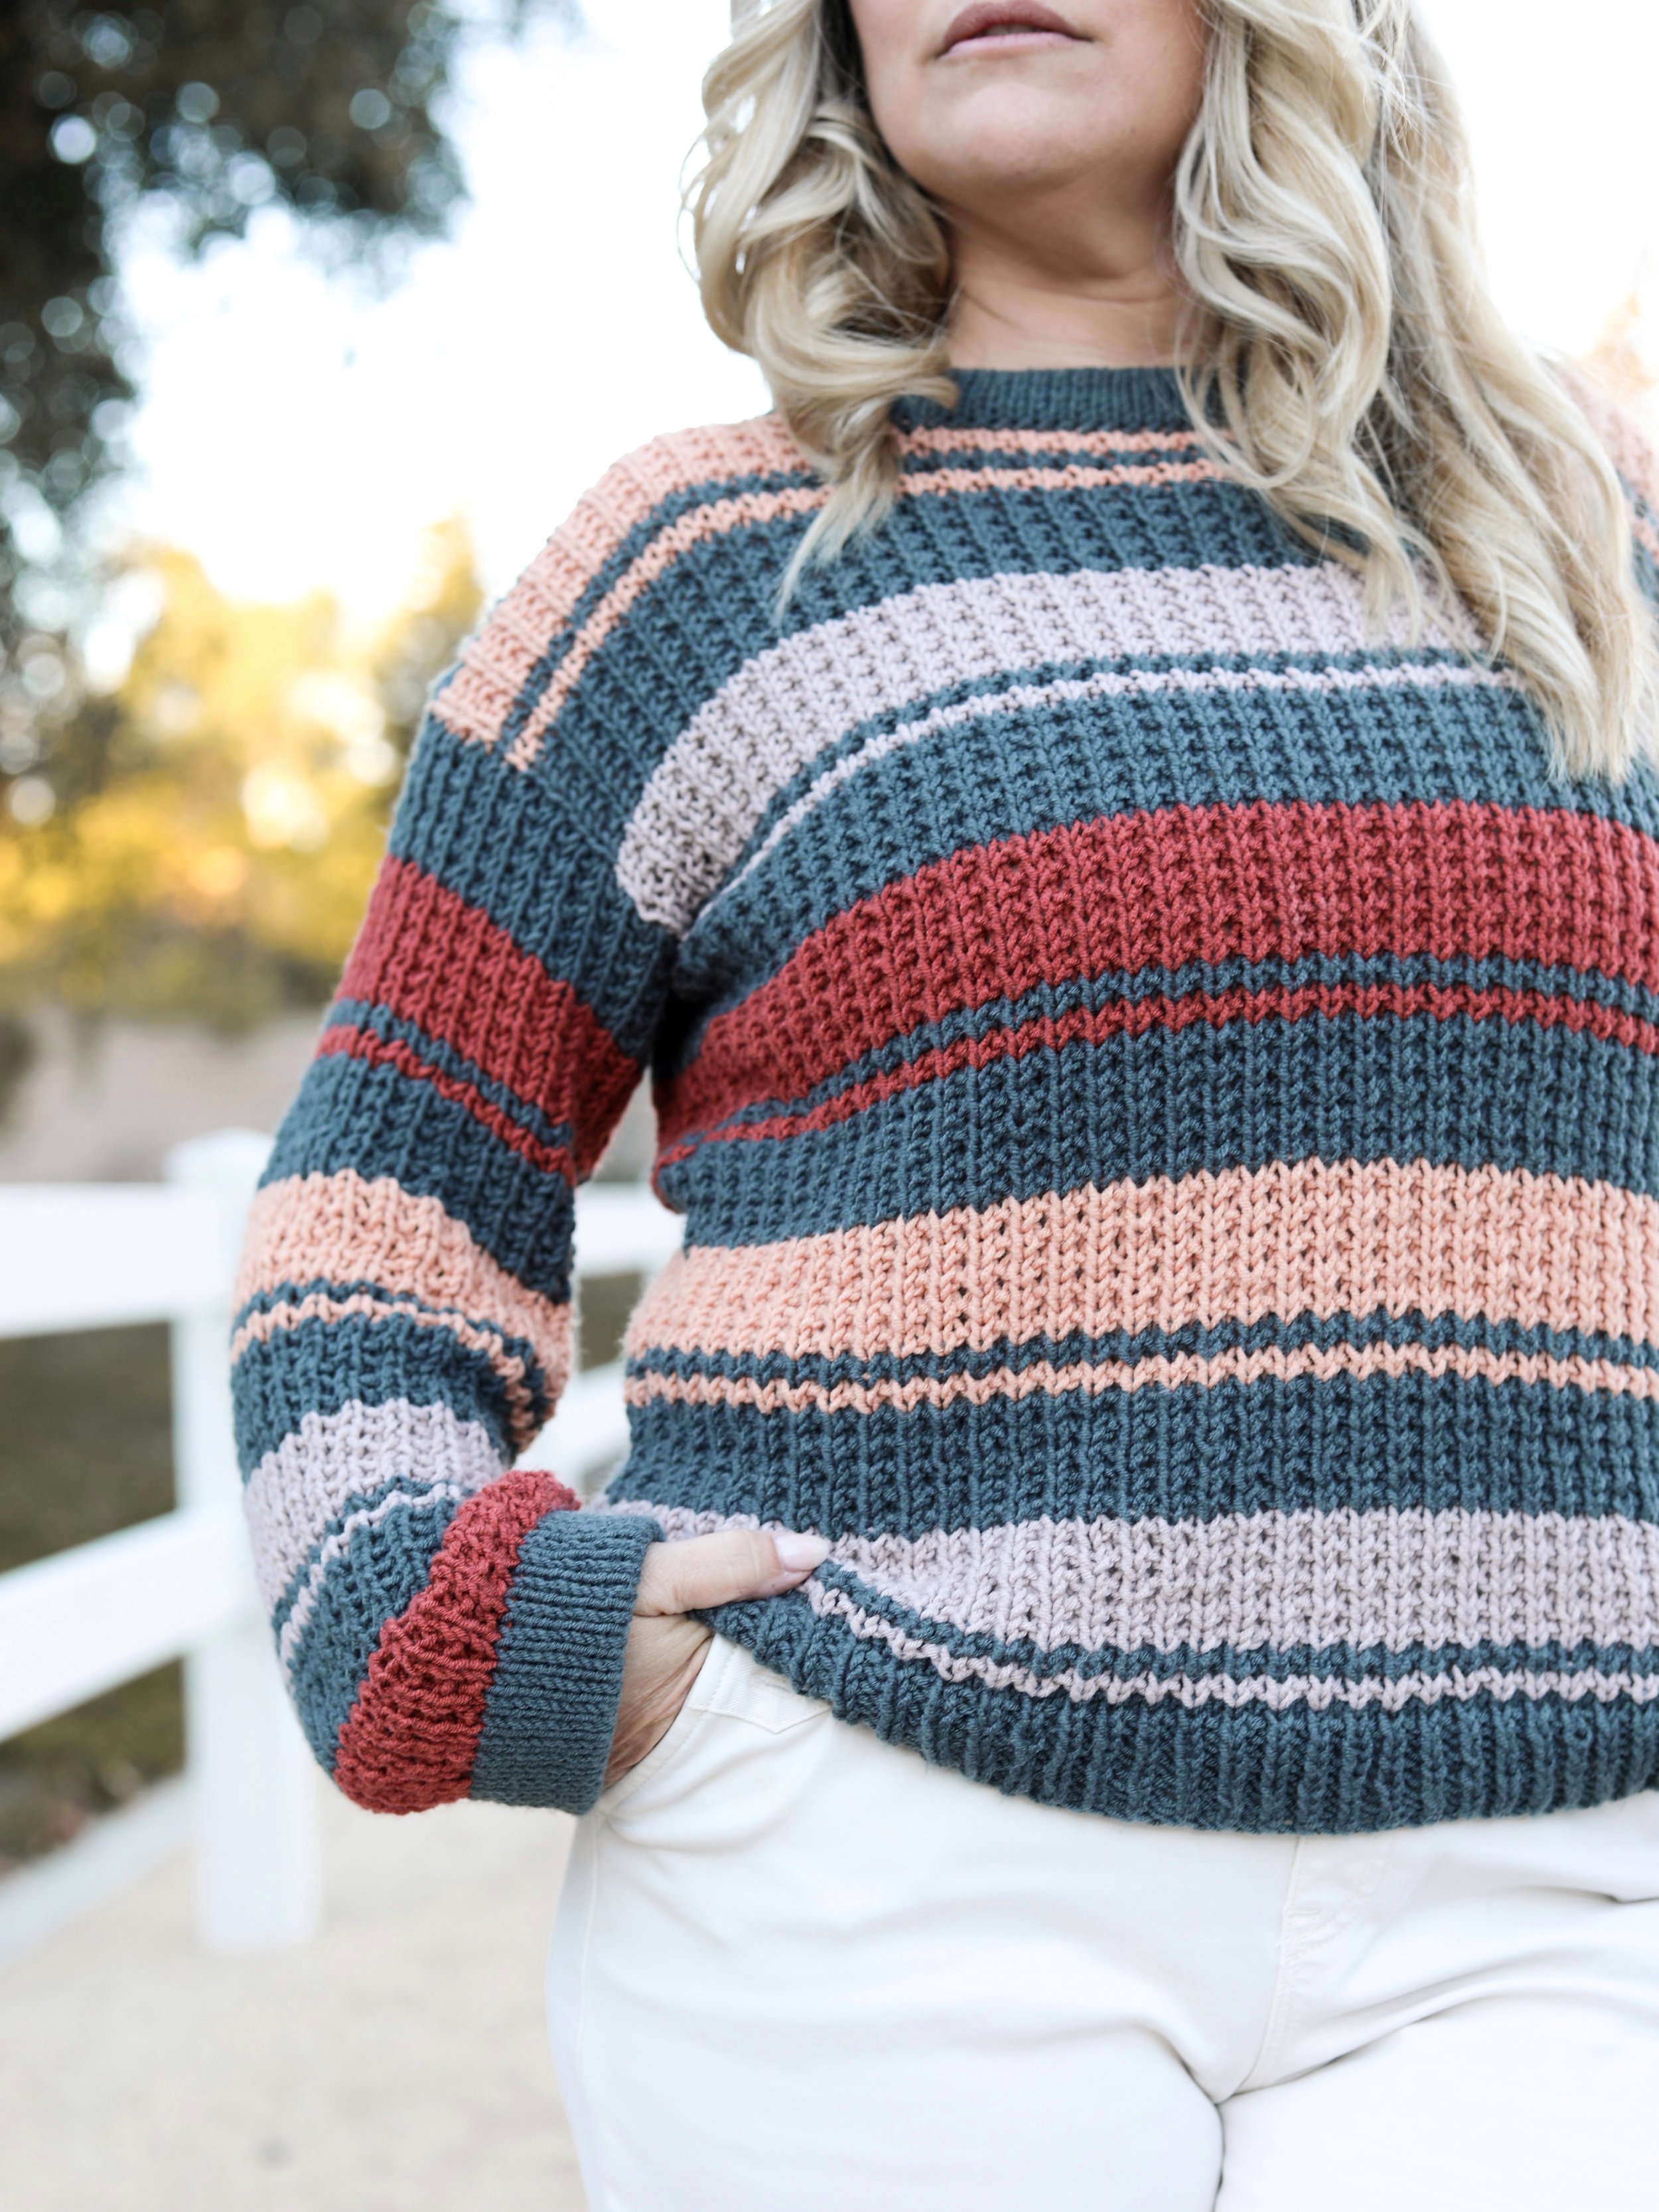
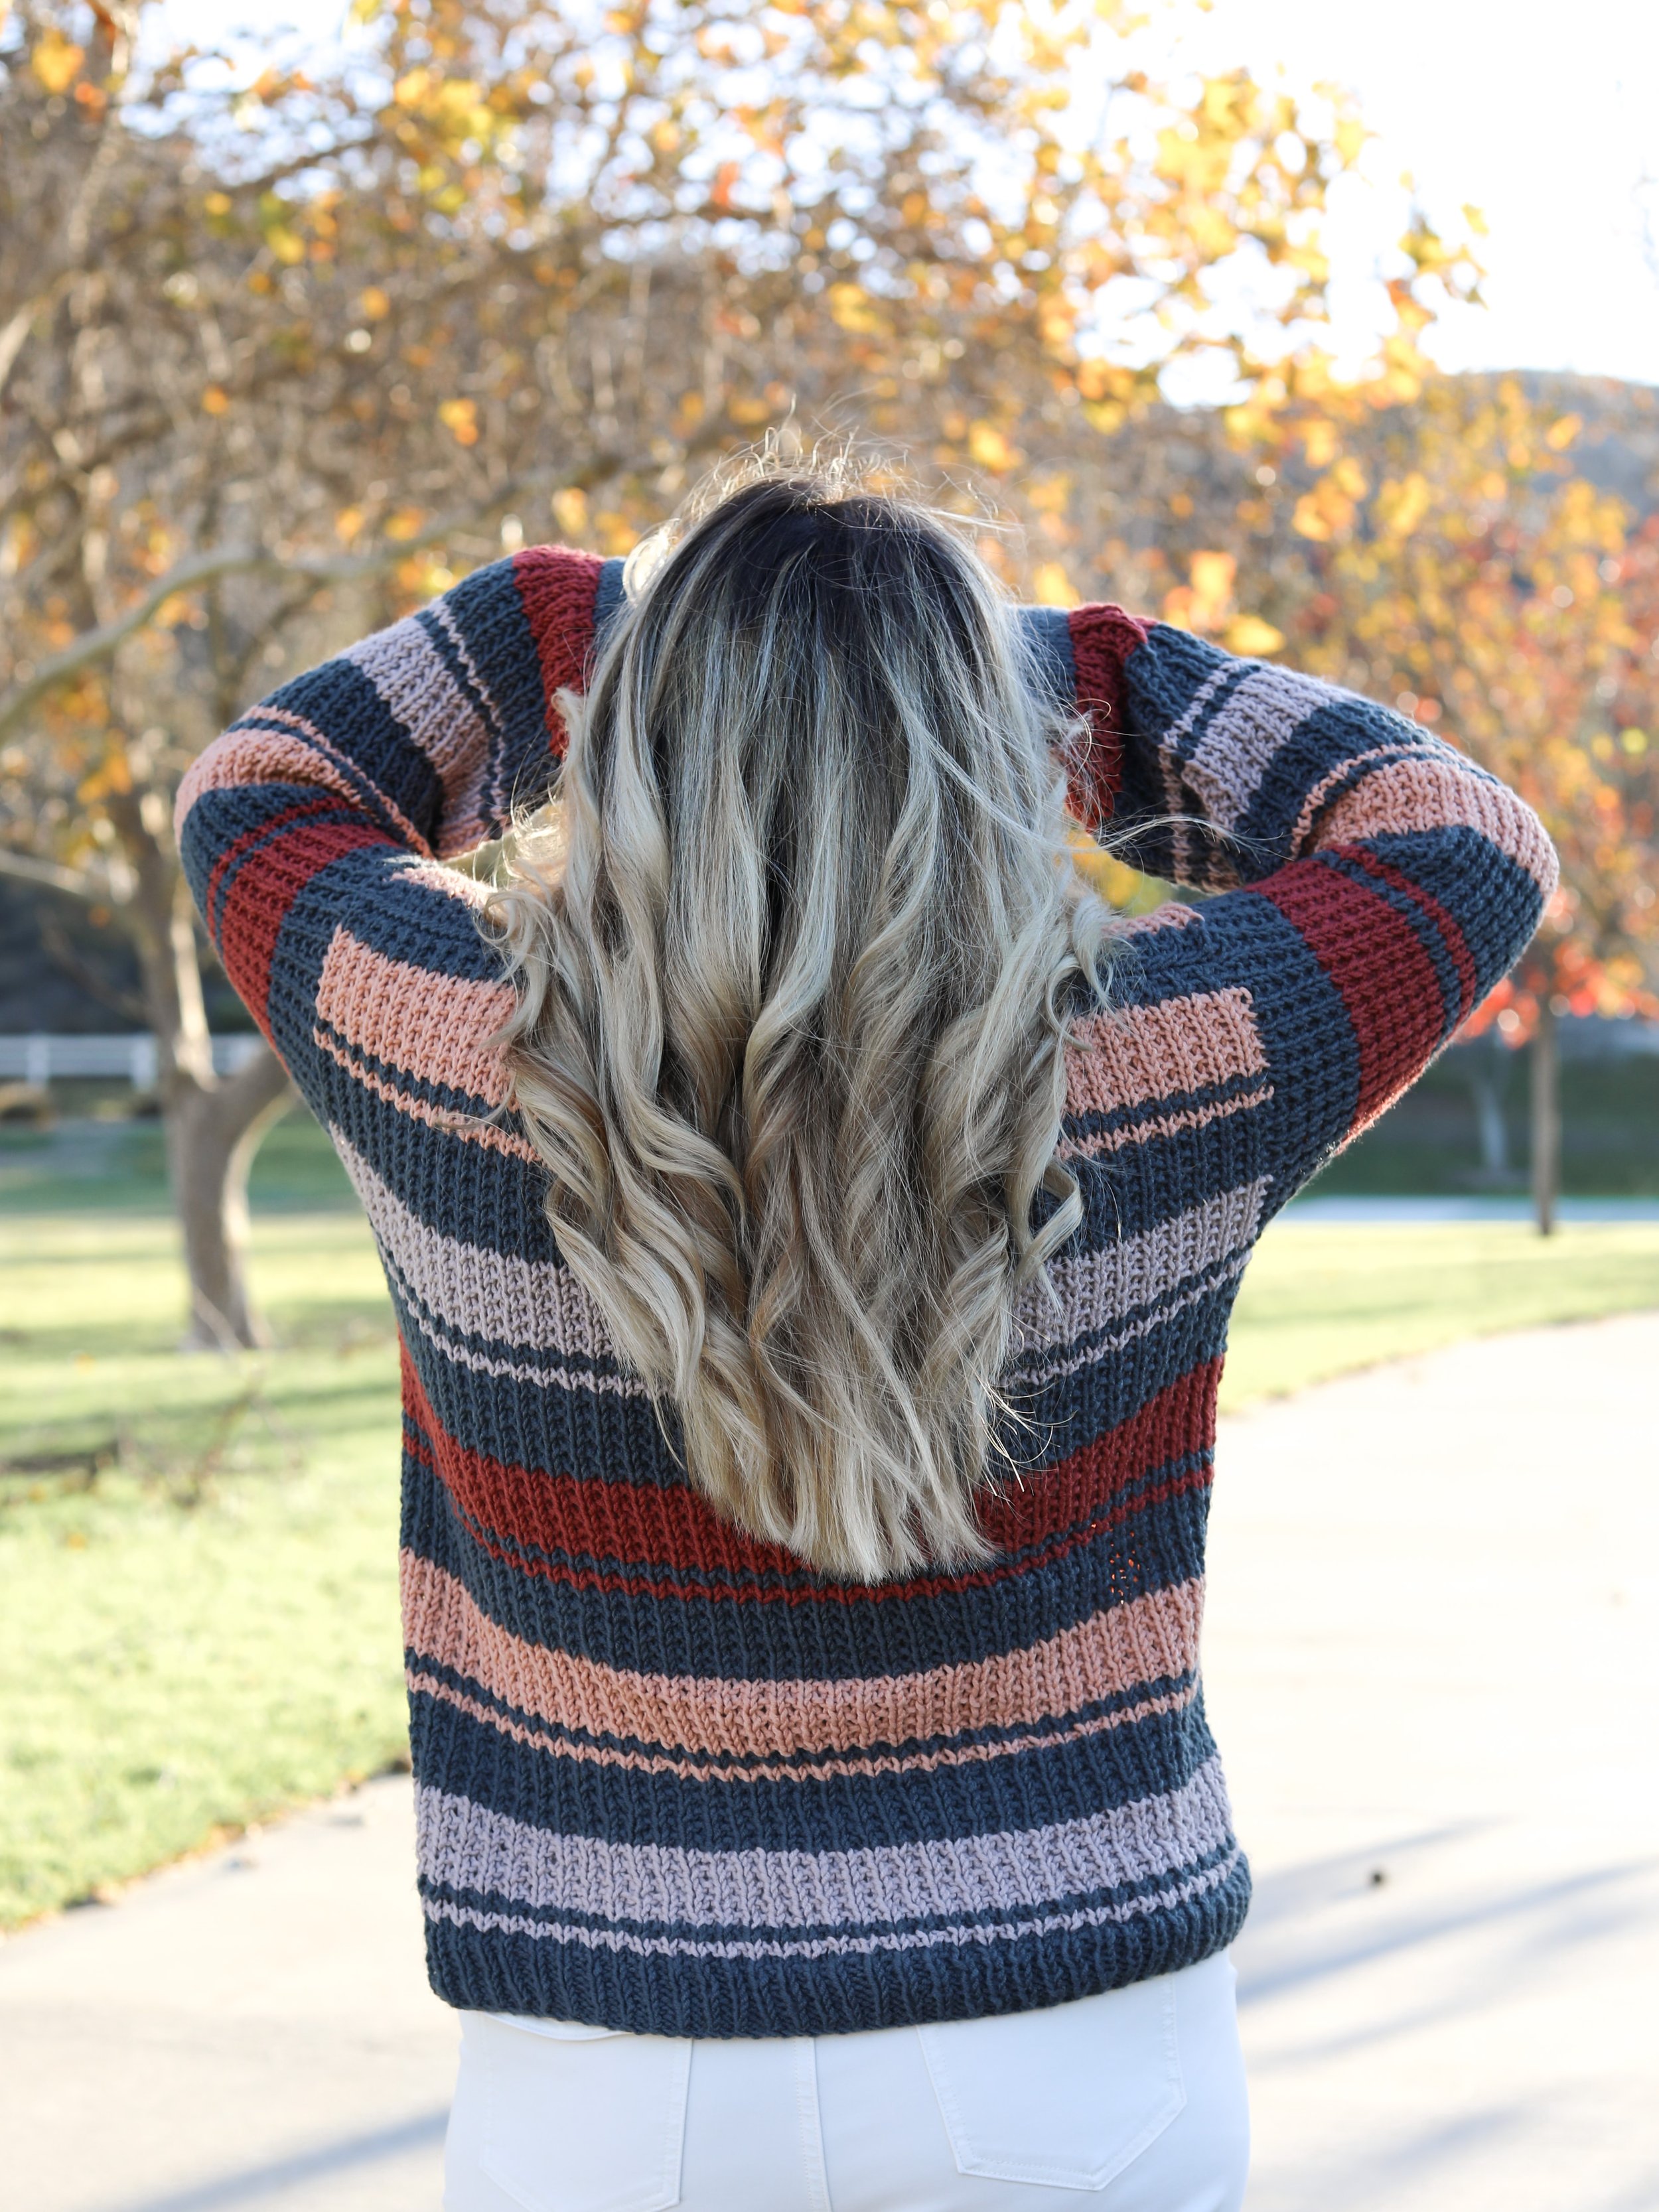
Like most of us, I get excited for Fall as the end of summer looms. I love the blend of cool and warm temps my local fall has and this colorway selection definitely came from me trying to find the perfect blend of colors for both. Cool and warm tones striped together to create a calming palette all its own. I loved how the center stripe, a lovely warm toned red, was reminiscent of some of my favorite fall spices, (mainly cinnamon, lol). I love the comfort and warmth I get when I eat something sweet and cinnamon flavored! It all starts with my love for Fall!
A blend of cool and warm tones add to the Fall love vibe of this comfy sweater. Made in a soothing Broken Rib texture with a folded collar and cuff detailing, that are a joy to work up! My newest knit design is available in sizes XS-5X, has a slightly fitted shape with a 2” postive ease, and has the loveliest rolled cuff and collar to bring it all together.
I’m so excited to announce this design is available as a kit via Lion Brand Yarn! I love when I can offer you a kit on a design because this kit comes with so many benefits. First, the pattern is included free, and secondly, you can change up the colorways to really customize yours or you can have the colors I used already selected so you can match me :)
I also wanted to say thank you so much for any of my designs you may have or will purchase as a kit! Your support means so much to me and every kit you get makes me able to keep collabing with LB which I hold so dear! I have loved using their yarns for over 30 years and the love continues with this newest line, Color Theory. This yarn has such a velvety softness to it! It’s more of a thin worsted, so size US8-9 needles work perfectly with it and it’s such a quick knit still. The softness adds an incredible drape that I think parallels some of the more expensive yarns. This one has easy care instructions with it, and it’s definitely a top fave of mine. I find it amazing they were able to combine so much awesomness into one yarn! I have crocheted and knit with it in different designs and it’s awesome with both. I know some yarns work with both, some better knit some better crocheted, but this one does double duty! I crocheted my Cirrus Wrap with this yarn and the drape it had was like no other, it actually still rivaled the knit which usually knit gets a soft drape all its own, this can only be attributed to this versatile yarn.
Right now the yarn is only available online, so the kit is a great way to get it on sale if you want to try it!
YARN SUBS?? You betcha! I’d say any thin worsted would sub in brilliantly! If you have a stash of partial skeins and want to work up some striped magic with it, this could be the perfect project for it!
Get the kit!
Pick your own color stripe inspo and receive the digital PDF free!
CONSTRUCTION: This one has a fun mix of my fave construction options. First, I love knitting in the round. There’s something relaxing about straight knit rows if you ask me. Second, when I finish the body I don’t have seams, same goes for the sleeves!
So, here’s how this one worked up! It’s perfect for beginners looking to learn a few more skills, and for any advanced knitter looking to make a sweater with subtle shaping and techniques to keep you interested all while adding that soothing memorizable pattern that always has a way of lulling any daily anxiety away! I often listen to my favorite shows while working and I love a knit that can sneak right in there. I have also been known to multi-task and knit while my kiddos play at the park and I love how a knit can work up yet I’m fully in a conversation or chatting with my kiddos and not losing my place! If you haven’t guessed those are my kinda makes!

The body is worked in the round, bottom up. Once you reach the underarm portion, you’ll work a decrease to reduce any bulk for a nicer fit and from there the front and back are worked flat. The front has a simple neck shaping to add to the comfy crew cut style. From there the sleeve stitches are picked up and worked in the round until you reach a cuff shaping, and then it’s a smooth knitting in the round sesh until you cuff them. From there the neck gets picked up and knit to mirror the cuffed edging of the sleeves.
A quick to make comfy and silky sweater! Perfect to cozy up in!

I hope you love this new design! I also have this available as a printable PDF to work on at your leisure and keep! You can shop my Ravelry or Etsy, whichever store front you prefer!

Get the printable version


Happy knitting! It’s quick and easy to make and most importantly COZY!
PATTERN
METHOD
Knitting
DIFFICULTY
Advanced Beginner
SIZES
XS (S, M, L, XL)(2X, 3X, 4X, 5X)
DESCRIPTION
A blend of cool and warm tones add to the Fall love vibe of this comfy sweater. Made in a soothing Broken Rib texture with a folded collar and cuff detailing, that are a joy to work up!
YARN
Lionbrand, Color Theory, #4 weight, 246 yds, 3.5 oz
Skeins needed:
A - Thunder: 3 (3, 3, 4, 4) (4, 5, 5, 6)
B - Bone: 1 (1, 1, 1, 2) (2, 2, 2, 2)
C - Himalayan Salt: 1 (1, 1, 1, 2) (2, 2, 2, 2)
D - Canyon: 1 (1, 1, 1, 2) (2, 2, 2, 2)
NEEDLES
Body: US 9 (5.5mm) circulars, use cords long enough for body sts
Sleeve Cuff/Collar: US 7 (4.5mm): 16” circulars, DPNs needed
NOTIONS
Stitch Markers, Yarn Needle
GAUGE
(blocked) US 9 Needle
18 sts x 24 rounds = 4”of Broken Rib (in pattern) in the round
*Matching stitches per inch will get your width to match
Thank you so much for your shop support! I hope you love it! Contact me for any help or questions you might have along the way.
**This Pattern is a copyright of Whistle and Wool© so you may not copy, alter, adjust, share, record, redistribute or resell my Pattern. No tutorials or any kind of demonstrations may be made using any information contained in my Pattern. I do not mind if you wish to sell a completed HANDMADE item and you are a small independently owned business, however, you do not have permission to use ANY of my photos. If you do sell a completed item, please list credit of the design belonging to me, Whistle and Wool and a link to my shop. www.WhistleandWool.etsy.com
NOTES:
Worked in the round until the underarm measurement, then the front and back panels are worked flat, separately.
Sleeve stitches are picked up and worked in the round. Use DPNs or Magic Loop method.
I carried my yarn up as I went in the striping work. Once I finished an A, B, C, D - 10 Round/Row- color block, I would cut my yarn between each one, since carrying the yarn up was a big distance.
For the body striping up to the underarm measurement, each size would end either right at the end of a 10 row stripe, at the end of a 2 row stripe, or 2 rows into a 10 row stripe. Add or remove length as needed and yours will still have the same colorful vibe as the sample, stripes may just slightly vary due to height and sizes.
The Collar and Sleeve Cuffs are worked using a smaller needle size, cuffed over and sewn along the starting row on the inside.
Tip: Picking up stitches for the sleeves: take how many stitches you need, divide by half and work half on the front, half on the back side. If you have an odd number you can place it on the under arm side to fill in any gaps.
Count how many rows make up the sleeve depth and then you can figure out if you need to skip a row at times, do that evenly. For example, pick up 4, skip 1 row, or work a ⅓, then skip 1, etc.
GAUGE:
**Please check your gauge before you start this Pattern to match the finished measurements:
It’s best to make your swatch slightly bigger than what the pattern states it should measure, so you can measure it in the center of your square, getting an accurate reading. You can do this by adding 2 additional stitches and working 2 additional rows. Do not count the first and last stitch in your measurement or the first and last row.
Needle Size Suggestions:
If your swatch has less stitches, swatch again using a smaller needle.
If your swatch has more stitches, swatch again using a larger needle.
Finished measurements (in inches)
Chest: 0-2” positive ease, included in final numbers: 30 (34, 38, 42, 46)(50, 54, 58, 62)” Model is wearing a Medium and is 5’3”
Neck opening: 8.5” - 9” from XS-5X
Upper arm width: Positive 2” ease: 11.75 (12, 13, 14, 15.5)(17.5, 19, 20.5, 20.5)”
Arm Inseam: 17.5”, all sizes, adjust length as needed before cuff detailing
Bottom hem to Underarm: 14 (14, 14, 14.75, 14.75)(14.75, 15.75, 15.75, 16.5)” adjust as needed
Stitches to Know
CO - Cast On
k - Knit
k2tog - Knit two stitches together (decrease)
p - Purl
m - Marker
SSK - Slip 1 knitwise, slip 1 purlwise, k the two together from the right needles
sts - Stitch(es)
RS - Right side of the project
WS - Wrong side of the project
*When cutting your working yarn, leave a long enough tail so you can easily sew in your ends
PATTERN
Body
With larger needles
Cast on : Color A, 136 (152, 172, 188, 208) (224, 244, 260, 280) sts, place a marker, join in the round
Round 1-8: (k1, p1) in rib pattern for the round
Round 9: Knit
Color Chart
*2B, 2A, 10B, 10A, 2C, 2A, 10C, 10A, 2D, 2A, 10D, 10A, repeat after * for the color striping pattern for the body
New skein changes are worked on a knit round
Round 1: (RS) With Color B, knit (counts as first Round of Color Chart)
Round 2: Color B, (k1, p1) for the round
Round 3 -74 (74, 74, 78, 78) (78, 84, 84, 88): Continuing with the Color Chart throughout, repeat Rounds 1+2 in pattern (measures 14-16” from CO), or until desired length to underarm. Last round worked is a Round 2.
Back Panel Section
NEXT: Split sts in half for the front and back panels to be worked in rows, by placing a place a marker at the halfway point. - 68 (76, 86, 94, 104)(112, 122, 130, 140) sts
Row 1: (RS) Cast off 4 sts, knit till marker, place remaining sts on a holder - 64 (72, 82, 90, 100)(108, 118, 126, 136) sts
Row 2: (WS) Cast off 4 sts in pattern, p1, (k1, p1) for the remaining row - 60 (68, 78, 86, 96) (104, 114, 122, 132) sts
NEXT: Work in Broken Rib until the total Underarm to Shoulder measurement is: 36 (40, 42, 46, 48)( 52, 54, 58, 60) rows
Approx. 6 (6.5, 7, 7.5, 8)(8.5, 9, 9.5, 10)”
Last row worked is a WS (k1, p1) row
(RS) Cast off in knit. Cut yarn and weave in ends.
Front Body Panel
NEXT: Place your held sts onto your working needle.
Row 1: (RS) Cast off 4 sts, knit the row - 64 (72, 82, 90, 100)(108, 118, 126, 136) sts
Row 2: (WS) Cast off 4 sts in pattern, p1, (k1, p1) for the remaining row - 60 (68, 78, 86, 96) (104, 114, 122, 132) sts
Front Body Panel continued…
NEXT: Work in Broken Rib for 24 (28, 30, 34, 36)(40, 42, 46, 48) rows, (continuing Striping Pattern) 12 Rows fewer than the Back Panel. Continue to Neck Shaping.
Last row worked is a WS (k1, p1) row
Neck Shaping
Panel 1
Row 1: (RS) Knit 19 (23, 27, 31, 35, 39, 43, 47, 51) sts, cast off 22 (22, 24, 24, 26)(26, 28, 28, 30) sts, knit till the end
Place sts before the cast off on a holder.
See Diagram on pg 7 for how it works up (on printable PDF)
Row 2: (k1, p1) for the row till the last st, p1- 19 (23, 27, 31, 35)(39, 43, 47, 51) sts
Row 3: SSK, knit remaining row - 18 (22, 26, 30, 34)(38, 42, 46, 50) sts
Row 4: (k1, p1) till the last 2 sts, p2 (ending in a p2 creates a smoother finish by the collar)
Row 5: Repeat Row 3 - 17 (21, 25, 29, 33)(37, 41, 45, 49) sts
Row 6-12: Repeat Rows 2-5, (ending on a WS row) - 14 (18, 22, 26, 30)(34, 38, 42, 46) sts
(RS) Cast off in knit, cut yarn and weave in ends
Panel 2
Place sts from holder onto working needle, we’re starting on a purl row since we worked a Row 1 in knit already.
Row 2: p3, (k1, p1) for the row
Row 3: Knit till the last 2 sts, k2tog - 18 (22, 26, 30, 34)(38, 42, 46, 50) sts
Row 4: (k1, p1) for the row
Row 5: Knit till the last 2 sts, k2tog - 17 (21, 25, 29, 33)(37, 41, 45, 49) sts
Row 6-12: Repeat Rows 2-5, (ending on a WS row - 14 (18, 22, 26, 30)(34, 38, 42, 46) sts
(RS) Cast off in knit, cut yarn and weave in ends.
Seam the Shoulders together
Lay the garment down, inside out, WS facing you. With a piece of yarn approx. 3X the width of your shoulder, Whip Stitch, up your shoulder seams. Work from the outer edge in.
Weave in ends.
Sleeves - Repeat for both
Worked in the Round, 16” circulars, DPNs or magic loop method.
Color Striping: I started with mine with Color A, the last 10 row repeat before the panels split. Then I worked backwards in body Stripe order so the sleeve matches the body striping. Use this method if you added length and adjust your starting yarn to match your own color flow.
Color Chart: *10A, 10D, 2A, 2D, 10A, 10C, 2A, 2C, 10A, 10B, 2A, 2B, repeat after * for the round
New skein changes are worked on a knit round
RS facing you, beginning in the center of the underarm moving clockwise:
Pick up: Color A, 52 (54, 58, 64, 70)(80, 86, 92, 92) sts
Round 2: (k1, p1) for the round
Round 3: Knit
Round 4: (k1, p1) for the round
Continue Rounds 3+4 in broken rib for 16” (or until desired length to the cuff is reached).
Cuff adds 1.5” in length.
Switch to smaller needles
XS ONLY: K3, (k1, k2tog) till the last st, k1 - 36 sts
S ONLY: (k1, k2tog) for the round - 36 sts
M-L ONLY: (k1, k2tog) till the last st, k1 - 39 sts, 43 sts
XL ONLY: *K1, (k2tog) twice, repeat after * for the round - 42 sts
2X ONLY: K2tog till the last 4 sts, k4 - 42 sts
3X ONLY: K2tog till the last 2 sts, k2 - 44 sts
4-5X ONLY: K2tog for the round - 46 sts
Cuff
Round 1-20: Color A, Knit
Cast off in knit
Cut yarn, leaving a long tail, approx 18”
NEXT: (Printable PDF has small photo tutorial) Turn the sleeve inside out. Fold the cast off edge to Round 1. Pin in place. Stitch parallel stitches to each other, with a flexible tension, to seam the cuff down along the inside.
Weave in ends.
Collar Ribbing
Switch to smaller needle, use 16” circulars, Magic Loop or DPNS
Round 1: Color A, Beginning in the center back of the neck, pick up ½ the back collar stitches, 10 sts on the decreased neckline section, your 22 (22, 24, 24, 26)(26, 28, 28, 30) casted off sts in the front, 10st on the decreased section again, then the remaining ½ back stitches. Place a BOR M, join in the round.
- 74 (74, 78, 78, 82)(82, 86, 86, 90) sts
Round 2-15: Knit
Cast off in knit. Cut yarn leaving a tail approx 3X your neck circumference to seam the fold over collar.
Next: To mimic the sleeve cuffs we will work a folded over collar, Fold the cast off edge to Round 1. Pin in place. Stitch with a flexible tension parallel stitches to each other to seam the collar down.
If you seam this too tight it will remove any stretch to your neckline.
Weave in ends.
Voila! You’re done! Block your Garment!