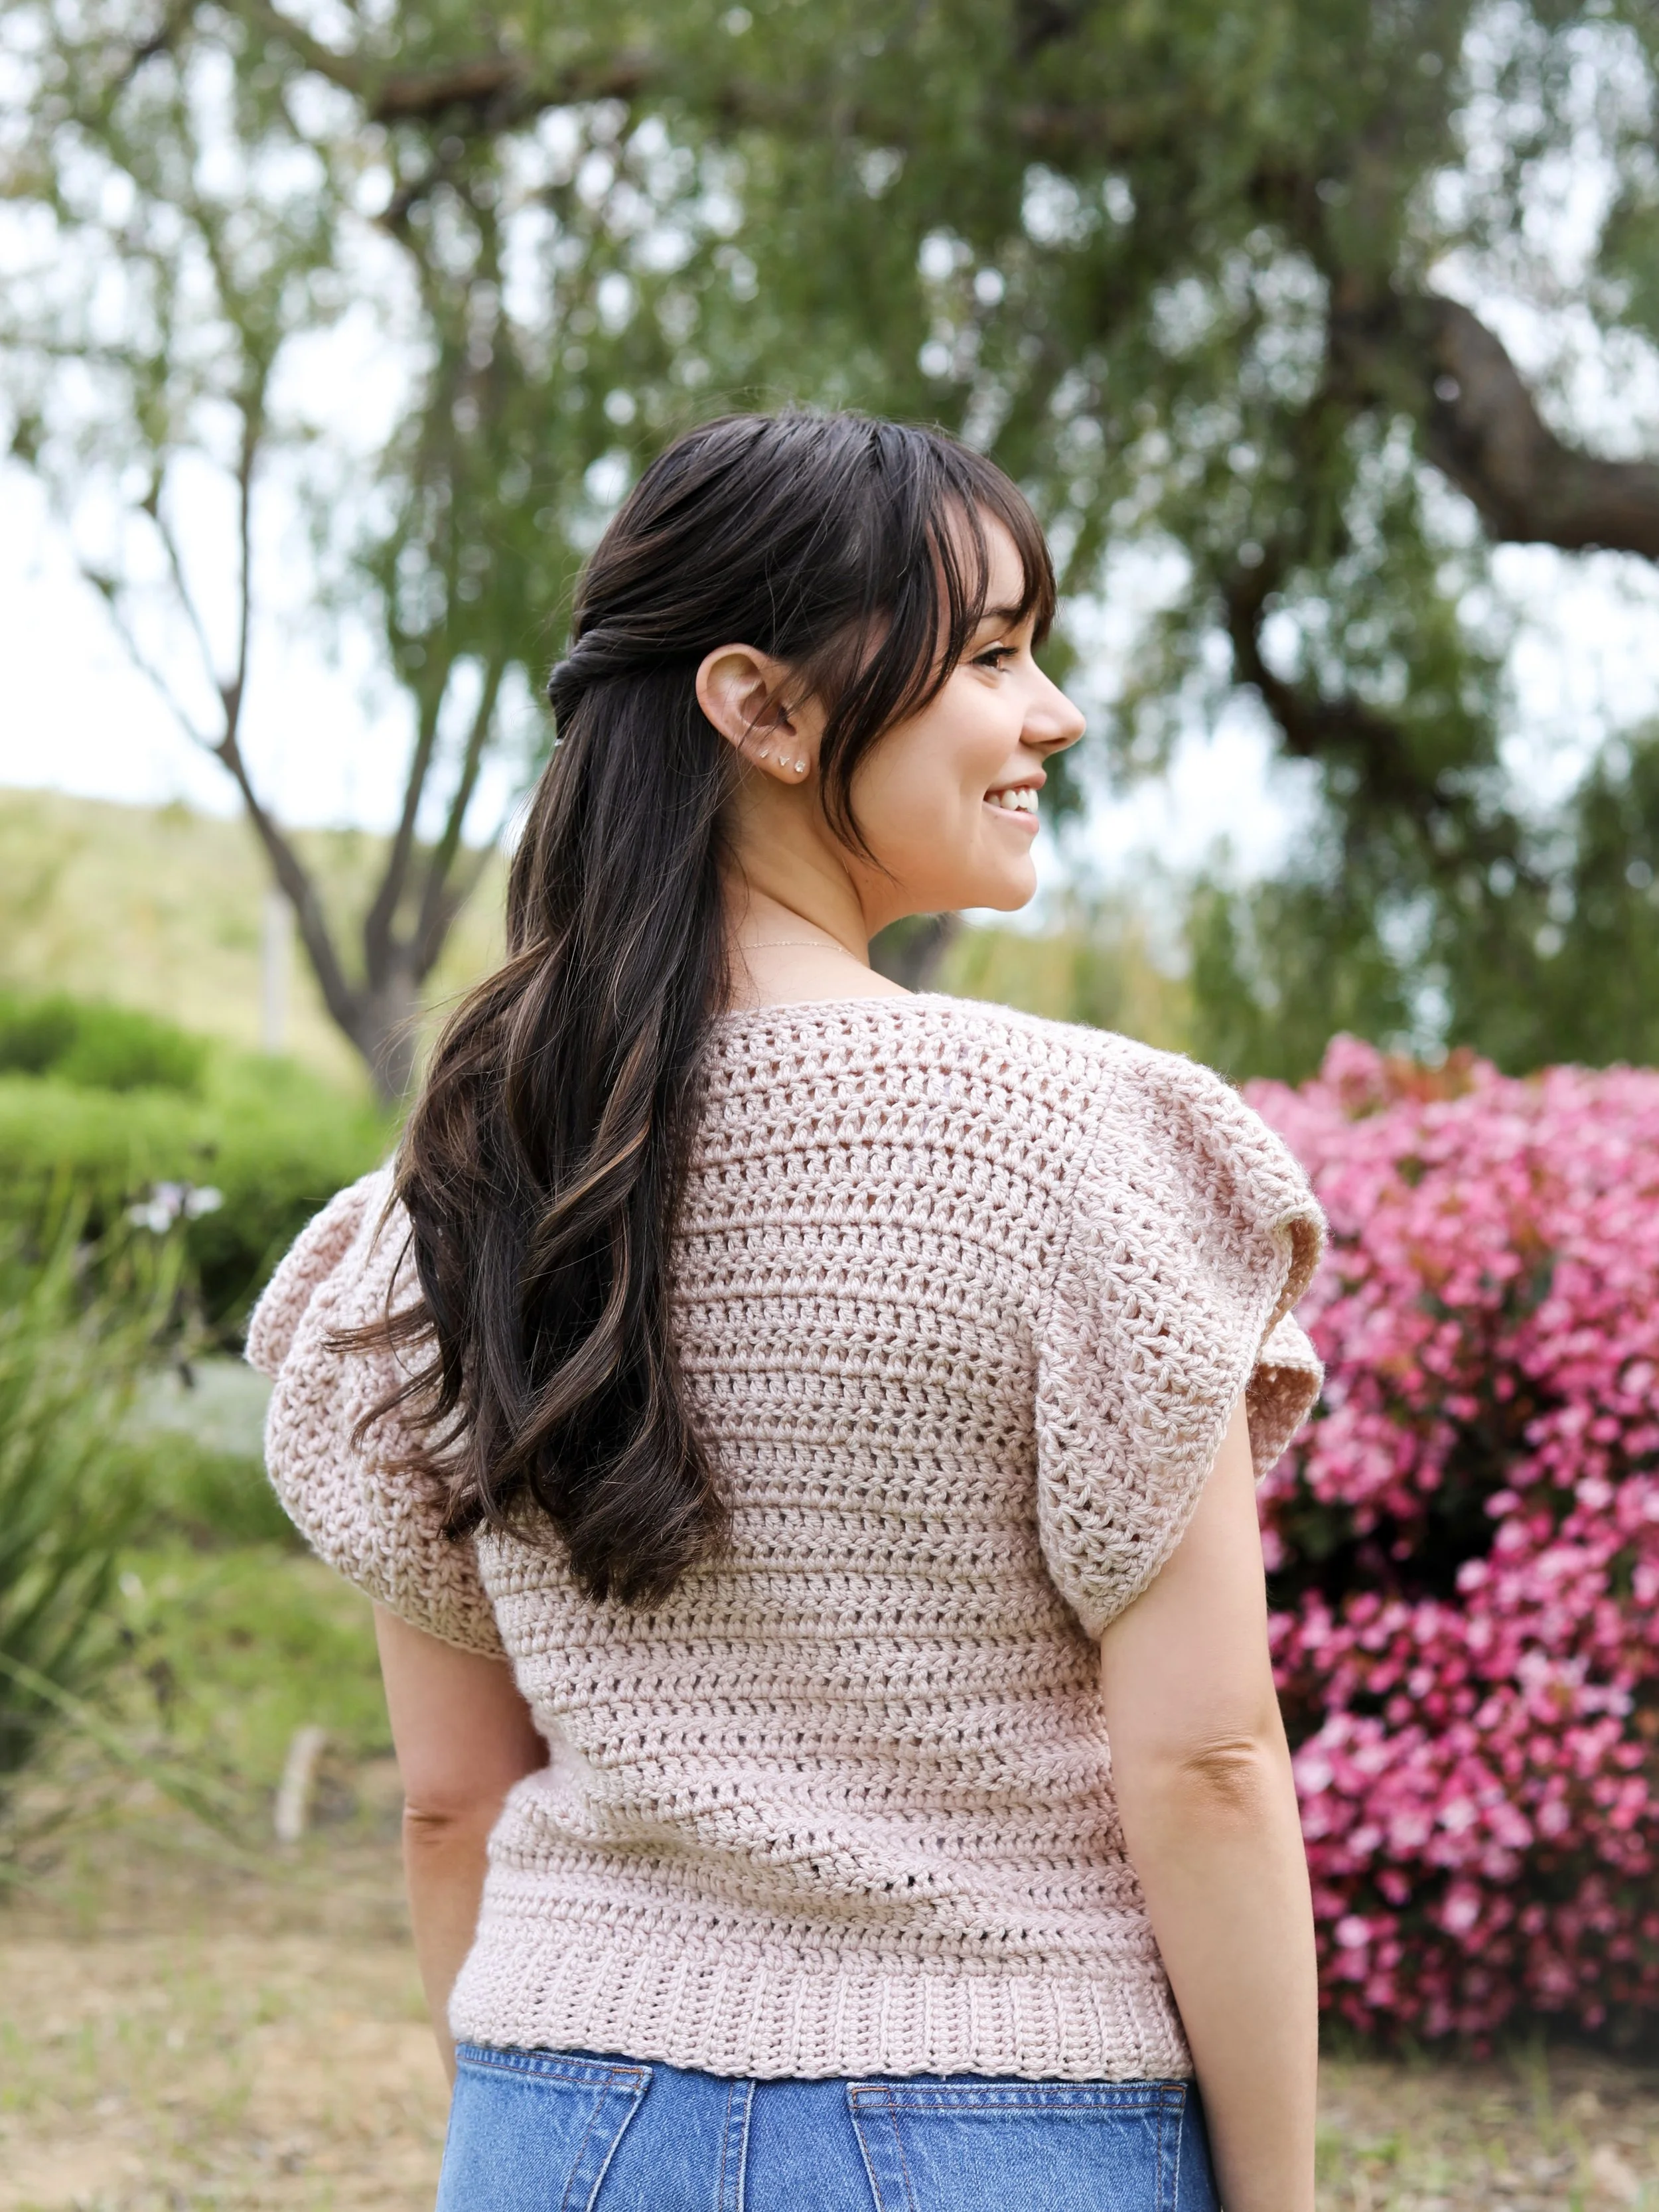
DC Flutter Tee
Available as a kit, PDF and FREE on the blog!
A bit of inspo behind the name:
If you love a dc, then this tee was made for you! This fun and flowy Flutter Tee has an open and airy texture and is perfect for Spring + Summer!
For this top, I knew I wanted to use the Basic Stitch I had in my stash, since this lovely pale pink and the idea of something fun and flowy for Spring felt like it lined up so well!!
I love a good flutter sleeve and the volume they give is always a fave, and a little throwback to an 80s vibe that is near and dear to my heart! If you love a dc then this was made for you and me! It has an open light texture throughout it and works up so quickly in this easy to care for worsted!
I’m so excited to announce this design is available as a kit with Lion Brand Yarn! I love when I can offer you a kit on a design because this kit comes with so many benefits. First, the pattern is included free, and secondly, you can change up the colorways to really customize yours or you can have the colors I used pre-selected so you can match me. :)
I also wanted to say thank you so much for any of my designs you may have or will purchase as a kit! Your support means so much to me and every kit you get makes me able to keep collabing with LB, which I hold so dear!

Get the kit!
Pick your own color inspo and receive the digital PDF free!
CONSTRUCTION: This one was such quick and cozy crochet pattern to make! It has a nice shaping for the neck adding to its comfort and has a combo of dcs through-out it. If you love a dc like me then this is for you!! The sleeves have such a smooth and slow flow to it too, nice and wavy adding to the fun of Spring! It’s also worked up in an easy to care for acrylic yarn from the Basic Stitch line with Lion Brand Yarn. A simple wash and dry, and your garment is refreshed.
SIZE CHANGES: This one has a nice fitted final shaping. If you’d like the body a bit looser, 2 extra inches, you can size up!
HOW TO GET THE PDF ONLY:
I hope you love this new design! I also have this available as a printable PDF to work on at your leisure! You can shop my Ravelry or Etsy, whichever storefront you prefer!

Get the printable version
Ravelry PDF

Get the Pattern
Shop ETSY

Happy knitting! It’s quick and easy to make and most importantly COZY!
PATTERN
METHOD
Crotchet
DIFFICULTY
Beginner
SIZES
XS (S, M, L, XL) , (2X, 3X, 4X, 5X)
DESCRIPTION
If you love a dc, then this tee was made for you! This fun and flowy Flutter Tee has an open and airy texture and is perfect for Spring + Summer!
YARN
Lion Brand Yarn, Basic Stitch #4, 3.5 oz, 185 yd
Blush Heather - Skeins: 4 (4, 5, 5, 6), (6, 7, 7, 8)
NEEDLES
Clover Amour I, 5.5 mm
NOTIONS
Yarn Needle, 2 Stitch Markers
GAUGE
Blocked
13 sts x 8 rows = 4” of dc
*Matching stitches per inch will get your width to match.
Thank you so much for your shop support! I hope you love it! Contact me for any help or questions you might have along the way.
**This Pattern is a copyright of Whistle and Wool© so you may not copy, alter, adjust, share, record, redistribute or resell my Pattern. No tutorials or any kind of demonstrations may be made using any information contained in my Pattern. I do not mind if you wish to sell a completed HANDMADE item and you are a small independently owned business, however, you do not have permission to use ANY of my photos. If you do sell a completed item, please list credit of the design belonging to me, Whistle and Wool and a link to my shop. www.WhistleandWool.etsy.com
NOTES:
Beginning chain doesn’t count as a stitch.
This works up quickly with dc and uses basic stitches.
GAUGE:
**Please check your gauge before you start this Pattern to match the finished measurements:
It’s best to make your swatch slightly bigger than what the pattern states it should measure, so you can measure it in the center of your square, getting an accurate reading. You can do this by adding 2 additional stitches and working 2 additional rows. Do not count the first and last stitch in your measurement or the first and last row.
Hook Size Suggestions:
If your swatch has less stitches, swatch again using a smaller hook.
If your swatch has more stitches, swatch again using a larger hook.
Finished measurements (in inches) will stretch when worn
Chest (Based on Measurements)
28-30 (32-34, 36-38, 40-42, 44-46), (48-50, 52-54, 56-58, 60-62)”
Chest (Finished Chest Measurements)
30 (34, 38, 42, 46), (50, 54, 58, 62)”
Flutter Width
3.75”
Bottom Hem To Underarm
12”
Stitches to Know
ch Chain
dc Double Crochet
2dc2 Double Crochets in the same space(increase)
dec Decrease
Sk Skip
M Marker
RS Right Side
sc Single Crochet
scblo Single Crochet in the back loop only
sk Skip the stitches indicated
Sl St Slip Stitch
WS Wrong Side
PATTERN
Ch 10(all sizes)
Ribbing:
Row 1: Starting in the second Ch from the hook, sc9 - (9 sts)
Row 2: Ch1, turn, sc1 in the first st, scblo7, sc1 in the final st - (9 sts)
Row 3-98(110, 124, 136, 150, 162, 176, 188, 202): Repeat Row 2
Place a M in the last stitch worked. Cut yarn leaving a 10” tail to sew the ribbing into a circle.
RS facing you, bring the short ends together, whip stitch them together (make sure your ribbing isn’t twisted). Turn it back right side out. Ribbing Height is 2”. Continue to the body.
Body
Next: We will work along the row endings of the Ribbing to begin the Tee body.
Attach your yarn with a ch2 at the M place holder.
Round 1: (RS) Dc 98 (110, 124, 136, 150), (162, 176, 188, 202) sts along the ribbing (1 st per row ending), Sl St into the top of your starting ch to join in the round.
Round 2-20: Ch2, turn, dc for the round, Sl St to join in the round
Last round worked was a WS round.
Should measure 12”.
Model is 5’ 1”, add/remove length as desired until preferred length to the underarm.
Back Panel
We will work half the sts for the back panel. From your turning chain, count 49 (55, 62, 68, 75), (81, 88, 94, 101) sts, place a M in the last st.
Row 1: (RS) Ch1, turn, Sl St in the next 3 sts to skip them (this carries your yarn over), ch2, beginning in the next st, work in established pattern to last 3 sts, sk3 sts - 43 (49, 56, 62, 69), (75, 82, 88, 95) sts
Note: Skipping the first and last 3 sts creates underarm shaping.
Row 2: Ch2, turn, dc for the row - 43 (49, 56, 62, 69), (75, 82, 88, 95) sts
Row 3-11 (13, 13, 15, 15), (17, 17, 19, 19): Ch2, turn, dc for the row
The Underarm to Shoulder length measures approx. 5.5 (6.5, 6.5, 7.5, 7.5), (8.5, 8.5, 9.5, 9.5)”
Cut yarn leaving a long tail for shoulder seaming later.
Front Panel
Working on the remaining half of the stitches:
Row 1: RS facing you (no turn needed), attach your yarn with a ch2 on the 4th stitch in, skipping the first 3 sts, dc to last 3 sts, sk the last 3 sts - 43 (49, 56, 62, 69), (75, 82, 88, 95) sts
Row 2: (WS) Ch2, turn, dc for the row - 43 (49, 56, 62, 69), (75, 82, 88, 95) sts
Row 3-7 (9, 9, 11, 11), (13, 13, 15, 15): Continue your back panel until you reach 4 rows from the total length of your back panel
Continue to the Neck Shaping.
Neck Shaping/Shoulders
Neck opening: Before turning for your next row, we’re going to use Markers to find the center 19 (19, 20, 22, 23), (23, 24, 24, 25) sts on the front panel. (diagram on PDF)
RS facing you, from the beginning of your current row (right side edge), count 12 (15, 18, 20, 23), (26, 29, 32, 35) sts in. Place a M in the next st.
Count 18 (18, 19, 21, 22), (22, 23, 23, 24) sts, place your next M in the 19 (19, 20, 22, 23), (23, 24, 24, 25)th st
Continue to the Right Shoulder.
Right Shoulder
Row 1: WS) Ch2, turn, dc till the M - 12 (15, 18, 20, 23), (26, 29, 32, 35) sts (see diagram, on PDF)
Row 2: (RS) Ch1, turn, sk1, dc for the row - 11 (14, 17, 19, 22), (25, 28, 31, 34) sts
Row 3: Ch2, turn, dc for the row
Row 4: Ch1, turn, sk1, dc for the row - 10 (13, 16, 18, 21), (24, 27, 30, 33) sts
Cut yarn leaving a long tail to use for Shoulder Seaming.
Left Shoulder
Row 1: (WS) Attach yarn with a ch2 in the stitch after the M, dc for the row - 12 (15, 18, 20, 23), (26, 29, 32, 35) sts (see diagram, on PDF)
Row 2: (RS) Ch2, turn, dc till the last 2 sts, sk1, dc1 - 11 (14, 17, 19, 22), (25, 28, 32, 34) sts
Row 3: Ch1, turn, dc for the row
Row 4: Ch2, turn, dc till the last 2 sts, sk1, dc1 in the last stitch - 10 (13, 16, 18, 21), (24, 27, 31, 33) sts
Cut yarn leaving a long tail to use for Shoulder Seaming.
Shoulder Seaming
With the garment inside out, Whip Stitch the front Shoulder Panels to the Back Panel.
Neckline
Beginning in the center back of the neck, attach yarn with a ch1.
Round 1: Sc around the neckline [sc1 per st on back halves and front of the neck, sc2 per row ending on dec sections and one extra in the corner (9 sts each side)], Sl St to join in the round - 60 (60, 62, 66, 68), (68, 70, 70, 72) sts
Round 2: Ch1, sc for the row, Sl St to join in the round.
Cut yarn and weave in ends.
Flutter Sleeve (updated 5/18/23)
All Sizes
Round 1: Lay the Tee flat in front of you. RS, Attach yarn with a ch2 in the center of the underarm, sc1 per underarm st and sc2 per row endings along the sleeve opening, Sl St to join in the round - 50 (58, 58, 66, 66), (74, 74, 82, 82) sts
Round 2: (RS) Ch2, (dc1, 2dc in the next st) for the round, ends in 1dc to keep the count even (adjust as needed for an even count), Sl St to join in the round - 74 (86, 86, 98, 98), (110, 110, 122, 122) sts
Round 3-8: Ch2, *sk1, 2dc in the same st between posts, repeat after * for the round, Sl St to join in the round - 74 (86, 86, 98, 98), (110, 110, 122, 122) sts
For Rounds 4-8, your 2dc will fall between the 2dcs in the previous round forming a V Stitch.
Round 9: Ch1, sc for the round, Sl St to join in the round
Cut yarn and weave in all ends.
Repeat for the other sleeve.